- Does the app background flicker slightly in some of your Windows programs?
- There’s a quick fix you can apply and solve this problem caused by the variable refresh rate technology meant for games.
- Learn how to tweak app settings in the Nvidia Control panel and how to disable VRR completely.

For some reason, I can’t seem to get rid of monitor problems. After fixing my main monitor turning itself off, then on, randomly, I now experience a slight background flicker in some Windows programs (and the “new” NVIDIA NV-Failsafe driver issue). Not all of them, just some.
This is why it’s harder to diagnose, but also easier, in the sense that I can now rule out the monitor as being the problem. If the monitor, GPU, or display cable was the problem I suspect the entire screen would flicker, not just a specific app window.
I’m not giving up that easily, so here’s how to deal with background flicker in (just) some Windows apps.
CONTENTS
How Does the Problem Manifest?
First, I think it’s important to detail how the problem manifests. It’s not a neon flicker, an obvious change in screen brightness, but a very slight background intensity change. I’ve managed to do a video of this issue in Photoshop, embedded below:
What apps are affected? For now, I could only reproduce this problem in Adobe Photoshop, DaVinci Resolve, and Adobe Illustrator.
This is what led me to believe it’s a problem caused by variable refresh rate (VRR), a technology developed for 3D games. What VRR does is it basically syncs monitor refresh rate to game frame rate, so that screen tearing and stuttering are eliminated.
In my case, the VRR technology is G-Sync compatible. Basically, I use an LG monitor that supports Adaptive Sync (basically AMD Freesync) and an NVIDIA GPU. G-Sync compatible means that on paper my monitor should work, but it was not tested by NVIDIA.
Therefore I can’t complain, since in games I have no issues. But in 3D apps that use hardware acceleration, it’s a problem that has quite a few fixes, which I’ll detail below.
Turn Off G-Sync for the Apps that Flicker
This is the method I recommend before everything else. Try and make a change only for the affected programs, check to see if the problem is fixed, then do the same for all other programs that flicker.
1. Right-click on an empty area on your desktop and from the contextual menu select NVIDIA Control Panel. If you’re on Windows 11, select first the Show advanced options or press Shift + F10 to display the old contextual menu.
2. With the NVIDIA Control panel open navigate to Manage 3D settings in the left-side menu.
3. Select the Program Settings tab and…
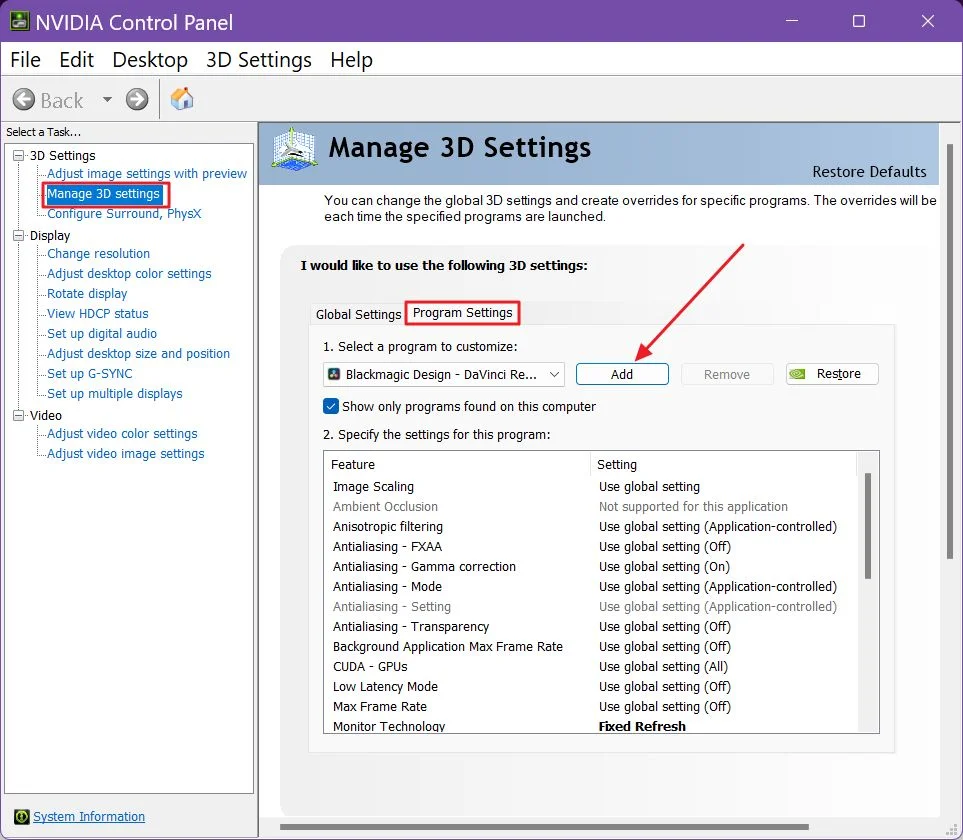
4. … either select the program you want to customize from the drop down list or click on the Add button. This will display a list of the last programs you’ve run.
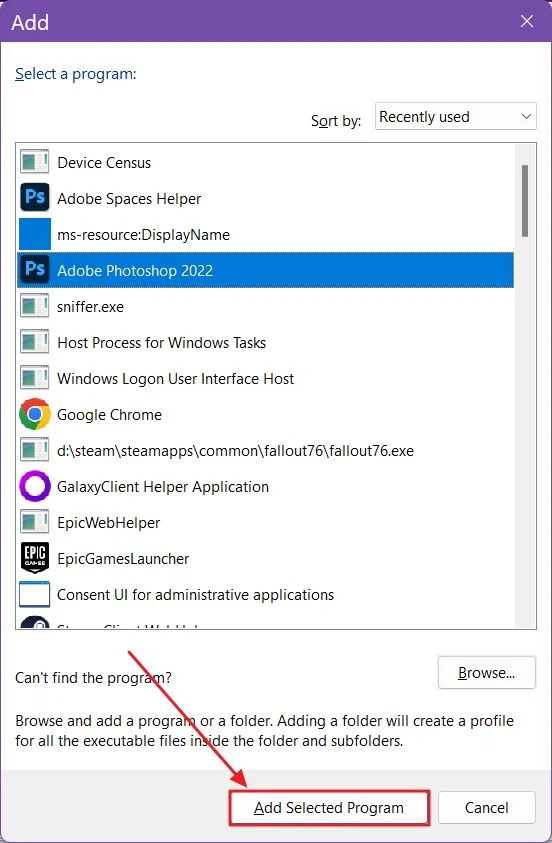
5. Select the program and then confirm by clicking on the Add Selected Program button.
6. Now scroll the option list below until you get to Monitor Technology and make sure the Fixed Refresh option is selected.
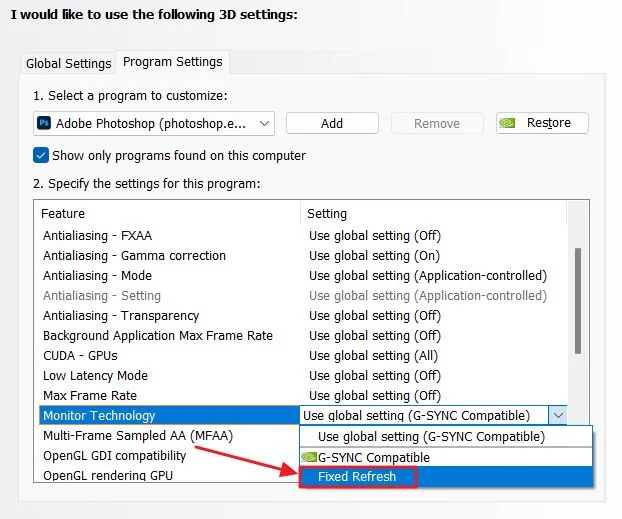
Wait a few moments for the Apply button show show up at the bottom of the NVIDIA Control Panel. Click on it to apply the setting change.
If this option doesn’t work for you, here are three other methods you can try. Mind you that these will disable variable refresh rate completely for all apps and games.
Disable G-Sync Completely in Nvidia Control Panel
If you want to turn of NVIDIA G-Sync system wide here’s what you need to do.
1. Open the NVIDIA Control Panel again.
2. Navigate to the Set up G-SYNC option in the left-side menu.
3. If you have multiple monitors select each of them and repeat the next step.
4. In the right-side panel uncheck the Enable G-SYNC, G-SYNC Compatible option.
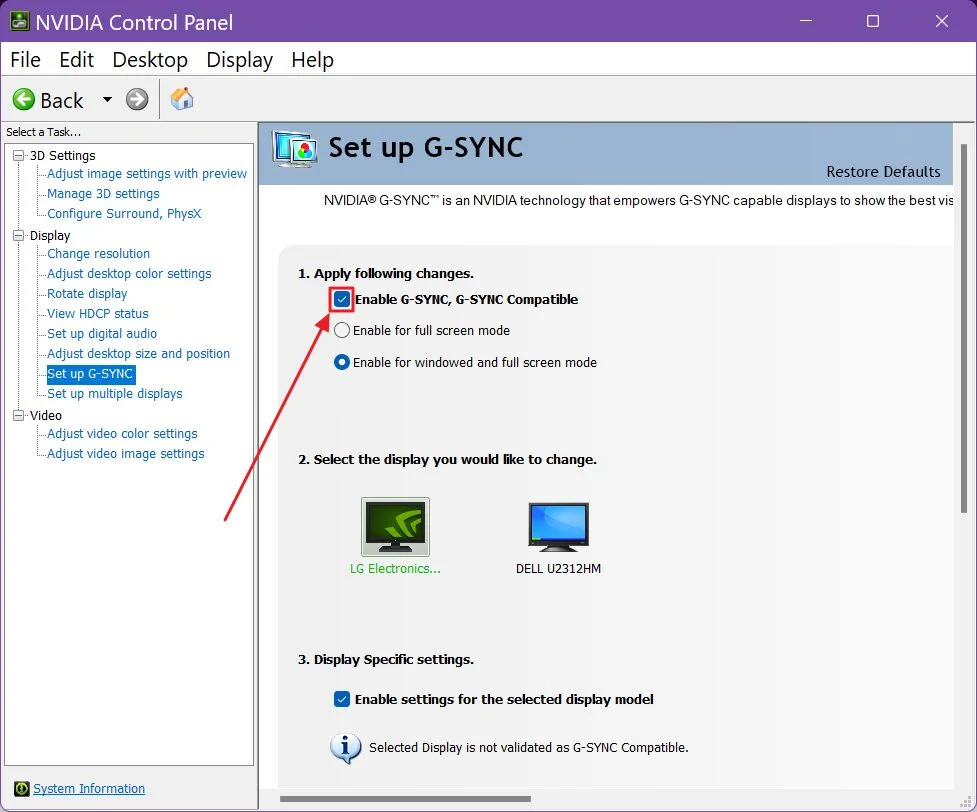
Click Apply to confirm. It’s also a good idea to restart your PC at this point.
Disable G-Sync from the Monitor OSD
Most monitors that support VRR also have a toggle switch in the OSD (On-Screen Display) menu, where you can control various display properties. You will have to check your specific display manual to find the option and turn it off.
Windows should detect the change automatically, but do restart your PC just to be on the safe side. It only takes a minute.
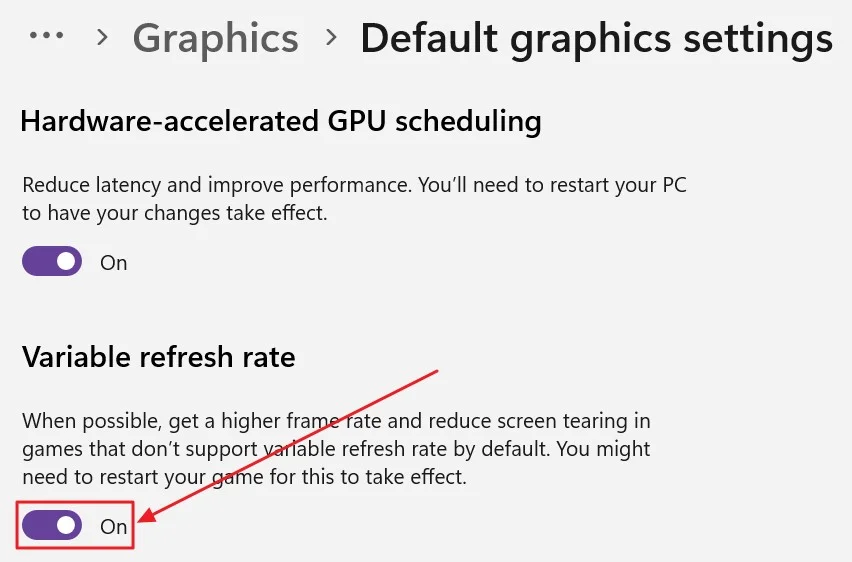
Turn Off Variable Refresh Rate in Windows Settings
The last solution is to access the Default graphics settings in the Windows Settings app. Here’s how you do that:
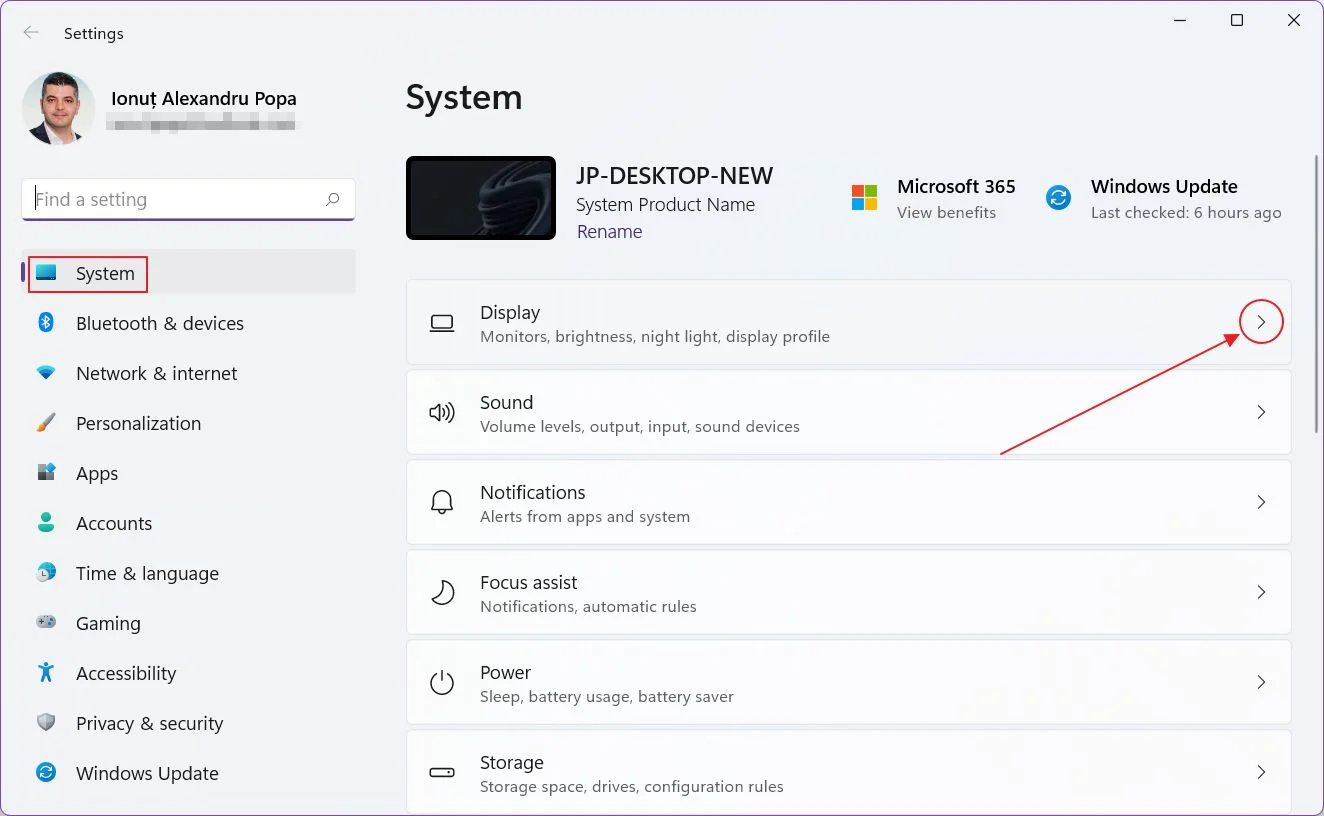
1. Open the Settings app by pressing the Win + I keyboard shortcut.
2. The System section will open by default. Click on the Display link.
2. Scroll to the bottom of the Display section and click on Graphics.
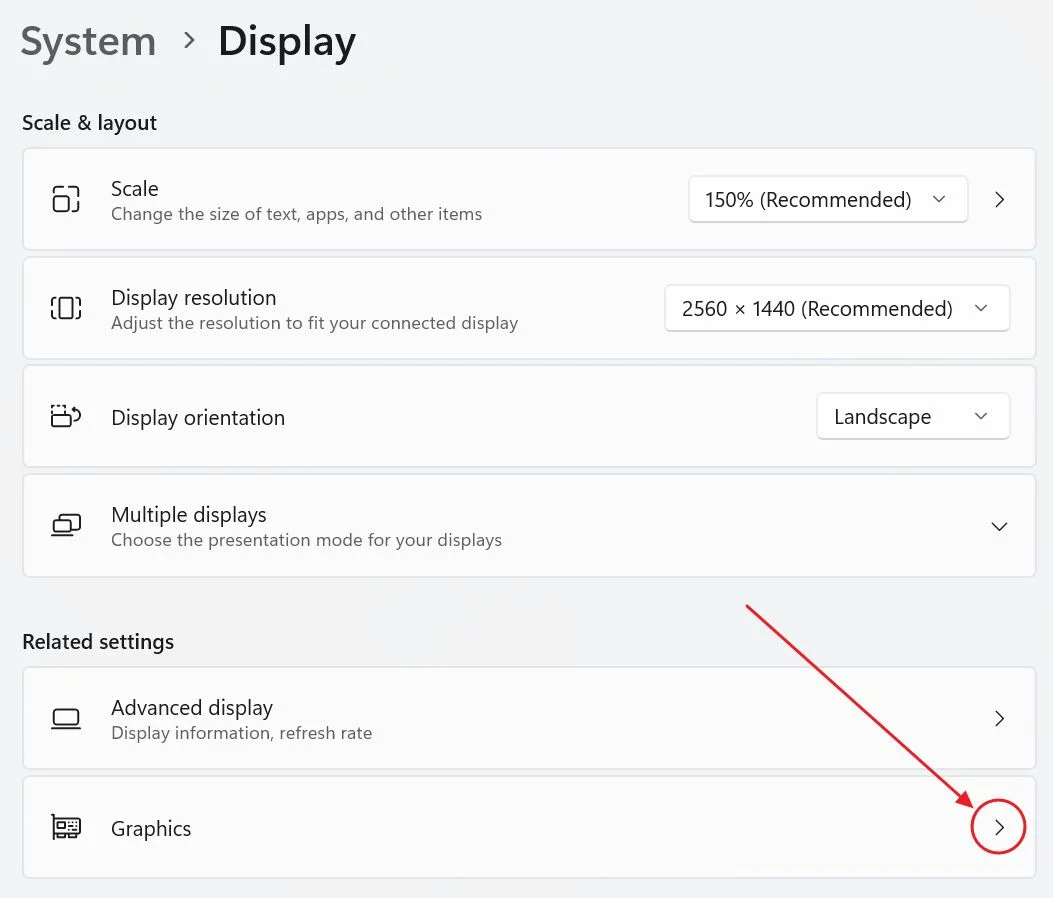
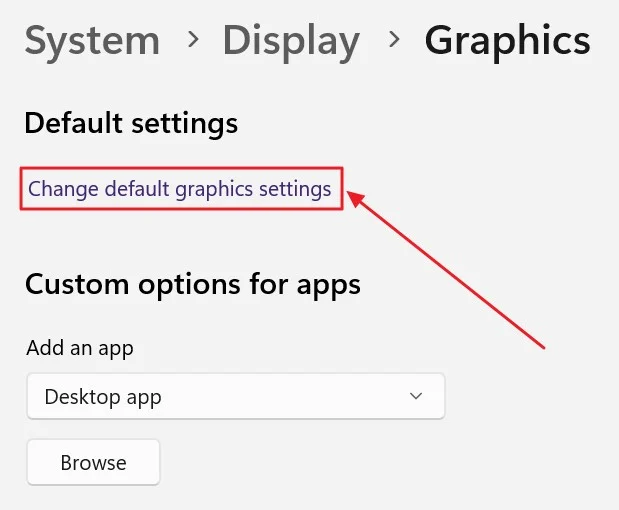
3. Right on top you’ll see a link called Change default graphics settings. Click on it to open the section we need for this guide.
4. Toggle off the Variable refresh rate option. If you’re already running a 3D game on an app that uses the dedicated GPU, they need to be restarted for the change to take effect.
Is the solution working? Yes. Here’s the same Photoshop background after disabling G-Sync and enabling the fixed refresh rate option for the app executable (1st method).
This is a quick fix and I’m happy it’s working so I don’t have to disable VRR completely on my monitor. It would be a shame to lose the motion clarity at low framerates in games.