- A disk image is essentially a backup or a mirror image of the contents of a computer disk.
- Disk images can be used for backup purposes, and for installing the operating system or other programs, just to name two of the most common uses.
- Learn about the most common types of disk images, how to create them, and how to mount or open a disk image to browse the contents.
As someone who works with multiple computers and virtual machines on a daily basis, I know how important it is to have a backup of important files and data (hence the dedicated backup and restore section).
One quick way to do this is by creating a disk image. A disk image is essentially a copy of all the data on a disk, including the operating system, applications, and personal files. It’s like taking a snapshot of your computer at a specific point in time.
You can take as many snapshots of the same computer as you wish, as long as you have enough space to store the disk images.
Creating a disk image is a simple process that can be done using built-in tools on your computer or third-party software. On Windows, you can use the built-in tool called “System Image Backup” to create a disk image.
On a Mac, you can use the built-in tool called “Disk Utility.” Third-party software like Acronis True Image and Carbon Copy Cloner are also popular options.
I use Backupper to back up my main system partition, and I still don’t have a reason to find another backup program.
CONTENTS
What is a Disk Image?
Simply said, a disk image is a file that stores the complete content and structure of a storage device, such as a hard disk, USB flash drive, or optical disk.
Creating a disk image is like taking a snapshot of the entire disk, bit by bit, 100% identical to the source, including the operating system, applications, settings, and data, and saving it as a single file that can be used to restore the disk to its original state.
You will often come across the term “disk image” when reading about data backup, system recovery, or software installation. These are the most common use cases for disk images.
The Technical Definition
A disk image is an exact digital copy of a storage device that captures all the data, files, and settings on the disk, as well as the partition table, boot sector, and file system structure.
Copying the contents of a disk it’s not the same as creating a disk image, as some of the data, partitions, boot sector, and less known types of data can’t be accessed with something like File Explorer.
A disk image is created by using disk imaging software that reads the source disk sector by sector and writes the data to a destination file, which can be stored on another disk, network drive, or cloud storage. Disk images can be compressed, encrypted, or split into multiple files to save space or enhance security.
Common Types of Disk Images
There are several common types of disk images, each with its own format and purpose:
- ISO: This is by far the most common disk image format for optical discs that use the ISO 9660 file system, such as CDs and DVDs. It contains a sector-by-sector copy of the disc’s data and can be used to burn a new disc, create a bootable USB drive or mount the image as a virtual drive to browse its contents.
- IMG: This format produces sector-for-sector copies of audio, video, and data tracks of CD-ROMs, DVDs, and magnetic volumes. It is often used for gaming, multimedia, or archival purposes.
- DMG: This format is specific to Apple’s macOS and iOS operating systems and mirrors a storage device’s entire structure, including the file system, metadata, and permissions. It can be used for software distribution, system installation, as well as backup and recovery.
- VHD (Virtual Hard Disk): This format is used by Microsoft’s Windows operating system and represents a virtual hard disk that can be mounted as a drive or used by a virtual machine. It can contain a complete operating system or data files and can be used for testing, development, or migration.
Some Uses of Disk Images
Disk images have many practical uses for individuals, businesses, and organizations. By the way, you don’t have to be a tech expert in order to use disk images.
- Backup and Recovery: disk images can be used to create a full backup of a disk, which can be restored in case of data loss, disk failure, or system corruption.
- Data migration: disk images can also be used to clone a disk to another disk with the same or different size and file system format.
- Software Installation: disk images can be used to distribute software packages, such as operating systems, applications, or games, in a convenient and secure way. Images can be burned to a disc, copied to a USB drive, or downloaded from a website (this is exactly how Microsoft distributes Windows, with ISO images you can download for yourself).
- System Deployment: disk images can be used to deploy a standardized system configuration to multiple computers, servers, or virtual machines, saving time and effort. They can be customized with specific drivers, settings, and applications and deployed via network or locally.
- Forensic Analysis: disk images can be used by law enforcement agencies or digital forensics experts to investigate crimes, recover deleted files, or analyze system activity. They can be analyzed with specialized software that can reveal hidden data, malware, or encryption keys without putting the investigator’s computer at risk.
How to Create a Disk Image
Sorry, but this part is not a step-by-step guide because there are so many types of disk images that it’s impossible to cover all scenarios.
That doesn’t mean I can’t outline the basic steps needed to create a disk image. For a detailed example, I recommend you read our guide about creating a Windows system image backup.
- Choosing the imaging software – there are tons of tools available to create a disk image. I prefer to use AOMEI Backupper, but there are other options such as EaseUS Todo Backup, and the built-in Windows Backup and Restore tool.
- Selecting the Source Drive – the source drive is, of course, the drive that you want to create a disk image of. This can be a hard drive, a solid-state drive, an optical disk, or a partition on a drive.
- Choosing the Destination Drive – the destination drive is where you want to save the disk image. This can be an external hard drive, a network drive, or a cloud storage service. If you’re imaging a partition it’s possible to save the disk image backup to the same physical hard drive, but that’s not ideal in a recovery scenario. Usually, you would want to at least copy the disk image to another computer altogether.
Depending on the size of the disk you’re imaging the process of creating a disk image can take from a few minutes to a few hours. The source/destination speed is also important.
What is Mounting?
Mounting an image means creating a virtual disk that shows up in your operating system like a normal drive. You can access the disk and see its contents, files, and folders, not the bootable sector or hidden partitions.
Mounting a disk image is the correct term, but if you want you can say you’re opening a disk image.
How to Mount an ISO disk image in Windows
As with creating disk images, opening them depends on the operating system you’re using and the format of the disk image file. For exemplification I’m going to show you how to mount a disk image in Windows, covering the most popular ISO format, which is supported by Microsoft without the need of third-party tools.
Here are the steps to follow:
1. Open File Explorer (use the Win + E keyboard shortcut) and locate the ISO image.
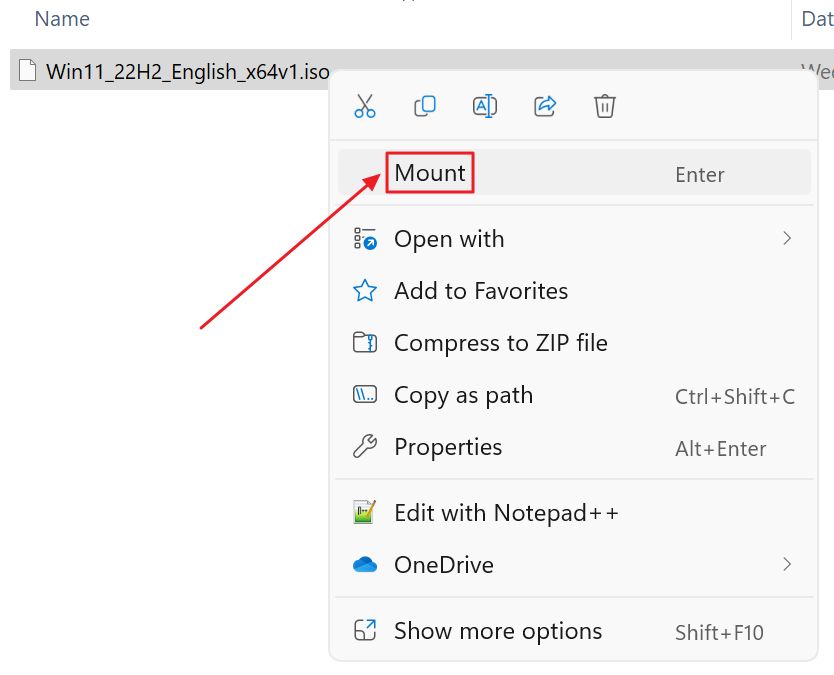
2. Right-click the disk image file and from the contextual menu choose Mount. You can also double-click the image if you didn’t choose another default Windows app to open the ISO files.
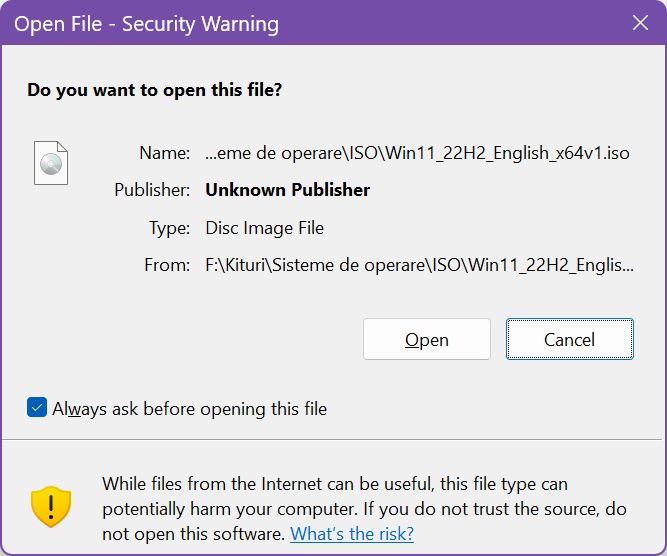
3. Wait a few moments and a security warning will ask if you’re sure you want to open the image. Select Open to continue.
4. You’ll notice two new drives appearing in File Explorer’s left-side tree menu. Both contain the same image. Why two virtual drives? You’ll have to ask Microsoft why it keeps this confusing process dating back to the first time Windows was able to read ISO images.
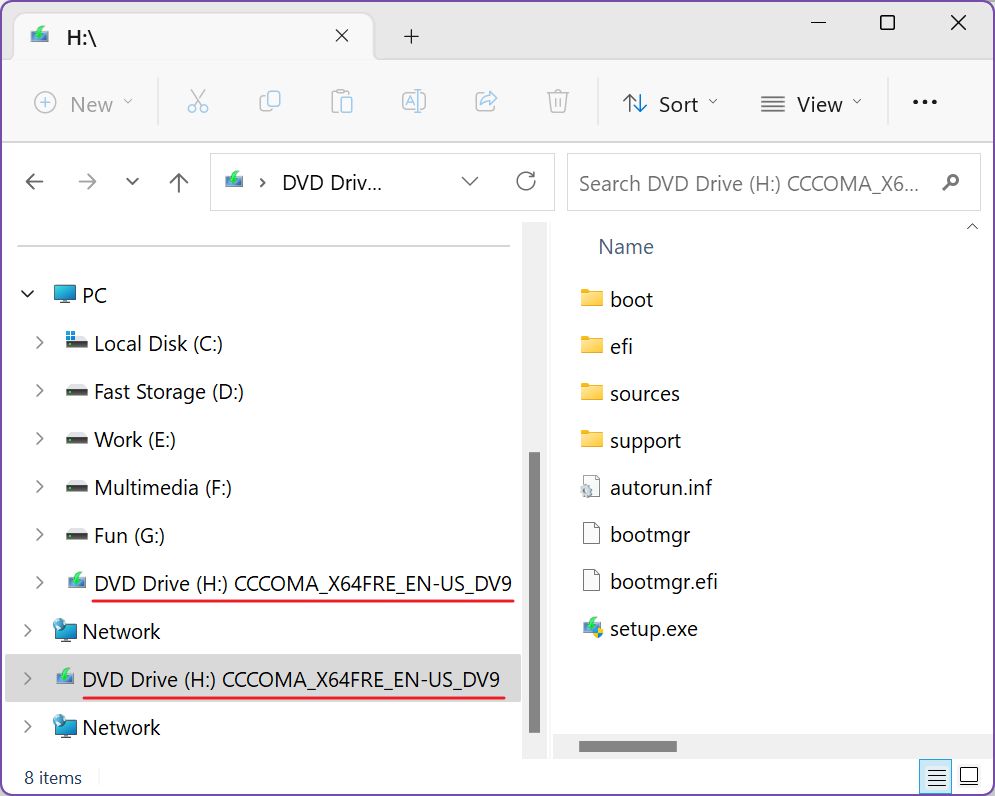
5. Clicking any of the two virtual drives will reveal in the right-side panel the contents of the ISO image that can be read by Windows. You can copy files from the disk image, but you can’t copy files into the disk image. Not without using a third-party tool.
You can also launch executable files if you need to install something from the disk image.
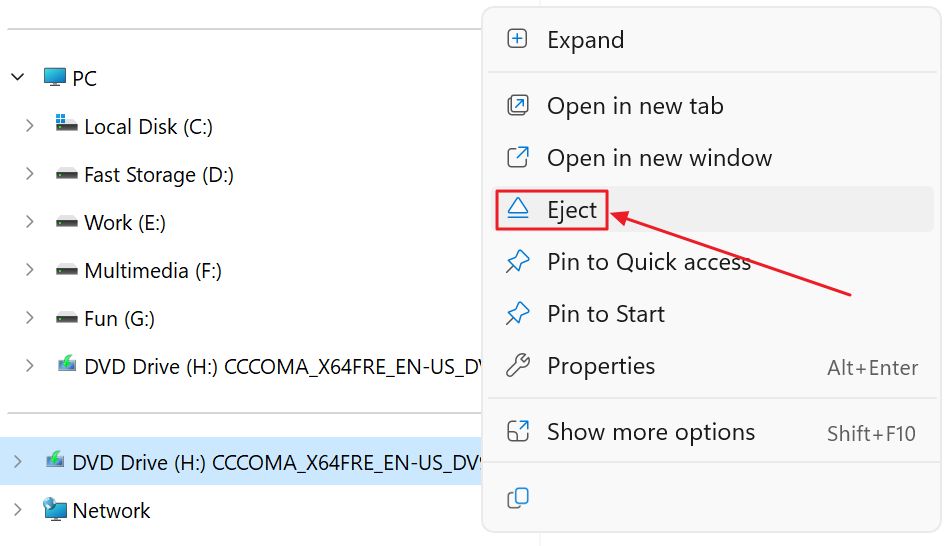
6. If at any time you want to unmount the disk image all you have to do is right-click on any of the two virtual disks and select Eject.
That’s it: you now know the basic terminology of a disk image, what it does, and how to create and mount one. Let me know if you have other questions about disk images and I’ll try to answer them all.
