- Here’s how you can use the included EZ Flash 3 Utility to do an ASUS motherboard BIOS update safely.
- Updating your motherboard’s BIOS to the latest firmware version is very easy.
- Even if a motherboard BIOS update falls into the “if it isn’t broken don’t fix it’ category, sometimes you have to perform an update to support new hardware components or features.
Most modern gadgets offer the option to update their firmware. What’s firmware, you ask? Well, it’s the interface between hardware components and the software, some sort of a translator, if you wish.
When it comes to motherboards we’re talking about really complex firmware packages. They’re technically called BIOS or UEFI (learn the difference from this article), but the role is the same. Also, most people say BIOS, even if they’re talking about UEFI.
Do You Need to Update the BIOS of Your Motherboard?
In the past, it was not really something you needed to do. The BIOS is usually a very reliable piece of software, with few bugs, if any. Now, since companies started treating us as guinea pigs testers, updating the BIOS is a lot more important.
It’s not just because of the bugs or various security issues that are patched by each new version, but also because BIOS updates can add support for new CPUs for example, faster RAM modules, or can add new features, like Resizable BAR support, just to give you an example.
Today it’s important not to leave your motherboard on the BIOS version it shipped with. It’s most likely a rushed version with tons of issues.
Is it Safe to Update the BIOS?
Updating the BIOS means rewriting completely the translator, which is stored on a special chip on your motherboard, not on your hard drives. While the new code is written on your motherboard it’s crucial to ensure you:
- Don’t flash the wrong version of the BIOS.
- Have checked that the firmware file is not corrupted.
- Your PC is powered on throughout the entire update process.
If any of the three issues above happen then you may brick your motherboard. It could fail to boot and the BIOS chip will need to be replaced or rewritten with the correct version by a technician who has the proper tools.
Now, it sounds scary, I get it, but most motherboards have fail-safes to prevent the first two issues. They check the firmware file for the correct BIOS version and motherboard model, then also check the file contents before actually writing the new code.
For the third issue, a sudden power failure, some motherboards have other safeguards in place: either there’s a second BIOS chip on your motherboard (Gigabyte invented this) or there’s a special USB port on the back I/O panel, where you can plug a USB flash drive which contains the firmware file in the root folder, renamed according to the manufacturer’s instructions.
I’ve performed hundreds of BIOS updates and never bricked one board. It’s not impossible, mind you, but it’s not likely to happen unless you’re really unlucky.
How to Update ASUS Motherboard BIOS with ASUS EZ Update Utility – Step-by-Step Guide
Why an ASUS motherboard and not any motherboard? Because I don’t have another motherboard brand to show you.
If you have another motherboard brand the BIOS interface will surely look different, but the general layout is pretty similar, so you could replicate this guide on another motherboard brand if you really put your mind to it and want to do a BIOS upgrade.
1. Go to your motherboard manufacturer’s website.
2. Search for your motherboard model.
3. Look for the support page link.
4. Once you find the support page look for the BIOS, UEFI, or firmware section. The wording can vary. In ASUS’ case, it’s called BIOS & FIRMWARE.
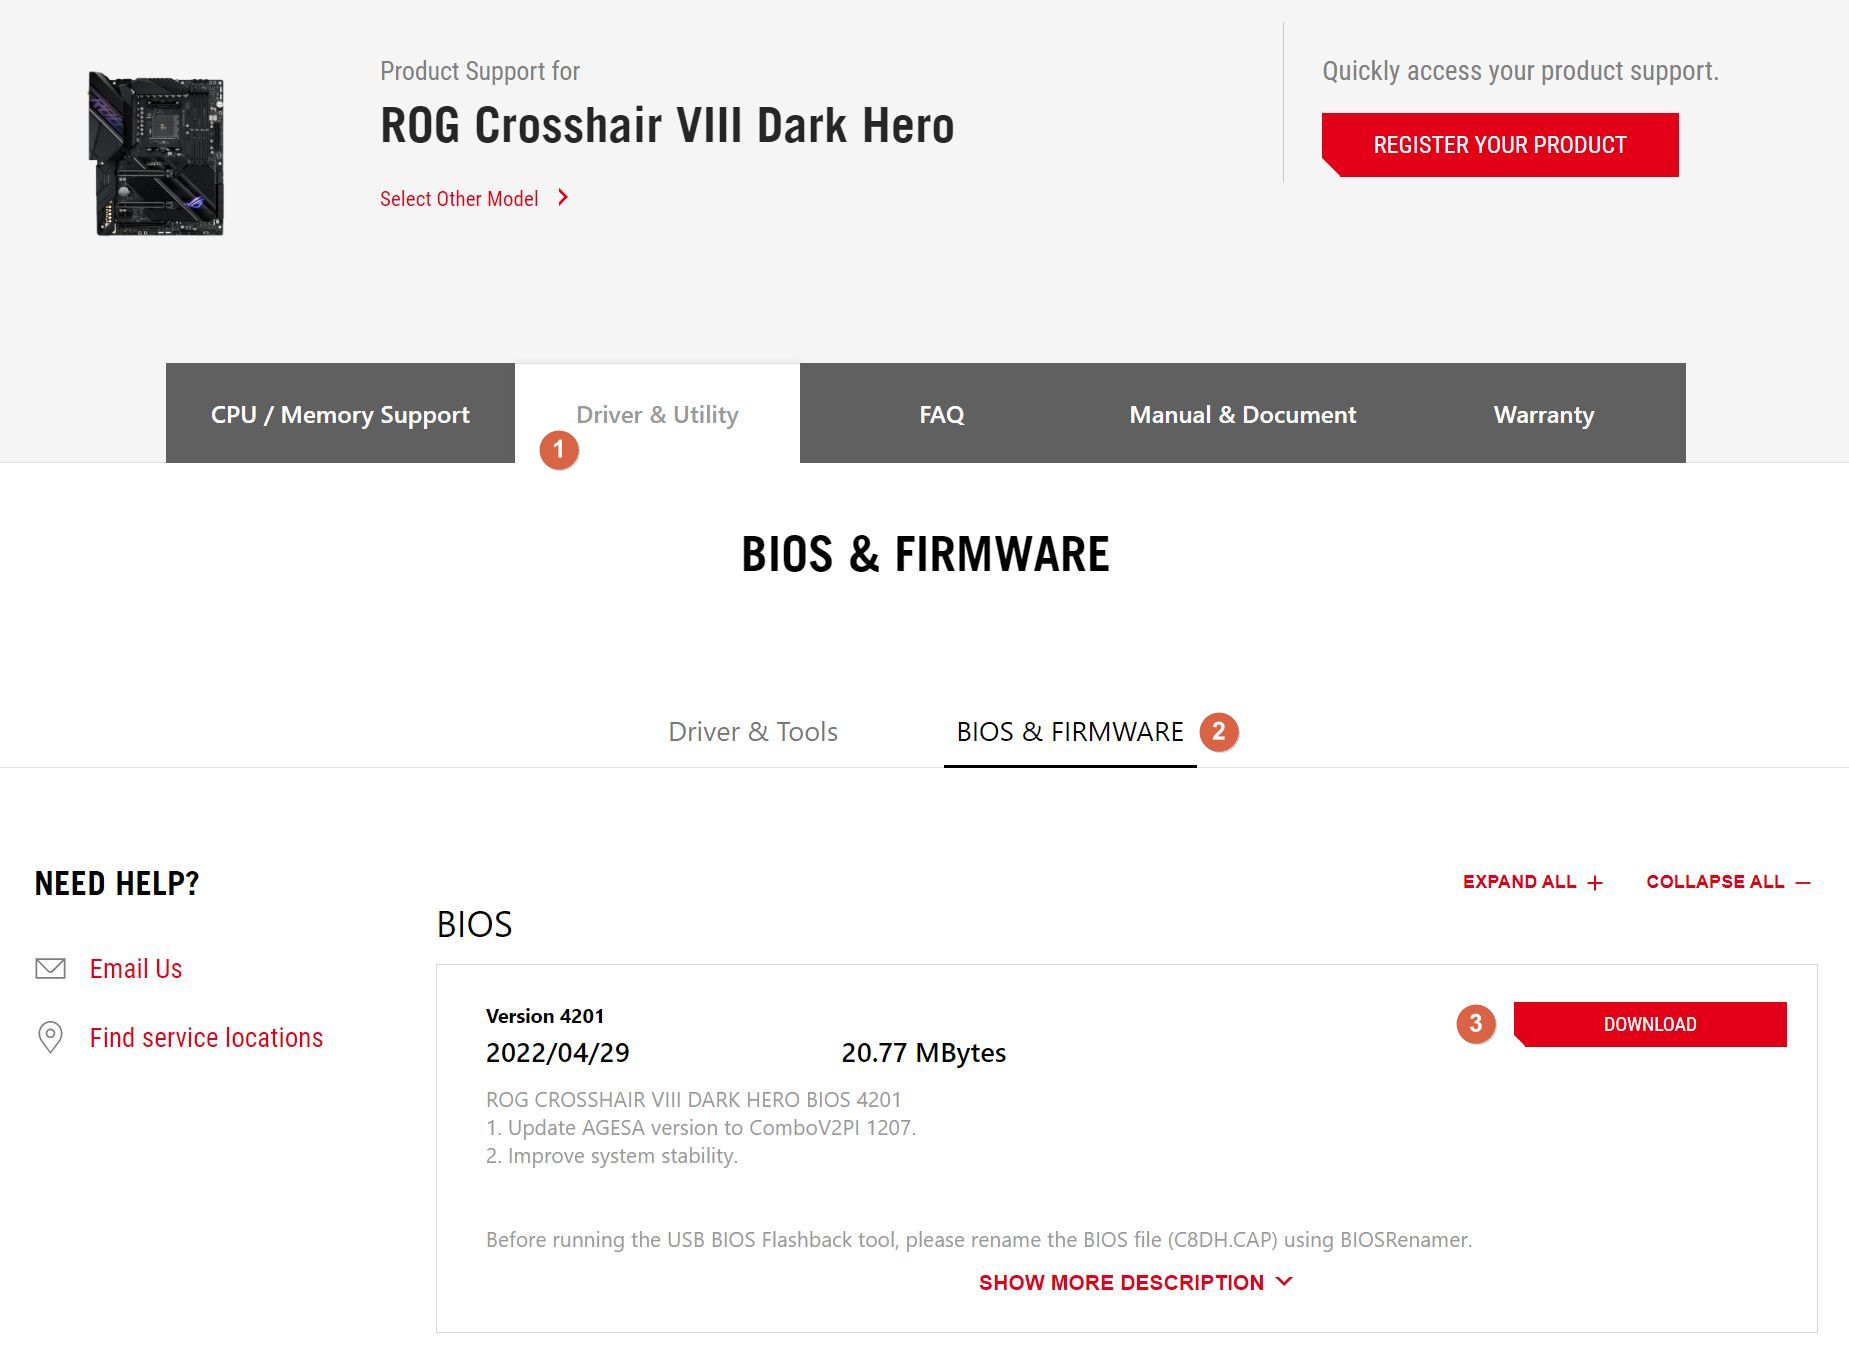
5. Before doing anything else, check your current BIOS version. If the number is lower than the one listed on the support website it means you can do an ASUS BIOS update.
Some manufacturers may list Beta BIOS version for some motherboards. I strongly suggest not to update to these versions. Only update if the listed BIOS version is final, stable.
6. Download the BIOS archive, extract its contents and copy them to an empty formatted USB flash drive or to the root of your C:\ partition. Most motherboards can browse the contents of your drives, too.
7. Place the Flash Drive into one of your free USB ports at the back. Don’t use the front case USB ports as these can cause signal integrity problems because of the longer cables that link them to your motherboard.

8. Restart or turn on your computer and press Del or F2 until you see this screen. On some motherboards, you can press F1 or F10. There’s usually a prompt on the screen during boot, but don’t count on it. Read the manual if you can’t open the BIOS interface.

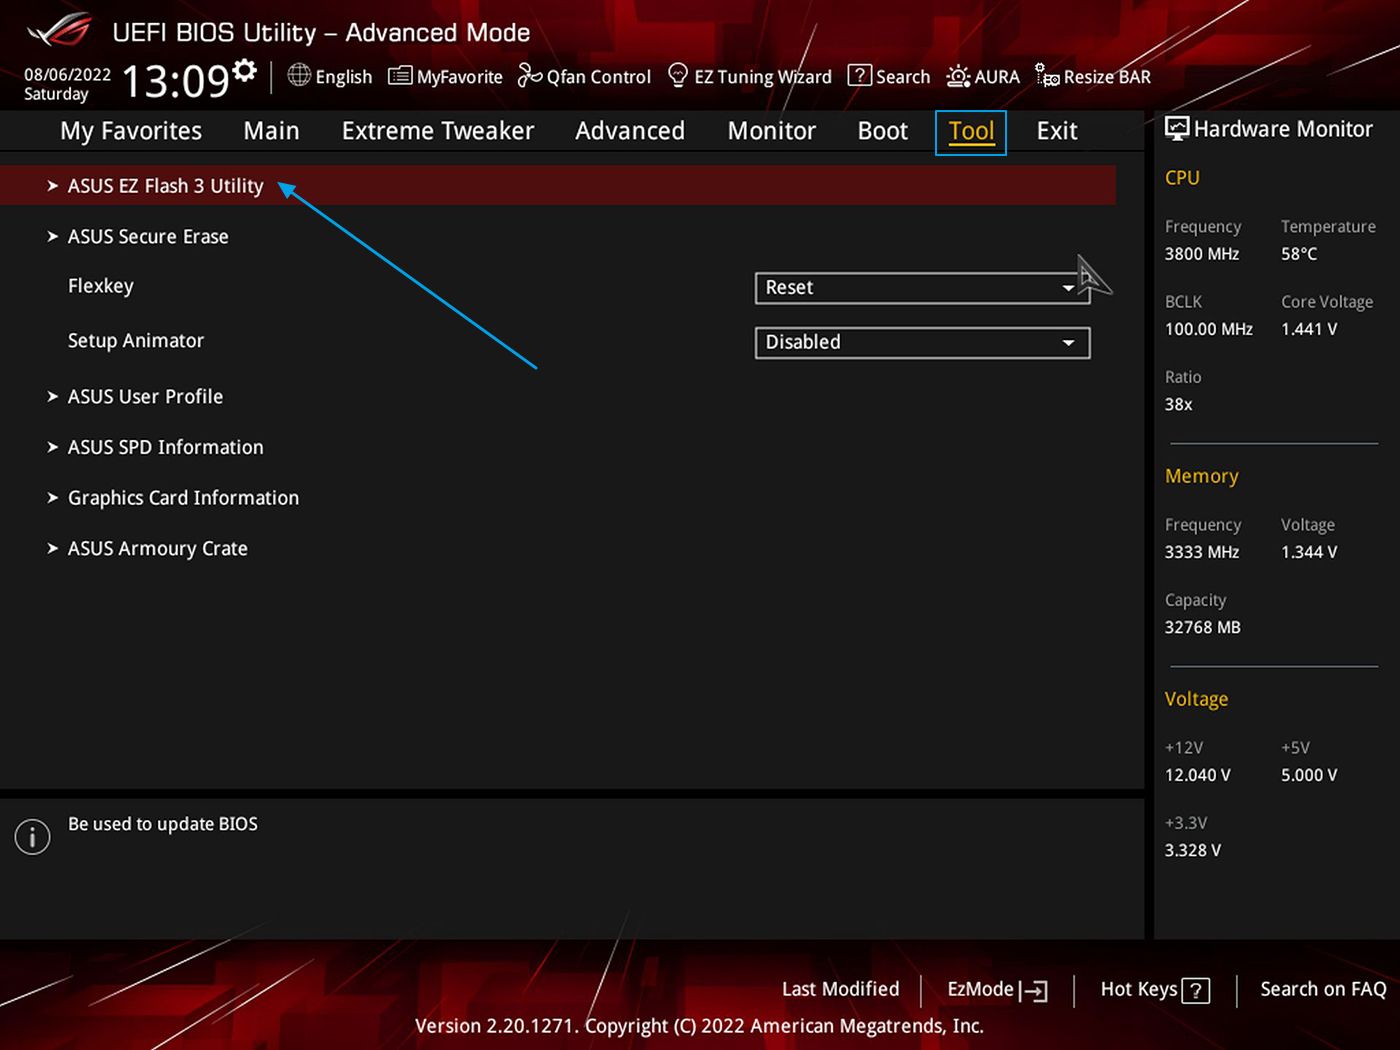
9. If your BIOS has a simple and an advanced mode make sure you’re in the Advanced Mode. There’s a link somewhere on that page. On an ASUS motherboard, you can press F7.
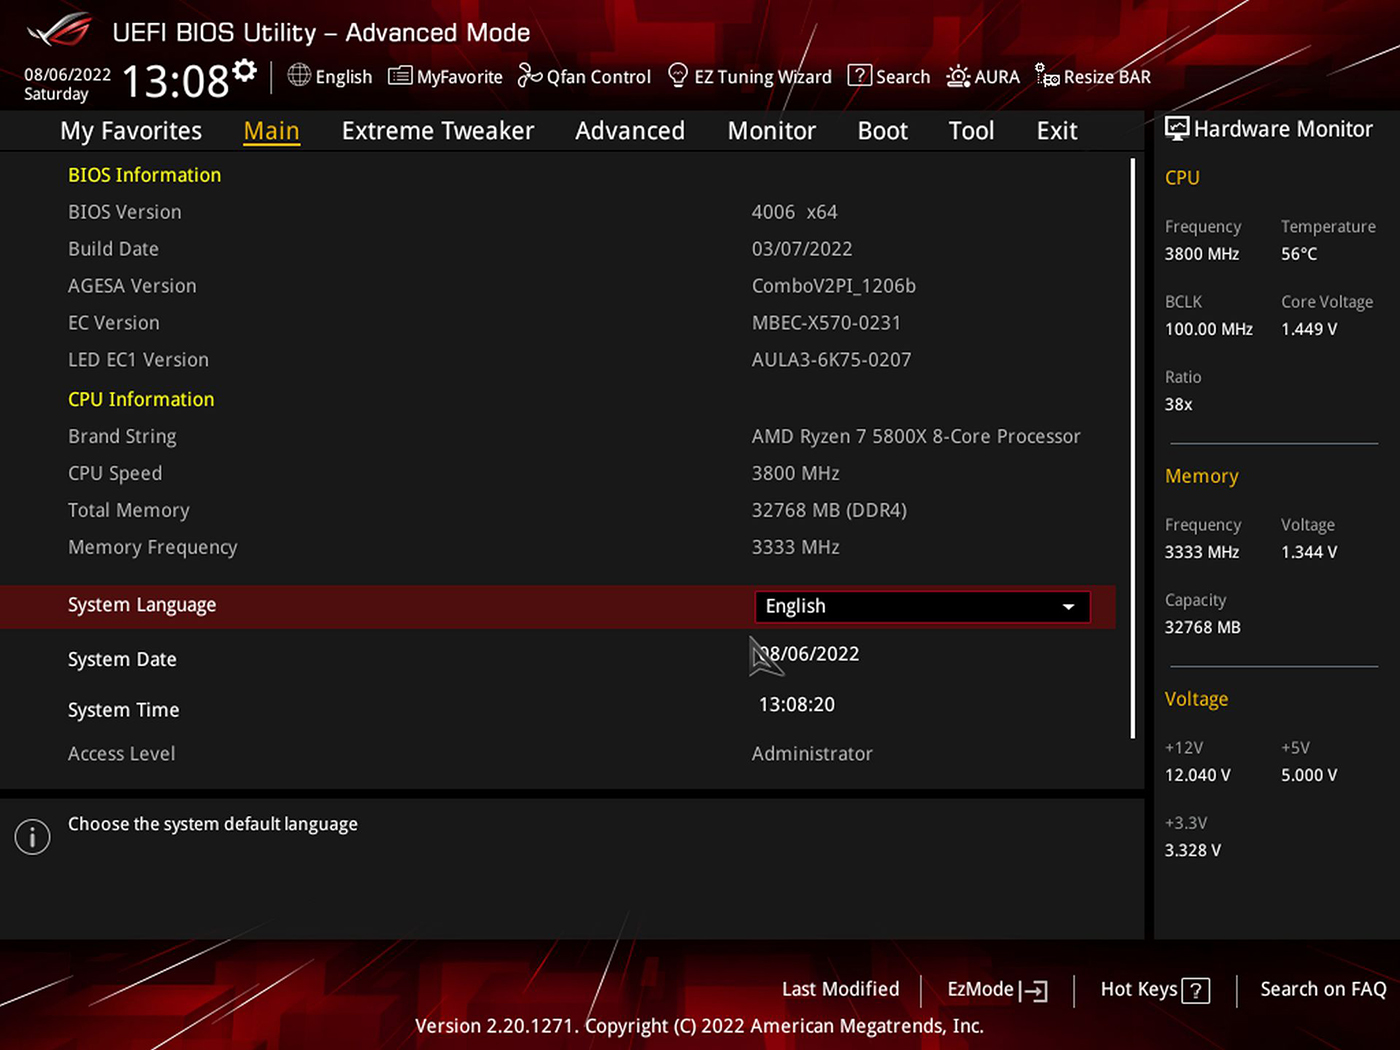
10. Navigate to the Tool menu on your ASUS BIOS. Click on the ASUS EZ Flash 3 Utility. This is the easy and safe way to do an ASUS firmware update.
There’s an ASUS BIOS update utility for Windows baked into the AI Suite 3 ( compatible older devices), and the option to use the “new and improved” Armoury Crate app, which features an Update Center, or the MyASUS app, but I always like to use the functionality baked into the ASUS BIOS, not some poorly coded software that can crash in the middle of the update.
You can also update your ASUS motherboard from Windows directly, but it’s more complicated since it involves typing a few commands. It’s just safer to do the upgrade from the BIOS interface itself. This is how I’ve done it for the past 15 years or so, since my first ASUS motherboard, and had no issues whatsoever.
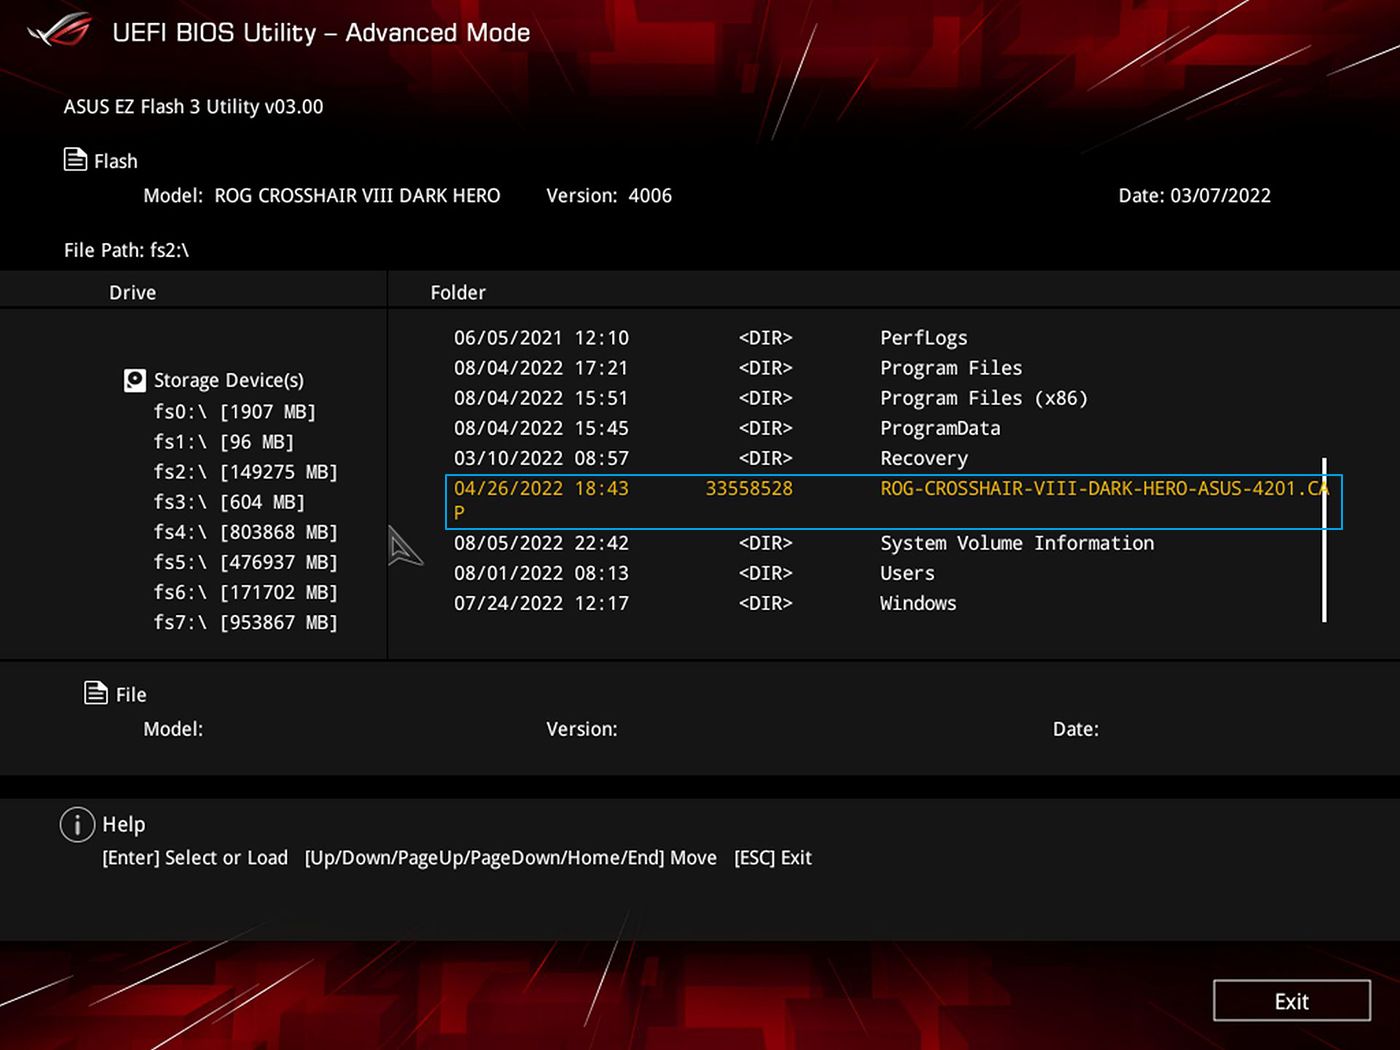
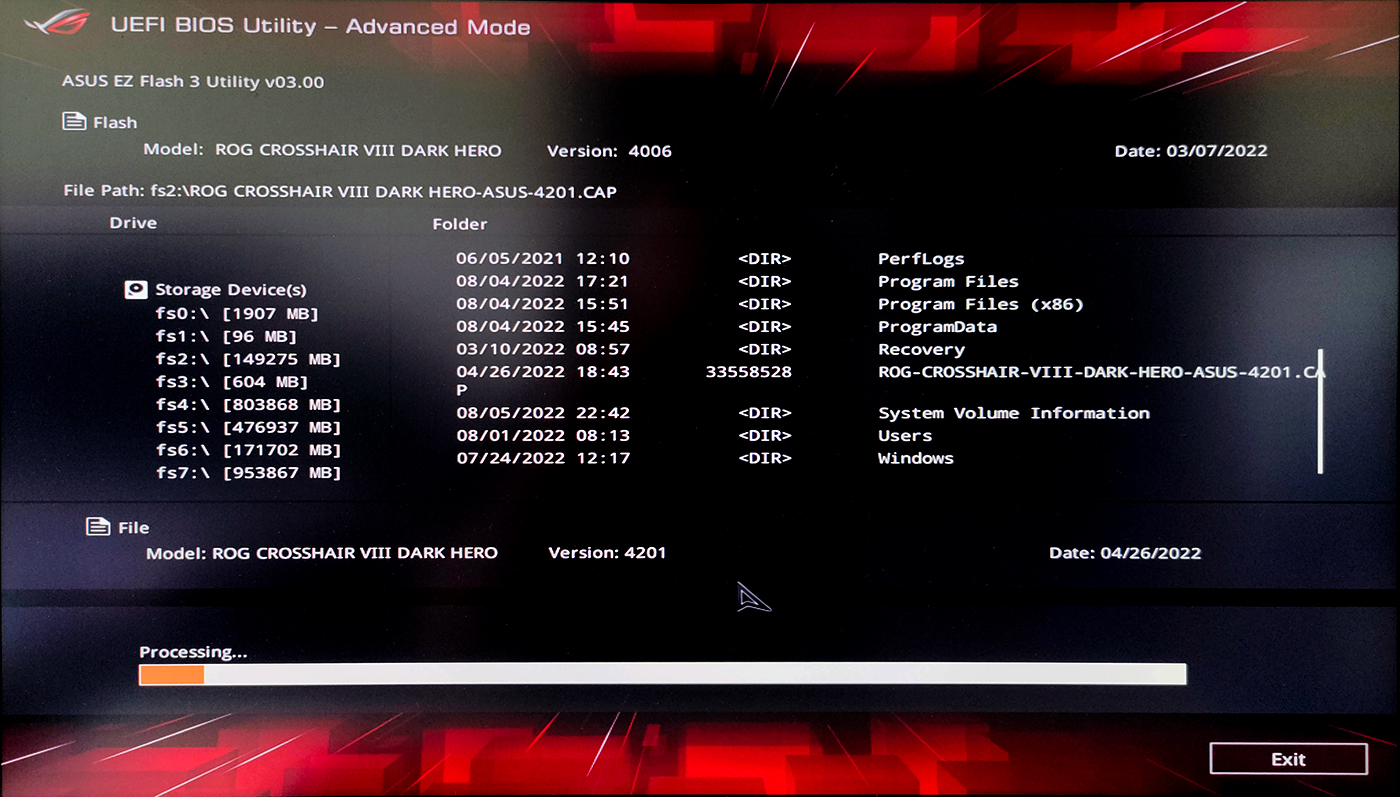
11. In the next screen navigate to where you’ve extracted and copied the firmware file by using the arrows. Select the correct file with the Enter key or by left-clicking the mouse, if your BIOS has mouse support.
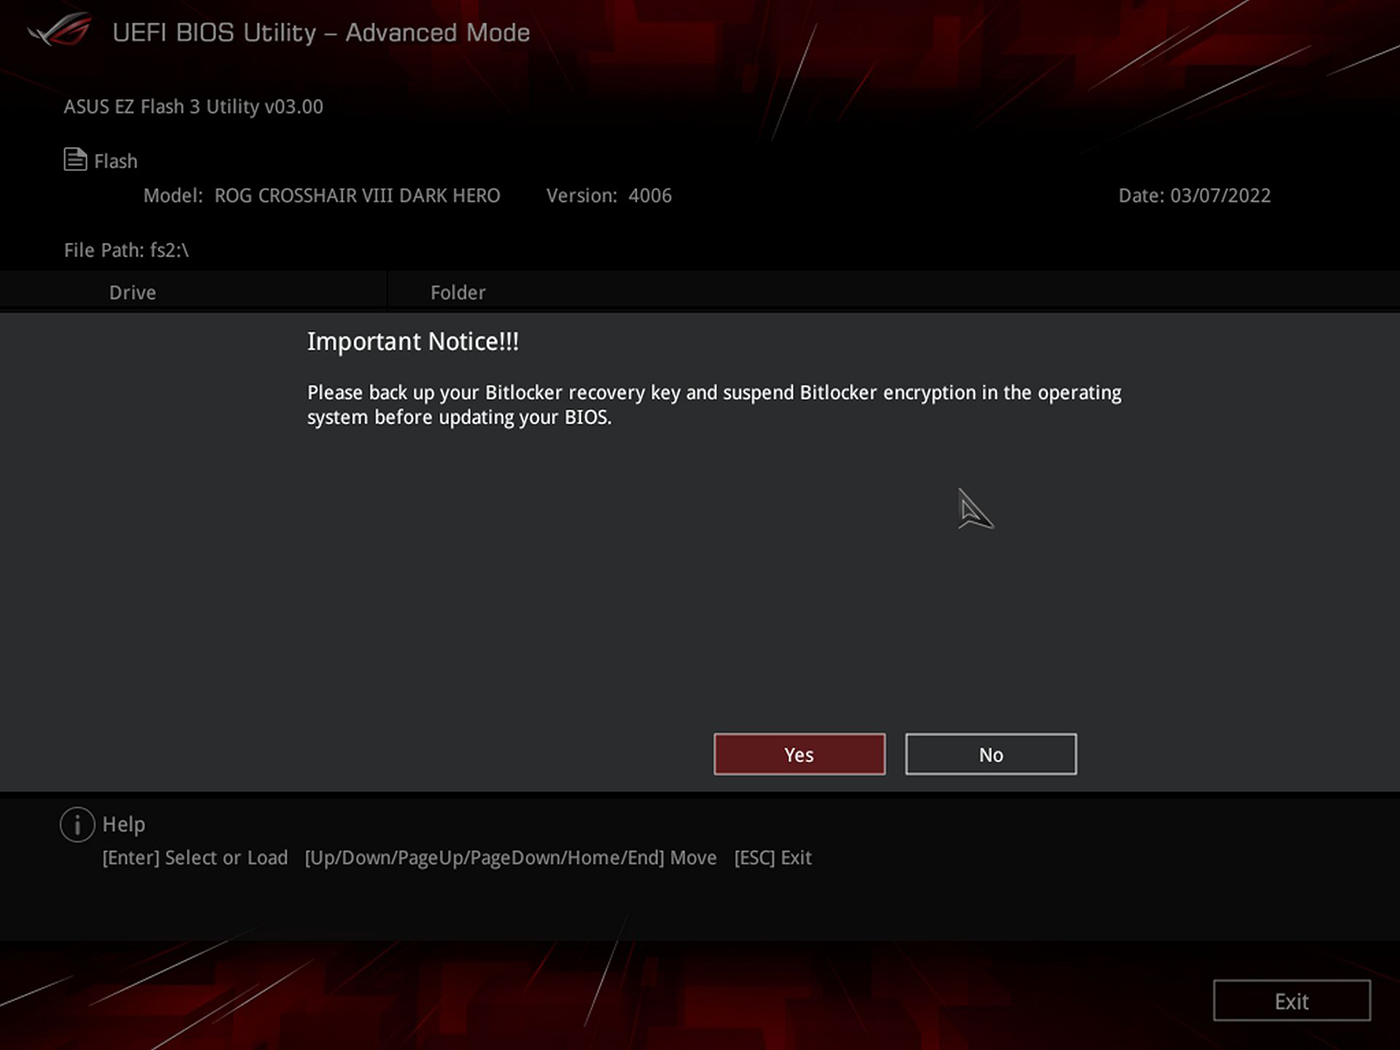
12. If you have encrypted your system drive with Bitlocker you may see this prompt. It’s crucial to either back up your Bitlocker decryption keys first, or disable this function before doing the update, or else your Windows OS install won’t boot after the update. You can enable BitLocker after the update is successful.
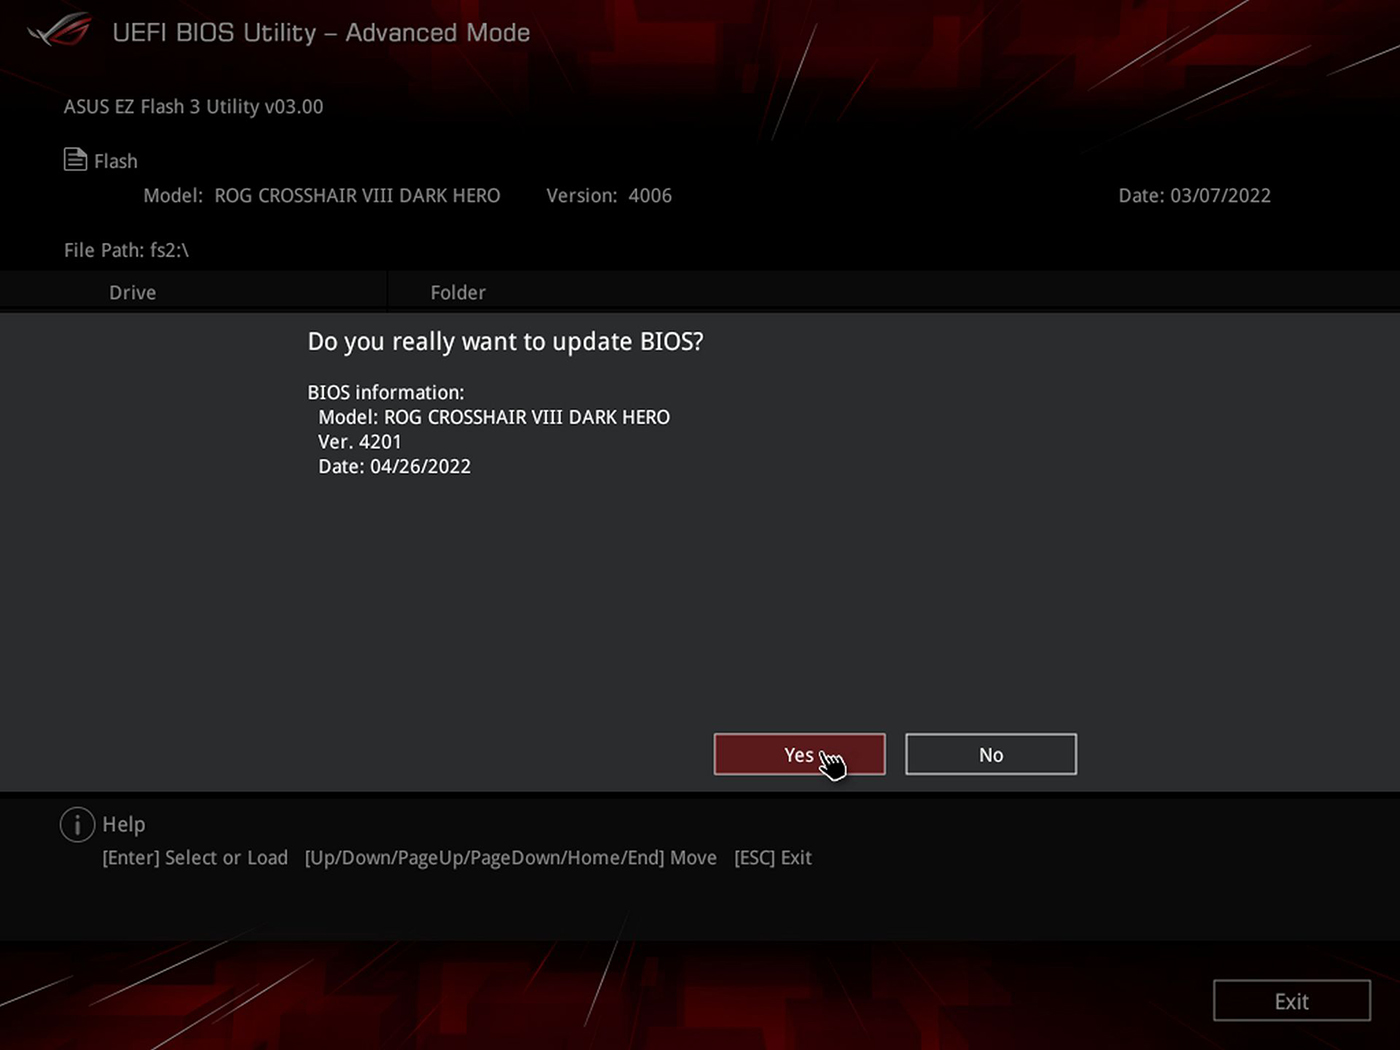
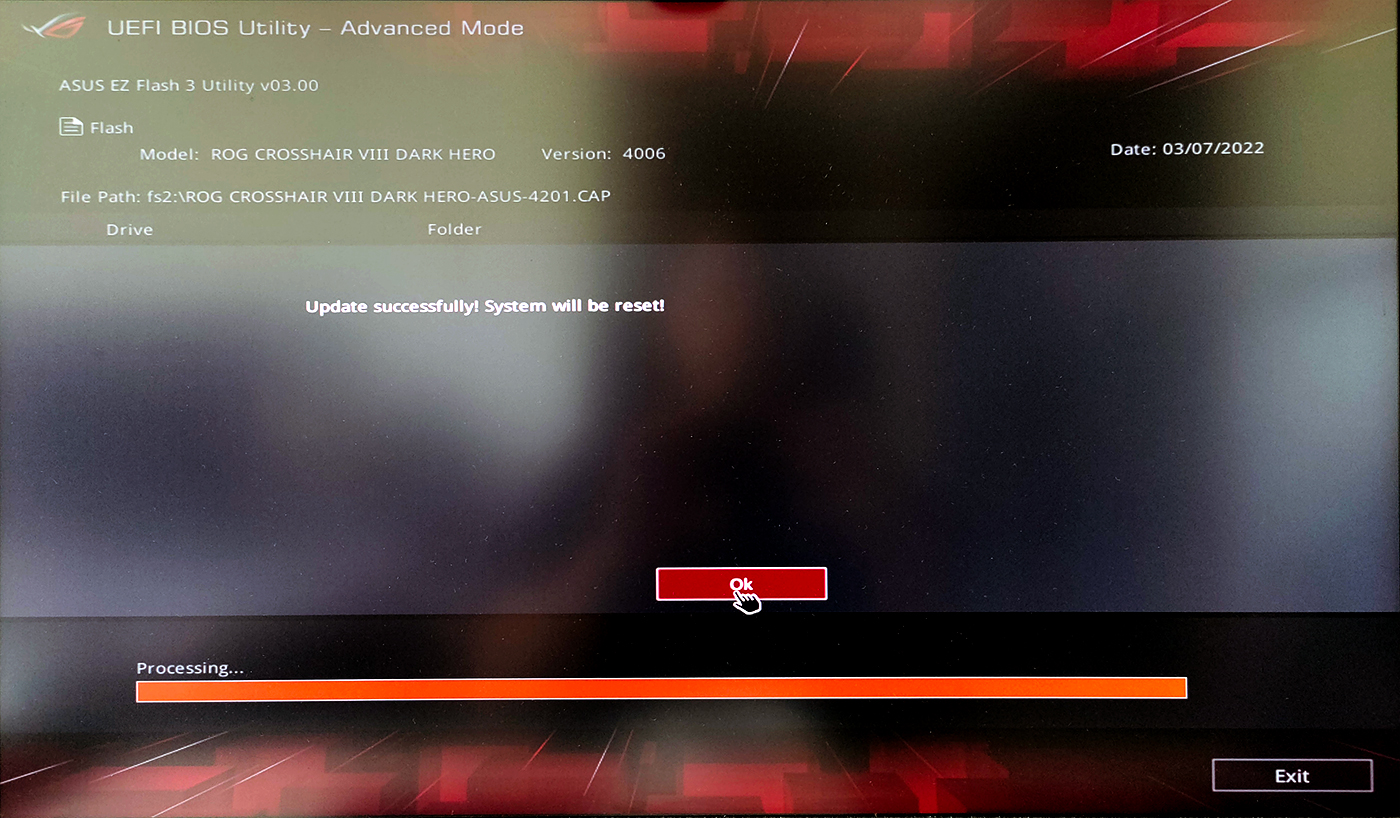
13. A final check will let you know a few details about the new firmware update. Confirm by clicking on the Yes button.
14. Now it’s time to wait. These could potentially feel like the longest minutes of your life. You’d better do something else than stare at the slow-moving line.
15. This is what you want to see: the success message. Your computer will now restart. It will take longer than usual but that’s OK, don’t worry, and be patient.
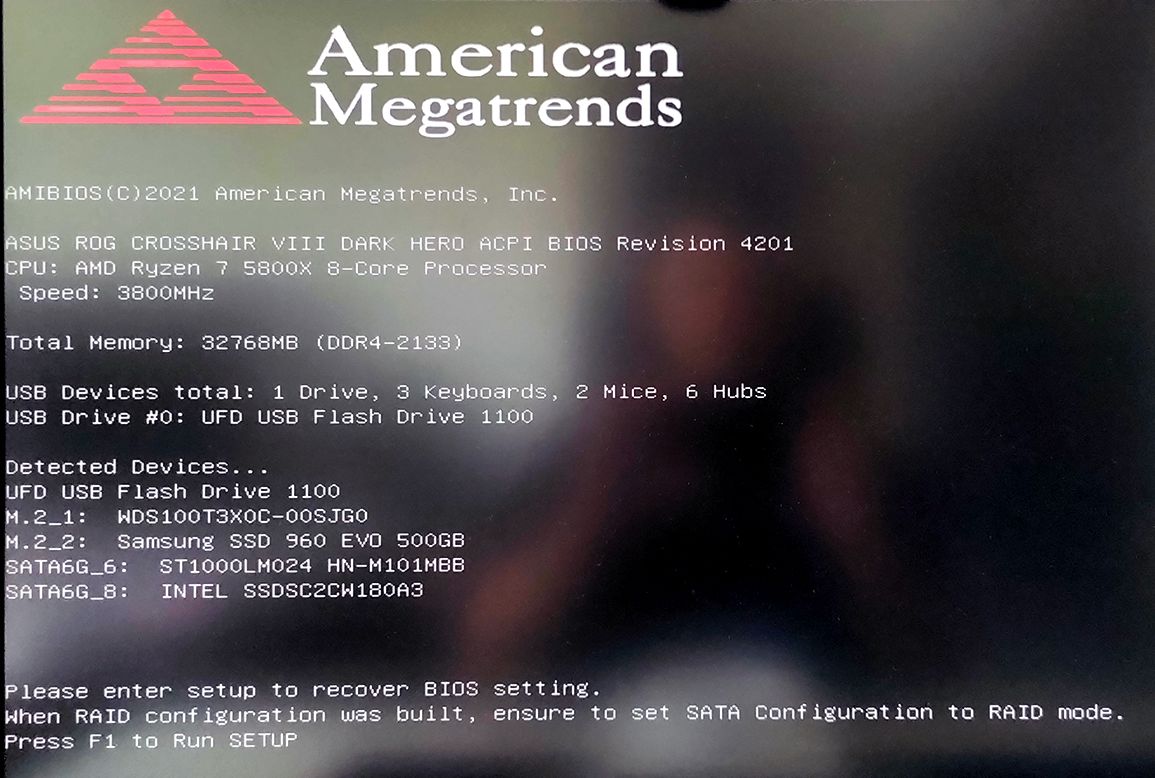
16. The first boot will be unsuccessful because you need to redo all your motherboard BIOS settings again. So don’t worry when you see this message. Press F1 as instructed to enter the BIOS interface again.
17. One thing people recommend, is to Load optimized defaults settings, after a BIOS upgrade. On an ASUS motherboard, the option is found in the Exit menu. This is a recommendation I don’t usually follow because I forget to do it, plus it doesn’t seem to do anything, especially since a UEFI BIOS update will already erase existing values.

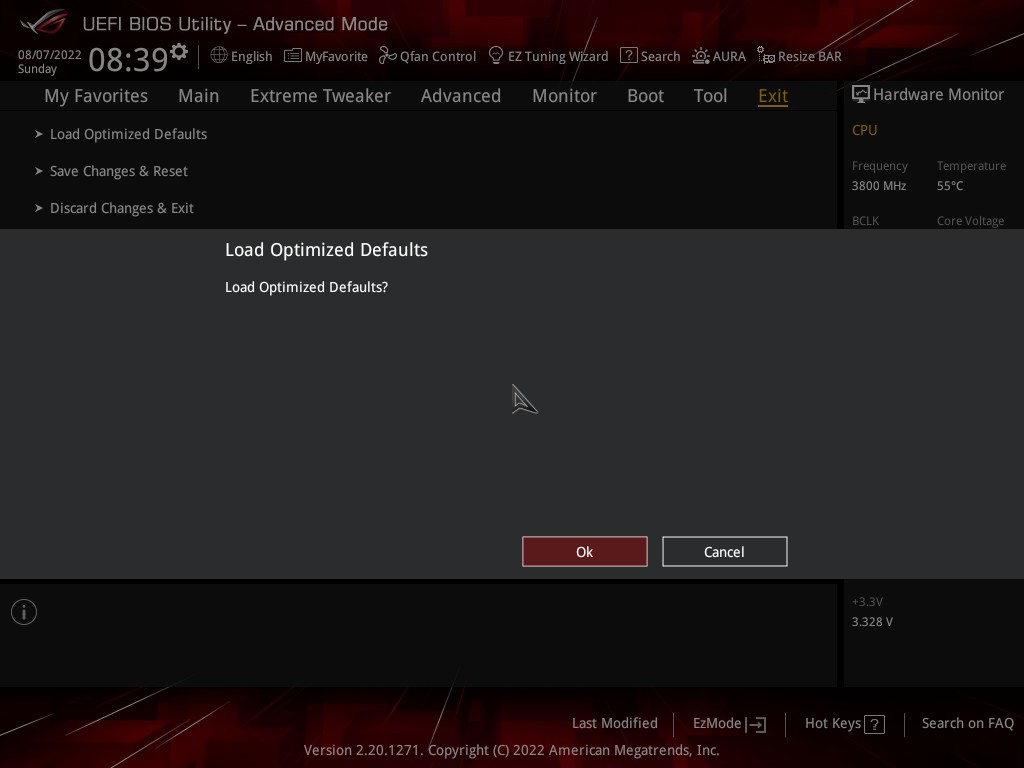
I highly recommend you take the time and tweak the settings properly. You may be leaving performance on the table, especially when it comes to RAM configuration.
My ASUS motherboard has the option to save BIOS settings profiles, but they’re erased during the firmware update. It’s better than messing things up because of leftover code.
Even if you saved the BIOS profiles on a USB flash drive, if you try to load them most likely your motherboard will refuse to apply these settings saved on older versions of firmware. It does on my ASUS motherboard anyway.
Have you tried doing an ASUS motherboard BIOS update before? Let me know how this adventure turned out.