- What if you could recover an older version of a document? File History in Windows does just that.
- Learn what is File History, how to enable it in Windows, and how to use it properly.
- File History is just one of the many Windows backup, recovery, and restore options offered for free by Microsoft.
Sometimes, especially when it comes to documents you edit frequently, it would be nice to be able to go back to a specific version in time, in case you want to recover some info you’ve erased in the meanwhile.
That’s possible in Windows with the File History functionality. It’s supposed to be an alternative to Apple’s Time Machine, but let’s face it: it’s not that easy and intuitive to work with.
If you read the entire article below I’m sure you’ll be a bit more knowledgeable about one of the included backup utilities dating back to Windows 8.
What is File History in Windows?
File History is an included Windows utility that, once enabled, will periodically save versions of the current user documents onto a second location: an external hard drive, flash disk or network location.
Users can then navigate to each previously saved File History version and restore it in the same location, or to a different folder, for comparison purposes.
What Does File History Do in Windows?
File History copies files on a schedule from the current user libraries folders to a second location and stores them in different folders, thus building a historic archive. Documents can be restored to any previous version easily with the included File History timeline navigation utility.
What is a File History Drive?
A File History drive is any external hard drive, USB flash drive, or network location folder that is currently used, or was previously used as a backup drive by File History.
You can switch File History to another drive at any time, in case space is filled with backups on the current drive, or if you want to access and restore older versions of your documents.
You can use any drive laying around, even if it has some data on it because File History will not format the History Drive in use. It will just add another root folder where it will save the backups.
How to Enable File History in Windows?
By default, Windows does not enable File History during installation. You need to enable and configure this yourself. That’s easy to do and involves the old Control Panel.
Windows 10 duplicates some of this functionality in the Settings app, but not every option is there, so this guide will focus on the Control Panel File History section, which is identical in Windows 10 and Windows 11.
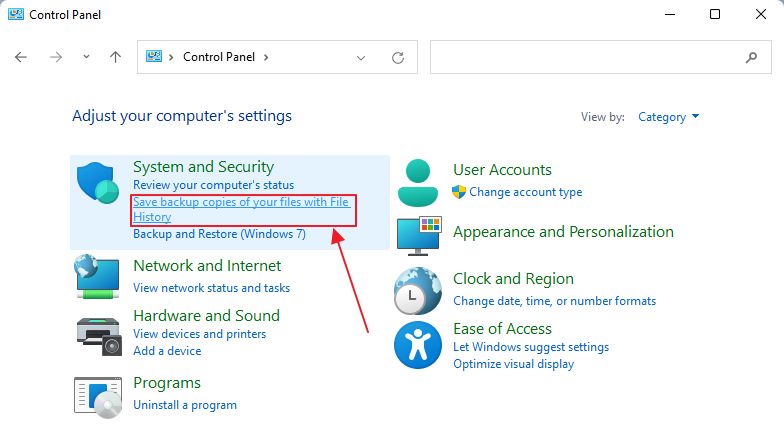
1. Open the Start menu and type Control Panel. Click on the first result.
2. In the System and Security section look for the Save backup copies of your files with File History.
3. If no external hard drives or USB flash memory drives are detected, you will see this message.
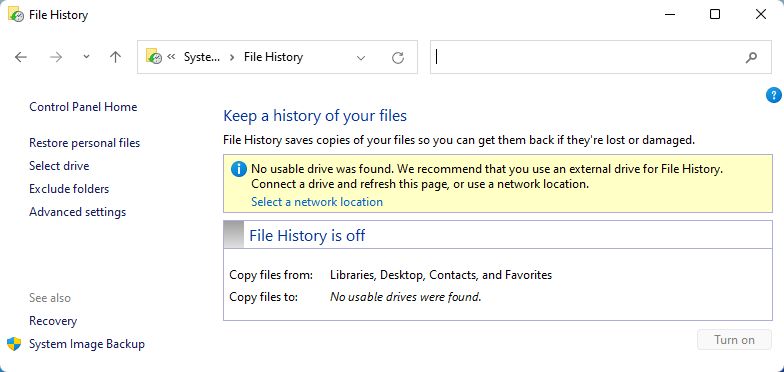
4. Connect a new drive and click on the refresh button next to the address bar.
5. The new drive will show up below. If more than one external drive is connected select the one you want to enable File History for.
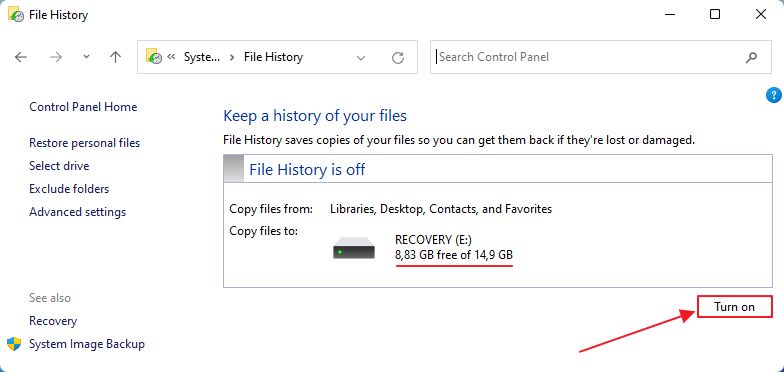
6. Finally, click on the Turn On button to enable File History. The utility will start doing its first backup right away.
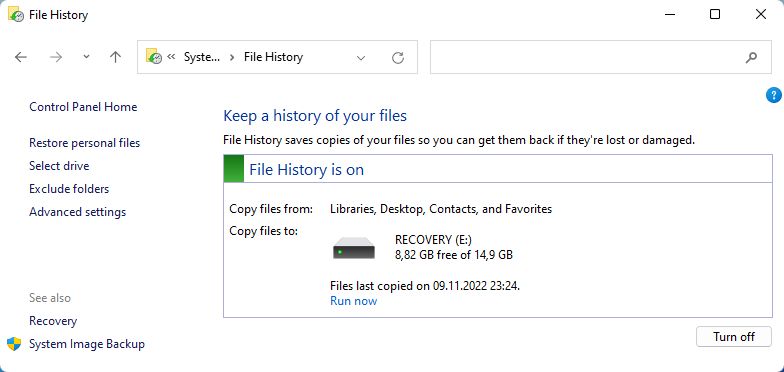
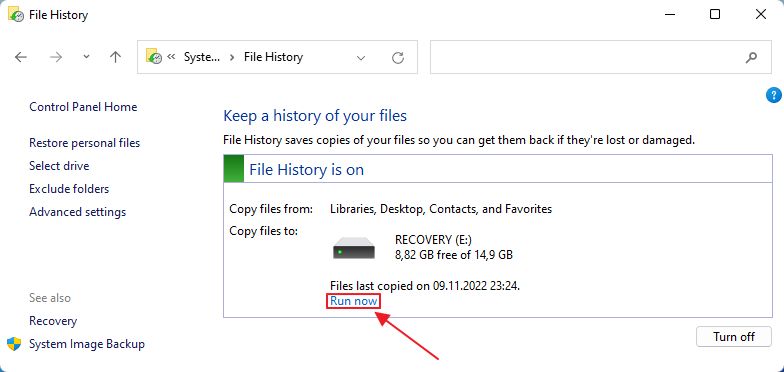
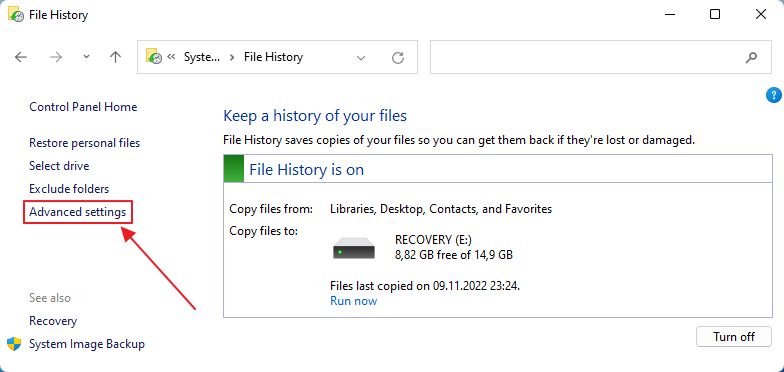
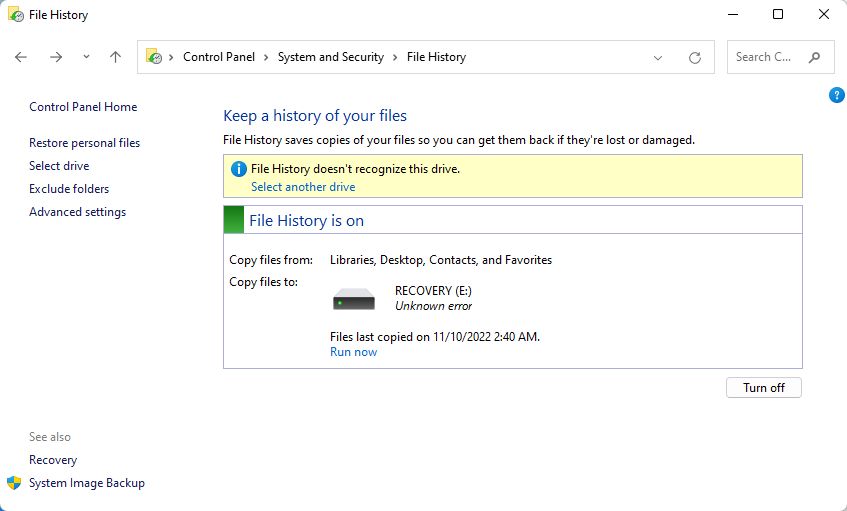
The File History window shows (1) if the service is enabled, (2) which drives it stores documents to, (3) how much space is available for backups, and (4) the date and time of the last backup.
If there are more user accounts on the same PC you need to turn on File History for each separate user. There’s no global toggle.
How to Start a Manual File History Backup
Once you’re in the File History main window, under the current File History Drive, there’s a Run now link. Clicking the link will force Windows to make a quick backup of your files.
An alternative to a manual File History would be to create a manual Restore Point if you know you’ll be doing some important changes soon.
It’s not necessarily a better alternative, since restoring from a Restore Point will override all changes. With File History, you are able to restore only specific documents.
How to Add a Network Location to File History
Using external hard drives is not ideal, if you ask me, since these can be removed accidentally from your system. That’s why I love network locations and I use a NAS for my backup needs, and other cool things.
Here’s how to use a network location as a File History Disk in Windows. By default File History will only detect attached USB hard drives and flash storage, not network locations.
If you didn’t attach any disk and open File History, you’ll notice a Select a network location link in the warning message. Click to open the File Explorer window that lets you select the network location.
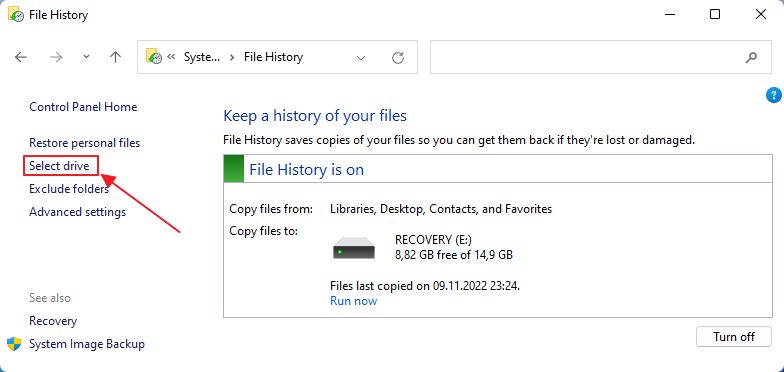
If there are attached disks, even if they were not selected, this message will not show up. What you have to do is click on the Select drive option in the left side menu.
A new popup will launch. In the lower right, there’s an Add network location link. Click to open a File Explorer browse window.
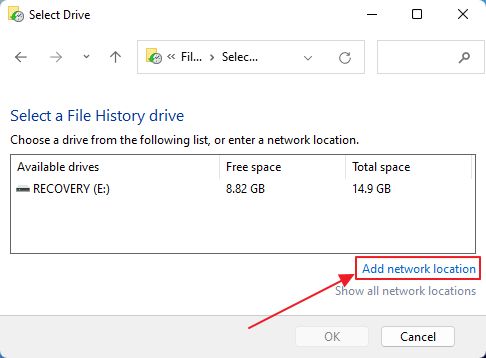
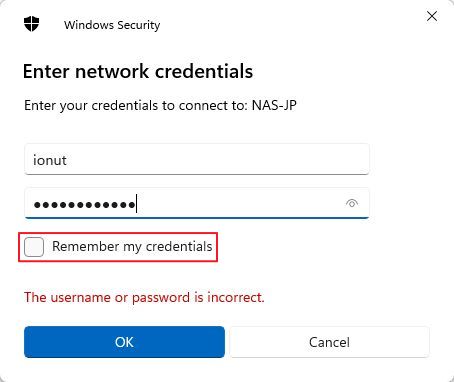
Navigate to the network share or NAS, select an existing folder, or create a new one. If you’re asked for credentials make sure you check the box Remember my credentials, or File History won’t be able to save to that drive later on.
Finish by clicking the Select Folder button.

It will be added up automatically to the list of available File History drives.
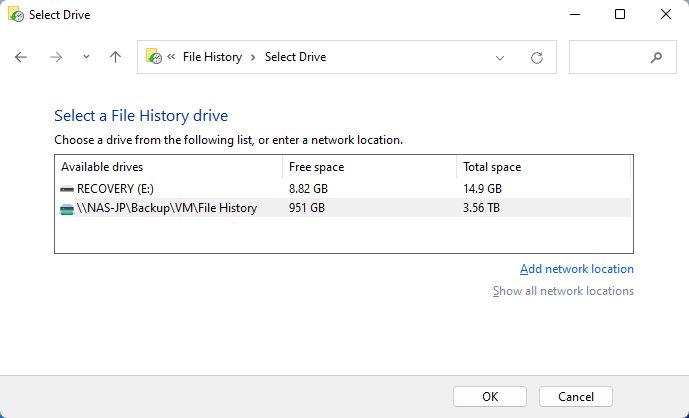
Just select it and click OK to confirm. The File History archive will now be stored in the chosen network location.
This is the method I’m currently using.
File History Saving Options Will Affect Storage Space
There are quite a few settings you can change. I highly suggest you click on the Advanced settings link in the main File History window. At least review them, but I think you need to change the default backup frequency and storage space allowance.
I don’t really understand why File History is set by default to save copies every hour and keep them forever.
Also, I can’t imagine how you could keep everything forever, even if you run out of space. I assume File History stops saving new copies when the drive fills up.
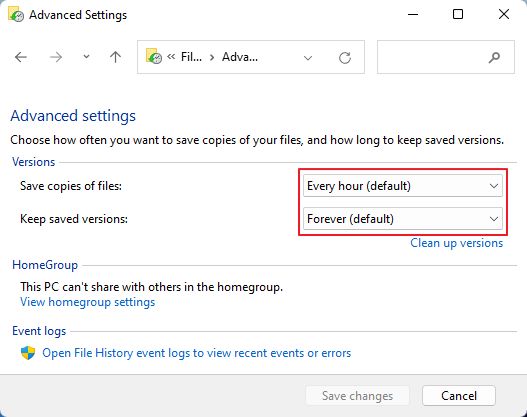
The settings I recommend are: save daily and keep older versions until space is needed. The last option will erase previous versions, starting with the oldest ones when the File History drive fills up, just like System Protection does with Restore Points.
Important note: reconnecting a previous File History Drive or selecting another Drive for saving File History backup will reset the advanced settings. Make sure you recheck the save interval and the amount of storage space used every time you make a drive change.
Which File Locations are Saved with File History?
What you need to understand is that File History doesn’t backup up all files stored on your computer.
File History will copy by default only for the current user libraries (Documents, Music, Pictures, Videos) plus everything in the user’s folder, browser favorites (I assume only for Edge), and your contacts.
How to Add Extra Files and Folders to the File History?
That being said, there are ways to add additional folders to File History. Here are two separate guides for Windows 10 and Windows 11. You’ll see immediately why.
How to Add Other Folders to File History in Windows 10 from Settings
Windows 10 started adding File History functionality in the Settings app (some functionality is missing, and some is only found in the Settings app).
For some reason the option to add other folders to File History is completely missing from the Windows 11 settings app.
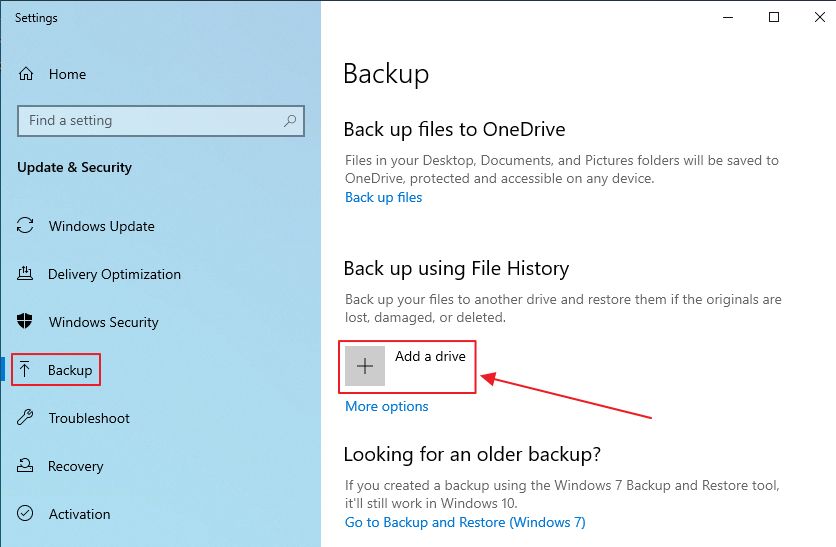
1. Press Win + I to open the Settings app.
2. Navigate to the Backup section. On the right side click on the Add a drive button to select a File History drive.
3. If you want to add a network location you’re out of luck.

Adding network drives is only possible from the Control Panel File History section. Told you this is incomplete.
4. Anyway, once you set up File History you can click on the More options button to bring up the advanced settings.
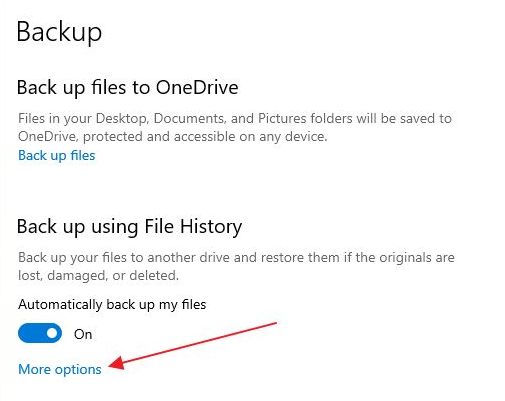
5. Scroll til you get to the Backup up these folders section. Click on the Add a folder button.
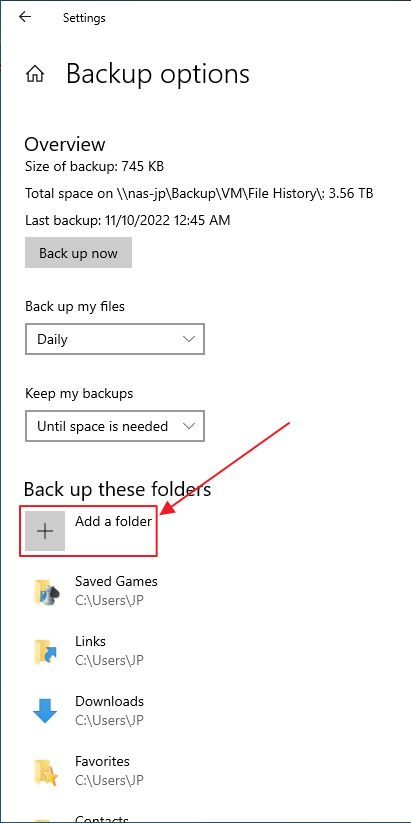
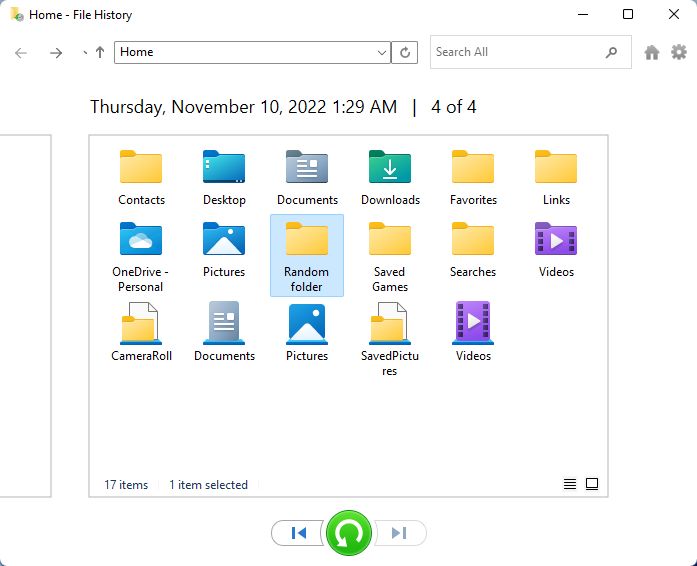
6. I’ve added a folder called Random folder and it was listed immediately at the top of list of File History backed-up folders.
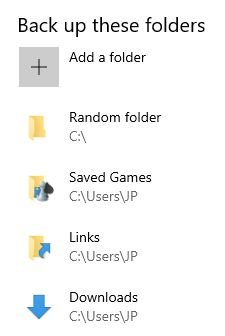
From now on, extra added folders will be automatically backed up according to the schedule you’ve set.
The Trick to Add Extra Folders to File History in Windows 11
Why Microsoft chose to disable the option to add external folders to File History Backups in Windows 11 is beyond me, but at least there’s a way to circumvent this. It’s not very hard to do, but involves editing a file and manually adding the folder path(s).
So, fire up File Explorer and in the address bar enter this string, then press Enter to open the location:
%UserProfile%\AppData\Local\Microsoft\Windows\FileHistory\ConfigurationOnce here look for the Config1.xml file. This is the file you need to edit if you want to add other folders to File History backups in Windows 11.
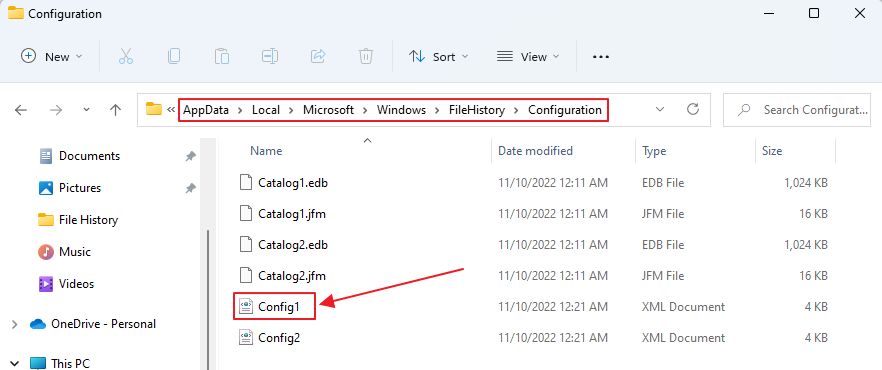
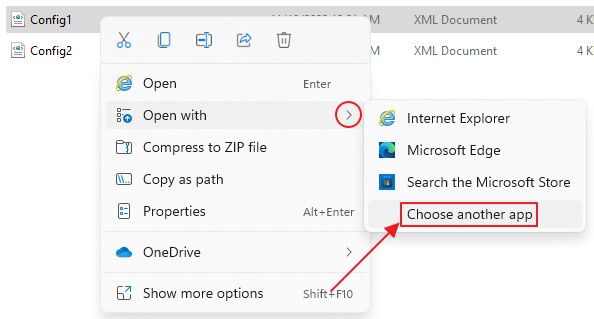
Right-click on the file, and from the contextual menu choose Open with > Choose another app.
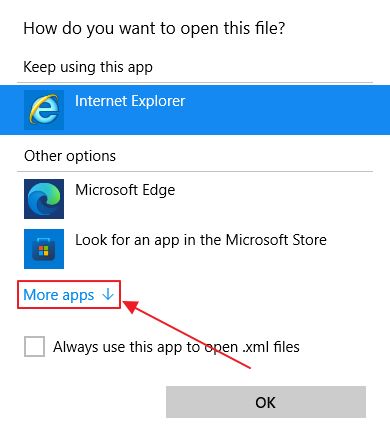
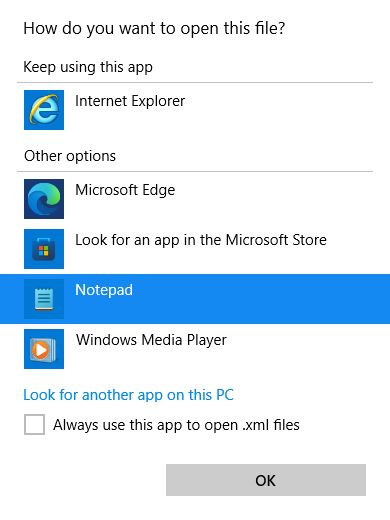
From the next overlay click on the More apps link and select Notepad.
This will open the configuration file in Notepad. To add a folder to the configuration just add a new line:
<UserFolder>C:\Path to folder</UserFolder>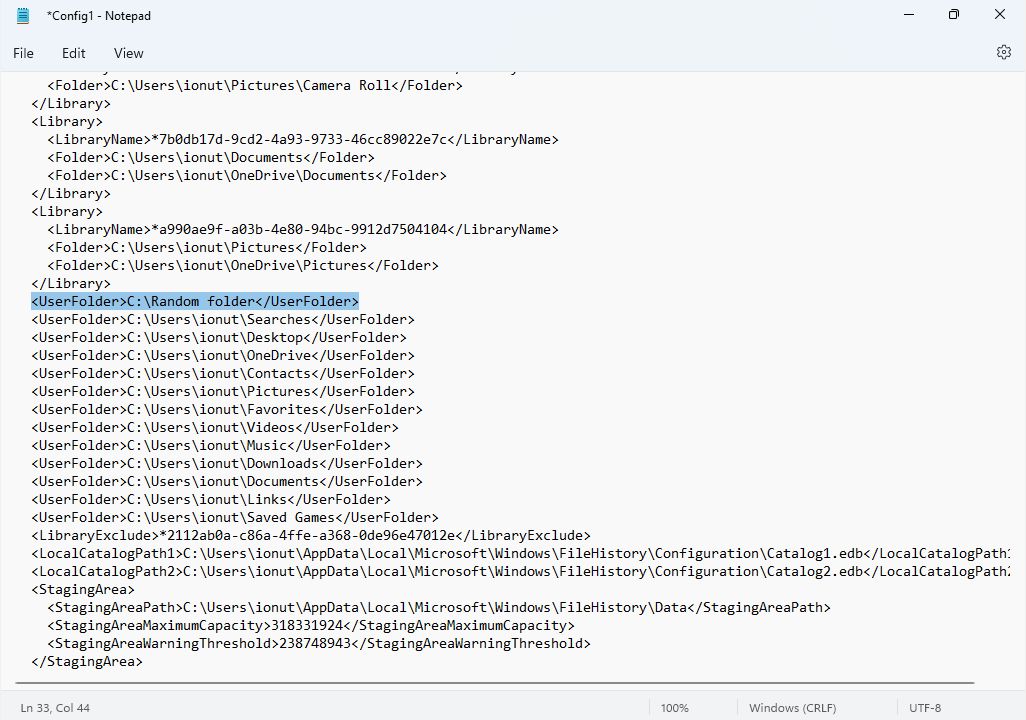
You can replace C:\ with other partitions or drives. You can also back up a subfolder. It’s your choice. Make sure to save the file (Ctrl + S) when you’re done adding all the extra folders.
For exemplification, I’ve added the same Random Folder from the C:\ partition.
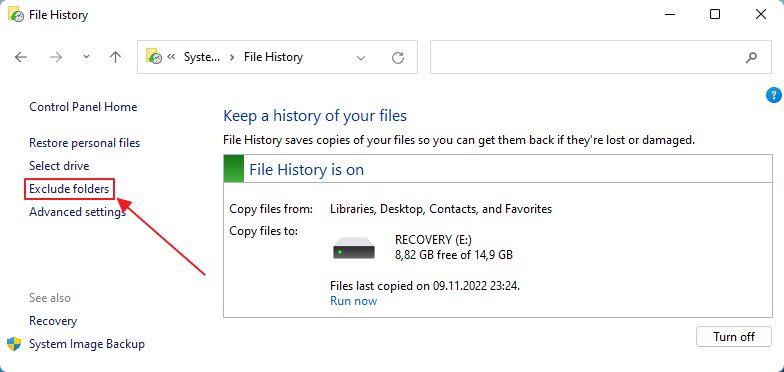
How to Exclude Files and Folders from File History Snapshots?
Microsoft offers the option to remove specific folders from backups. Maybe you don’t want to keep versions for folders that never change, such as your music library. Here’s how to proceed:
1. In the File History main window click on the Exclude folders link.
2. In the Exclude from File History window click on the Add button. Select each folder that you don’t want to be backed up. It will be added automatically to the exception list.
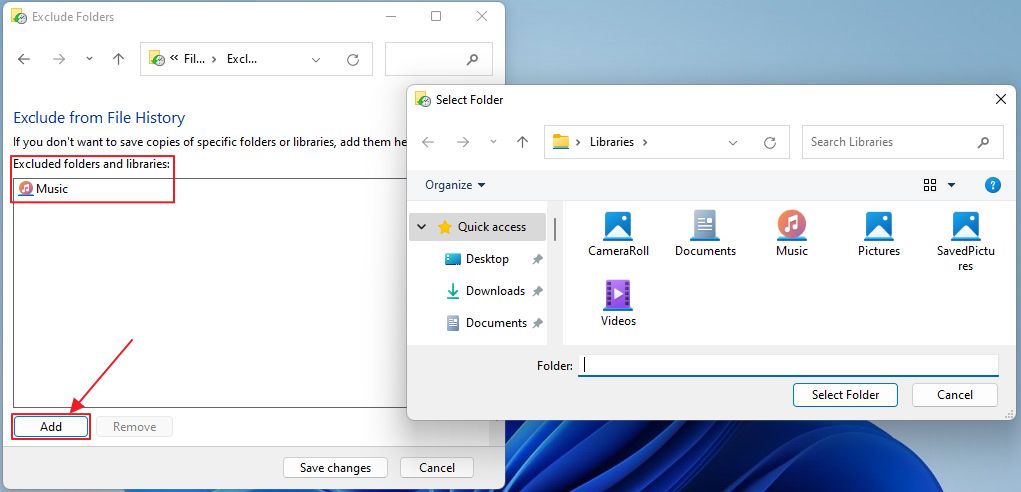
For some reason, you can also add as exceptions folders that are not backed up in the first place. Why? Beats me.
How to Use File History to Restore a File to a Previous Version
Now comes the cool part: restoring files and folders to older versions. This is my favorite section. There are two options:
- Restore from the File History utility.
- Restore from File Explorer properties of a selected file.
Restore From File History Interface
Using this guide you can restore deleted folders and file this, you can restore files and folders one by one, or all at once.
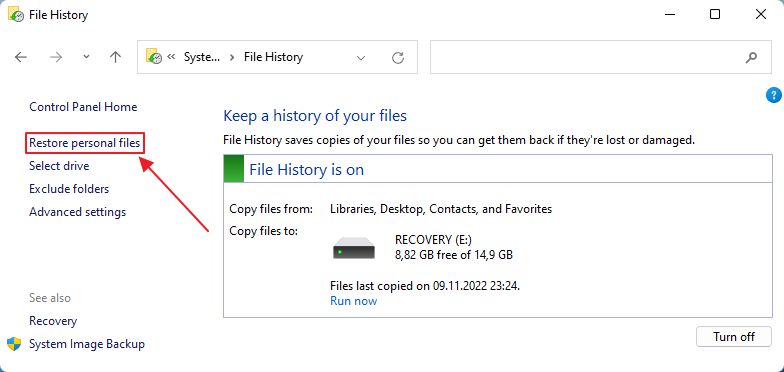
1. In the File History Control Panel section locate and click on the Restore personal files link in the left side menu.
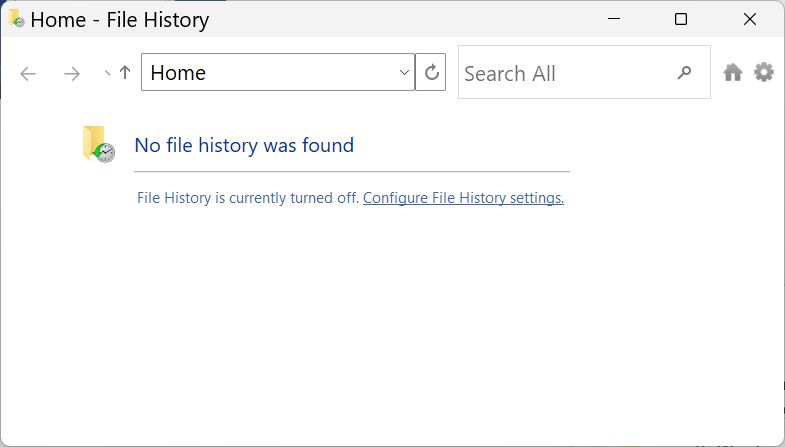
2. If File History is not set up, or no history drives are detected you’ll see this empty window.
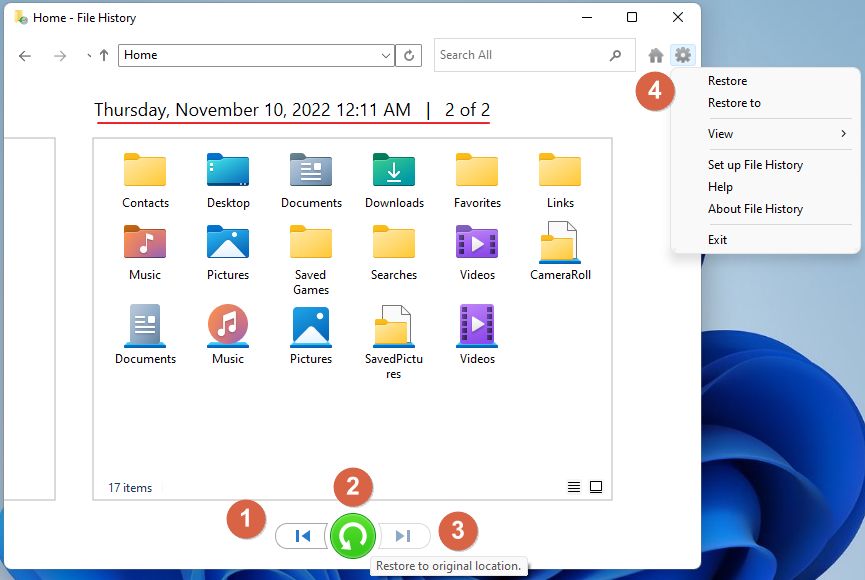
3. If File History has at least one backup a timeline view will open. By default, you will see a list of all folders that can be backed up and the date of the latest backup up top.
Here are your options here:
- Go back one step to an earlier backup.
- Restore the current selection of folders and files in this view. You can select specific folders and files by navigating in this window just like you would in File Explorer.
- Go to a newer backup in the list of available archives.
- Open the menu with the option to restore to a different location, so you will not be overriding the current documents.
Restore Individual Files From Their Location
If you’re wondering how to check file modification history in Windows for a specific file here’s what you have to do.
With this guide you can check each version of a specific file that was not already deleted by you, you can preview each version and restore it in place or to a different location.
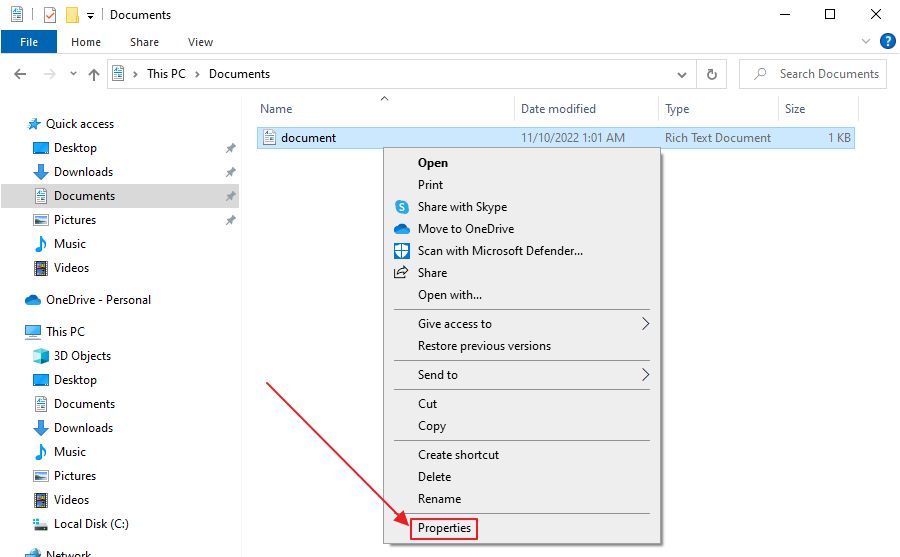
1. Open File Explorer (Win + E).
2. Navigate to one file you know it’s included in File History backups.
3. Right-click on the file and select Properties from the contextual menu.
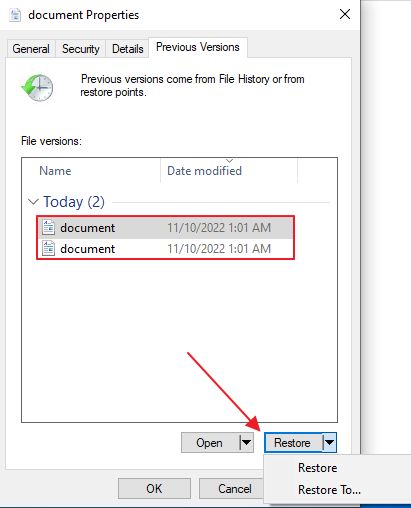
4. In the properties window navigate to the Previous Versions tab.
Here you’ll find a list of all versions of the current document. Select each one and choose one of the two options:
- Open the file so you can check its contents at the time of the backup.
- Restore either in the same place or to a different location, for comparison purposes.
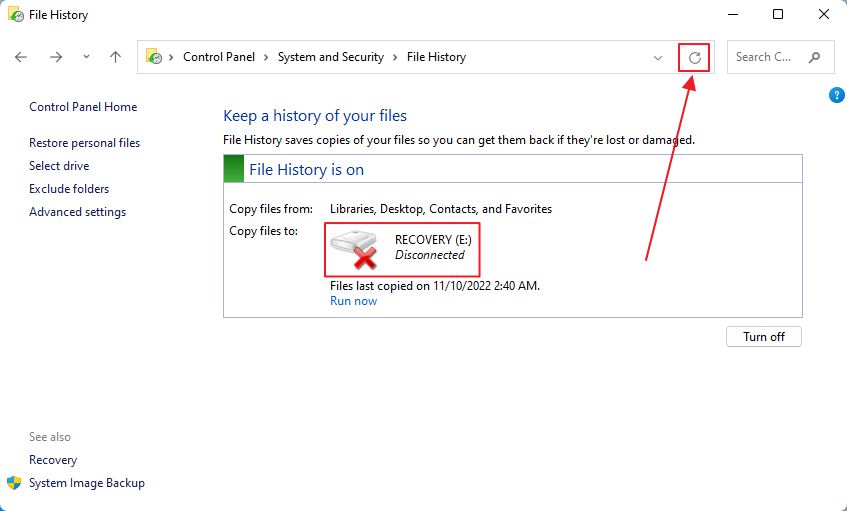
How Do I Reconnect My File History Drive in Windows?
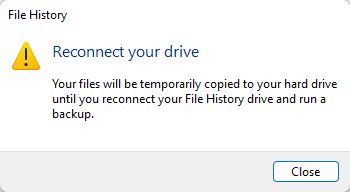
If for some reason, you disconnect the external hard drive, once you open File History, you’ll see a message letting you know Windows can’t find the previous drive. Makes sense.
If you choose to run a manual File History backup at this point, with the drive disconnected, you’ll see a message letting you know the backup contents will be saved on one of the local hard drives.
So, how do you reconnect a disconnected File History Drive?
- First, plug the drive back into your computer.
- Wait for it to be recognized by Windows.
- Click the refresh button next to the address bar in File History.
The drive will be reconnected automatically. No need to do anything else.
Once you reconnect the drive all temporary backups will be moved automatically to the File History Drive.
How Do I Change the File History Drive Used for Backups
Let’s say you have no space left on the File History drive, or you just want to save new backups to another drive, so you can keep a much bigger archive if that’s something your work requires.
1. Open the File History Control Panel app again.
2. Click on the Select drive link in the left menu.
3. In the next windows select the desired drive and confirm with OK. Network locations will not be detected, except the current location, so you’ll have to use the Add network location button to select a NAS folder or another network share.
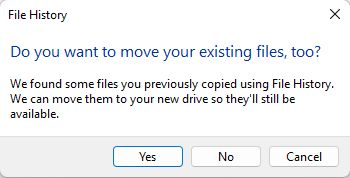
4. You will be prompted to move the existing File History archive to the new drive.
5. If you select a drive that contains older File History backups you will get this warning menu.
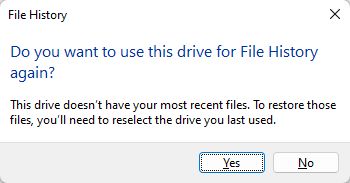
Windows lets you know that you won’t be able to restore the most recent backup. That’s OK because you can reselect the other history drive anytime you need to restore files from it.
Can I Connect a File History Drive with Backups From Another Computer? What Happens?
I used the same network location during this tutorial from my Windows 10 and Windows 11 VMs. I’m lazy I guess, so the backups all went into the same folder.
When I reconnected the drive and selected it as the desired File History drive the Select Drive window showed a new list at the bottom, which let me know that there are two different computers backed up in the same location.
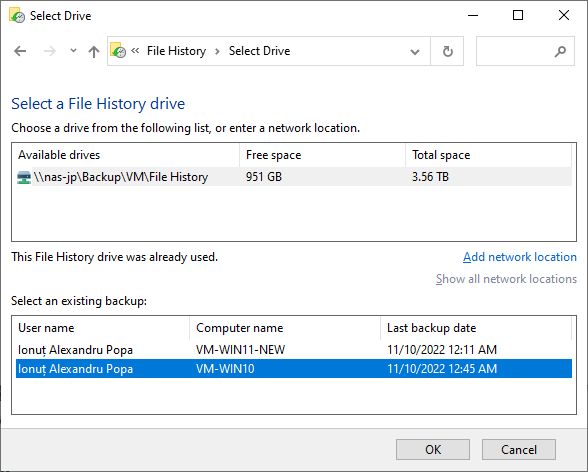
It seems you are able to select which backup archive to use. This way you could move user files from one machine to another. You must restore them after connecting the drive, of course, but it’s possible.
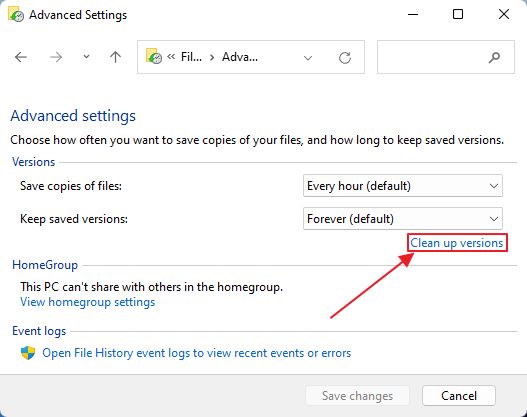
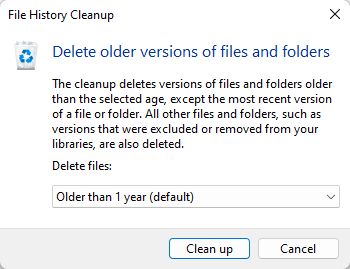
How do I Clean Up File History Versions to Free Up Space?
If at some point you need to free up space on your File History disk there’s a way to do that.
1. Open the File History app.
2. Click on the Advanced settings menu entry.
3. Under the schedule option there’s a Clean up versions link. Click to open an options menu.
4. By default, the last year of File History backups will be erased if you click on Clean up. You can choose to erase fewer versions or all of them. It’s entirely up to you.
How to Turn Off File History in Windows?
What if you wish to turn off File History, or pause for a moment? There’s a Turn Off button directly in the main window.
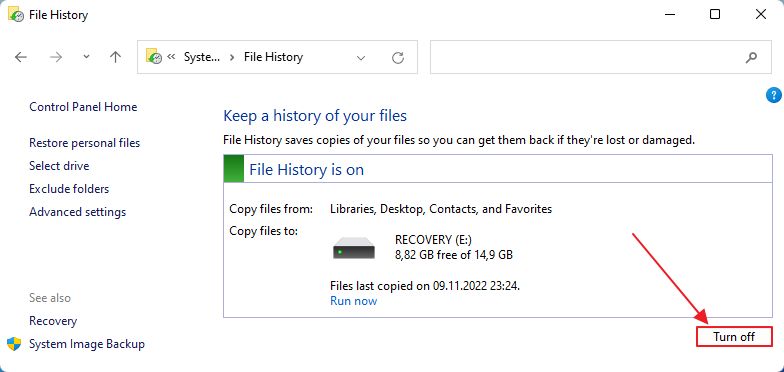
This will stop periodic backups but will keep your settings, so you can enable the functionality back again at any time. Just check those pesky Advanced settings options again, to be sure backups are saved at the correct intervals.
What If I Get the “File History doesn’t recognize this drive” Error Message?
This error happens if you reconnect a previously used drive where the File History folder contents were erased. Windows knows this was a History Drive, but since it can’t find any backups you’ll get this notice.
What do you do next?
- You click on Select another drive link.
- Select the same drive again. Network locations will not be relisted, you need to use the Add network location wizard again and select the same network folder.
- Click OK.
- In the “Do you want to move your existing files, too?” popup select No. Selecting Yes will throw another error, but you can start over.
Windows File History vs Windows Backup and Restore
If you’ve read our Backup and Restore article you may wonder why use File History at all since you can restore specific files from a Backup and Restore archive too?
The only advantage I see for File History is that you can quickly restore a single file from File Explorer. This is important for some people, I’m sure.
Other than that I much prefer the Backup and Restore utility, especially since it can also do scheduled backups. You can also fine-tune which folders are saved. Plus, it does a much better job of managing space, since it does incremental saving of only what data has changed between two consecutive backups.
If configured properly, Backup and Restore will also save a System Image, which you can use later to fully restore Windows in case something fails to the point Windows can’t boot anymore.
That’s all I had to say about using File History in Windows. I’m curious now to hear about your experience with Microsoft’s numerous backup utilities from Windows.