- Find out how to quickly back up Windows to a network drive which you can use later to recover the entire system of just important files.
- Windows is more stable than ever before, but bad things can still happen.
- There’s an easy way to set up Windows Backup and Restore to periodically save your system files to a remote network drive location.

I have a confession to make: I’m a bit obsessed with backing up my important data. I haven’t had any serious incidents that I can remember, but I know people who have and it’s not pretty.
That’s why I’m backing up my Windows computers periodically. In case something goes wrong and the system can’t boot I can quickly restore it to a previous state, even if that means data that is a few days old.
Files and projects I work on are always saved to the cloud, so there’s no danger (or little danger) of losing any work progress.
You can lose a ton of time and money if you don’t back up regularly. That’s why I’m going to dedicate a few articles here on BinaryFork to backups.
Today I’m going to show you how to set up Windows Backup and Restore, a small utility included in Windows so that you can copy your system data and important files and folders to a network drive on a schedule.
This way you can restore your system in case it fails to boot or restore specific files and folders to a previous state if needed.
I find Backup and Restore a more refined version of the File History functionality.
CONTENTS
Why Backup Windows to a Network Drive?
Well, that’s what NAS devices are used for by most people, even if a NAS can do a lot more.
Secondly, and probably the most important motive: if you back up your system to the same physical drive it’s not really a backup. A failing disk will erase all chances to restore your system to a working state.
Even Windows will issue a warning in case you’re trying to back up to the same drive where Windows is installed.
There’s a lot of debate in the tech community about what, how often, and where to back up important data, so don’t expect this guide to cover you in any situation.
I’ll just show you an easier, more convenient, and a bit safer way to back up Windows using the functionality already present in Microsoft’s operating system. No need for third-party software.
How to Set up a Schedule for Windows Backup to a NAS Location
This guide will let you periodically save your system data to a NAS. We’ll add other in-depth guides on how to recover the entire system of just specific files and folders from these backups.
This guide will only cover how to set up Windows Backup and Restore, the utility that dates back to Windows 7, but it is still available in Control Panel in Windows 10 and Windows 11.
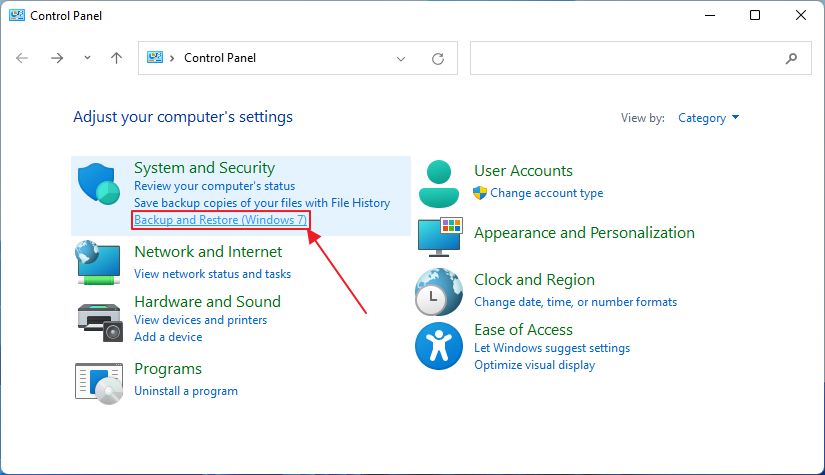
1. Open the Start menu (Win key).
2. Type Control Panel and open the first result.
3. In the System and Security section click on Backup and Restore (Windows 7).
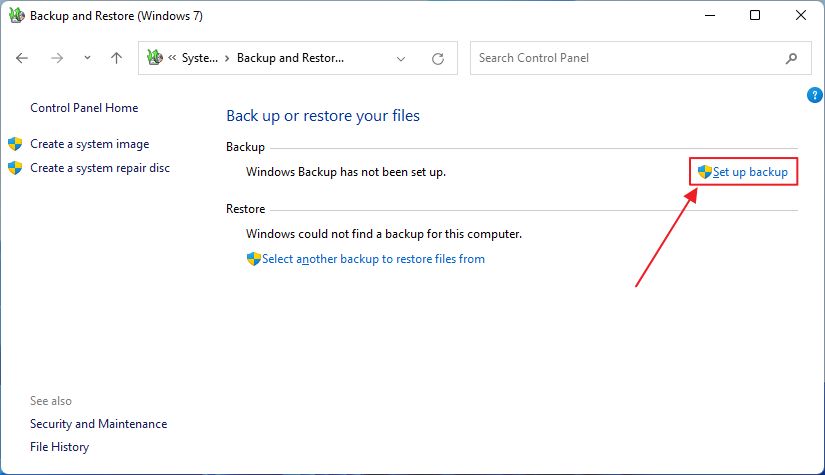
4. This will open the Backup and Restore window. If you’ve set up a previous backup schedule you can see the details here. If not, you will see the screen below. Click on Set up backup.
5. It takes a few moments for the following window to show up.
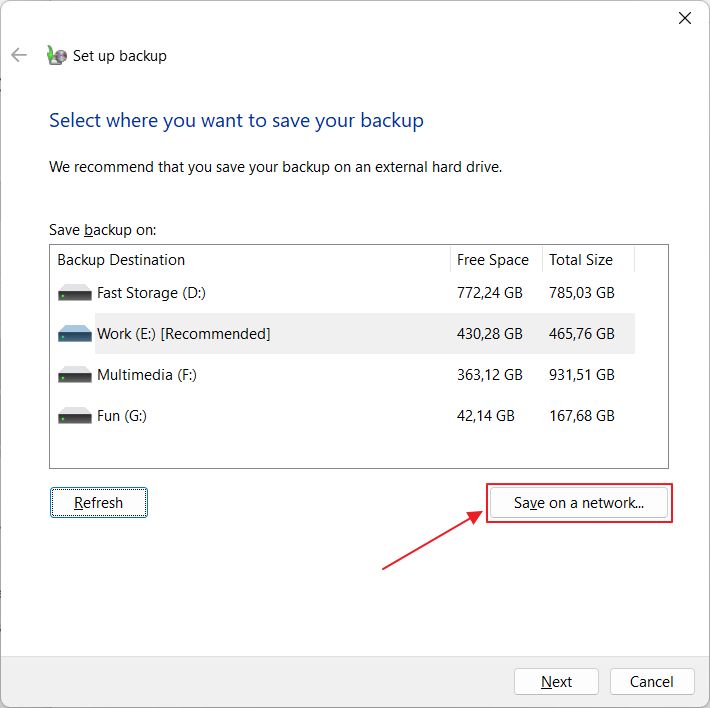
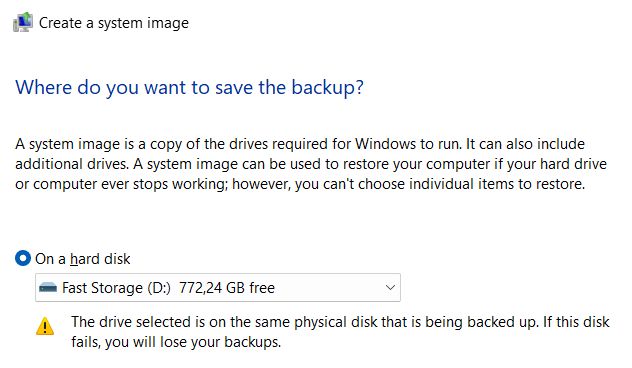
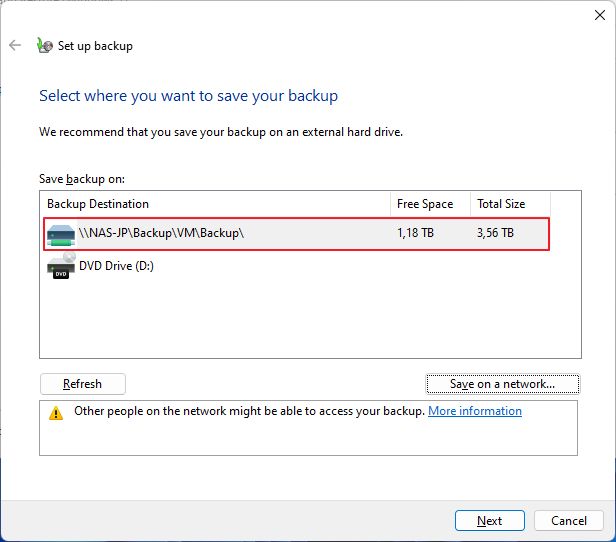
You can choose to save to another local partition. The list will not show the system partition, C:\, as expected. Since we will be saving to a NAS, click on the Save on a network… button.
Another option that I can recommend is mapping your network drive first, so that it shows up as a separate partition (local disk).
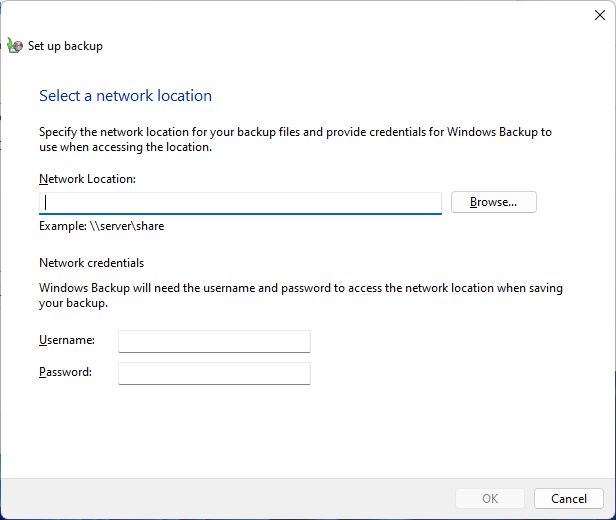
6. In the new window you will need to browse for the exact folder on your NAS where you will save the periodic backups. Click on Browse…
7. Wait for the Network to detect all devices you can save to. It doesn’t have to be a NAS, as you can save to another computer with a Windows shared folder, but if you do, ensure the computer is turned on when Windows Backup needs to run its schedule.
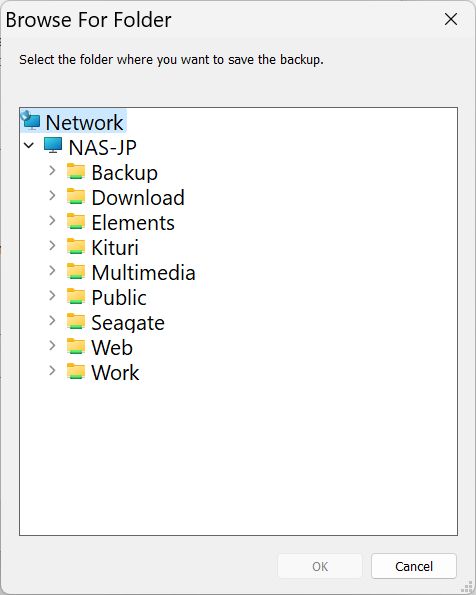
Select a valid folder and then the OK button will become active. Click OK to continue.
8. The previous window will now populate the Network Location field with the selected folder path.
Note: you can enter the path manually, thus skipping the last two steps.
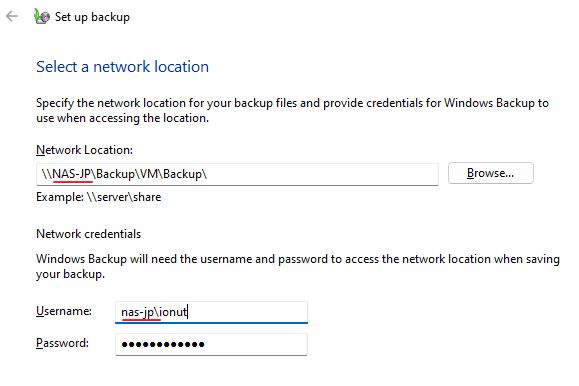
Below the location, you’ll see two fields, for username and password, which need to be filled correctly for password-protected network shares, or else the backup can’t be saved to the desired location. Learn how to turn password protection off in Windows, if you want to.
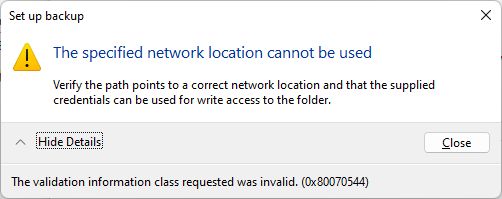
Important: If you get the error 0x80070544 it means you didn’t add the network drive device name in front of the username, followed by backslash. Weird, undocumented, but definitely necessary.
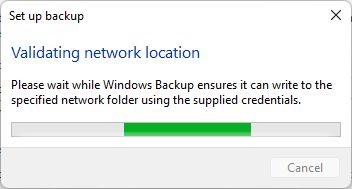
9. The location and credentials will now be validated.
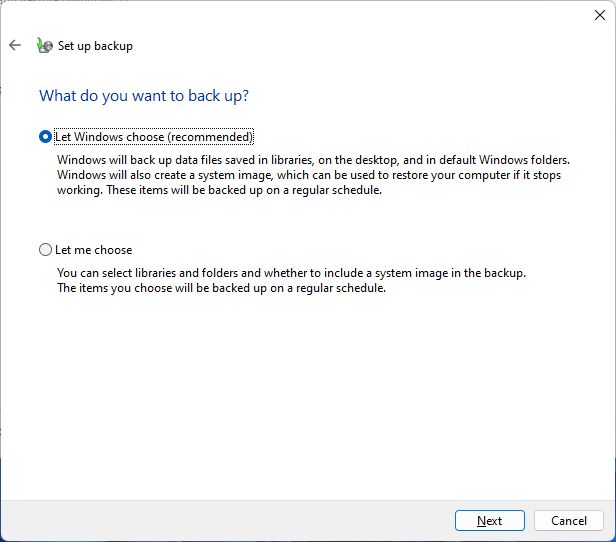
If everything checks out you will see this popup. Here you have to specify what data to back up regularly.
- Let Windows choose – will create a system image plus your desktop files and all user folders.
- Let me choose – is what I would use, so that I could specify also other important folders to back up.
10. You will need to confirm again the backup location. The previous selection is pre-selected. Click Next to continue.
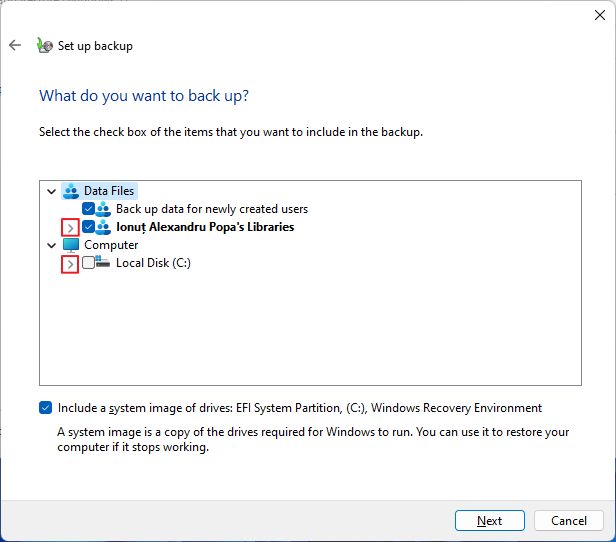
11. If you pick option number two you’ll see these options:
- Data files – future user folders you create plus a list of all current system users. You can choose entire users or pick specific folders.
- Computer – list of all system drives. You can pick entire drivers or pick specific folders to back up.
- Include a system image – I highly recommend you check this so that your system can be recovered if it won’t boot. Backup and Restore will only save the last version of the system image, even if you create it manually, so you won’t be able to recover to an older state, just the most recent one (learn how to do so here).
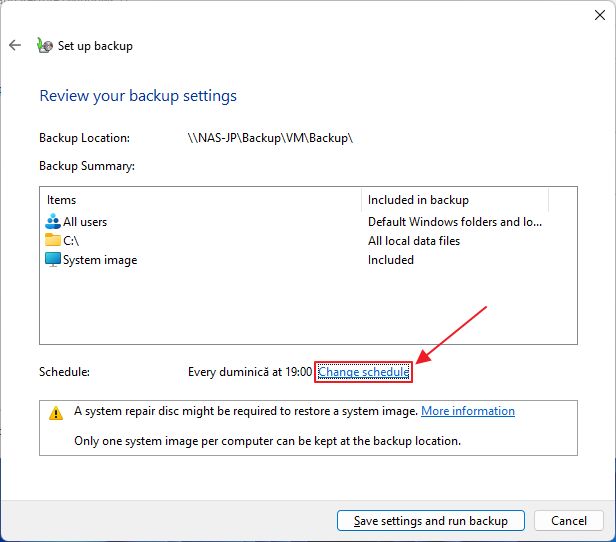
12. A summary of the settings will show up. Here you can click on Change schedule to edit the already set backup periodicity.
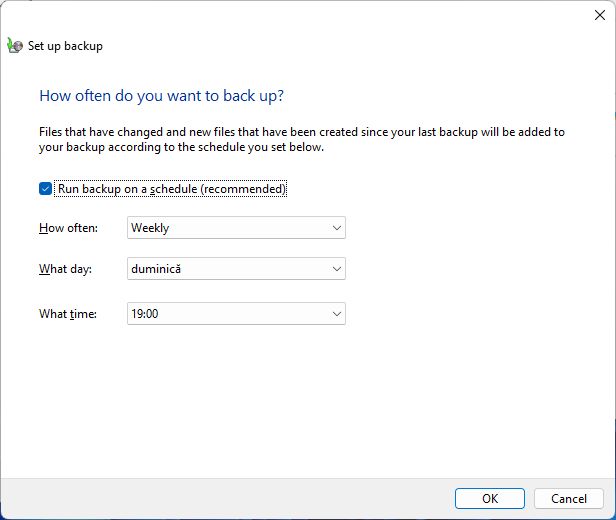
13. You can change between daily, weekly, and monthly. If you’re worried about occupied space don’t be, because only new files will be added to the backup. So this is an incremental backup. Clicking OK will start the first backup.
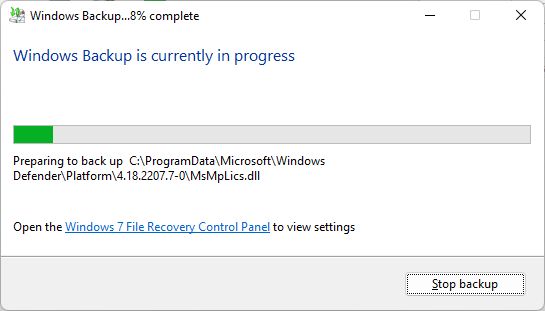
14. Backup and Restore will now run. Time for a coffee break.
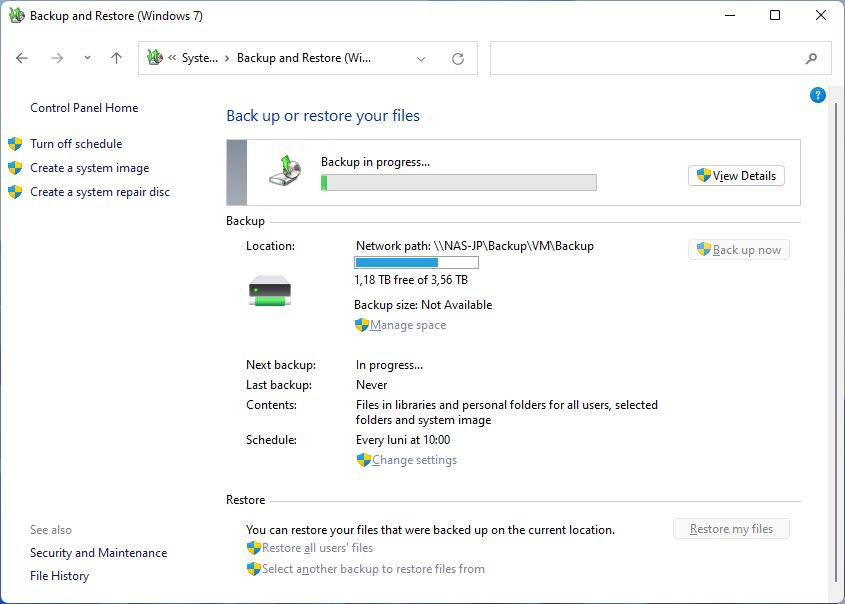
You can click on View Details to see the progress if you’re impatient.
You can continue working while the backup runs. You can even close the Backup and Restore window. Depending on your system configuration you may feel a slowdown, as the app will take up a few resources when it runs.
At this point, everything is set up and you won’t need to do anything else.
Manage Windows Backup Occupied Space and Delete Previous Backups
What Backup and Restore utility is missing is the ability to set a maximum quota for backups so that it won’t fill the entire network drive.
Fortunately, you can still manage existing backups and delete data manually. Here’s how:
1. Open Backup and Restore again from Control Panel.
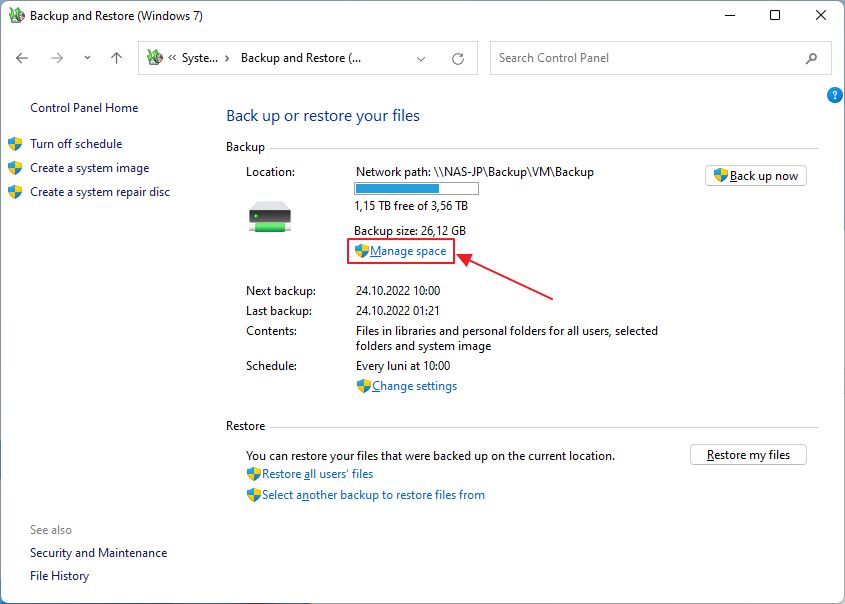
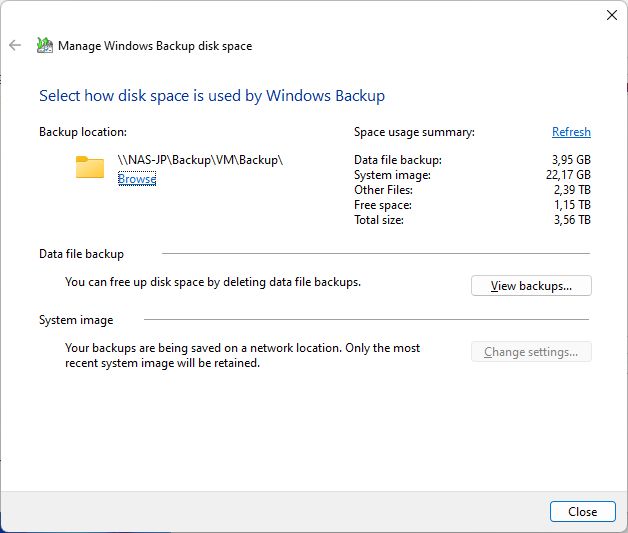
2. You will see a summary of backup size, the capacity of the same location (network drive in our case), and remaining free space. Click on Manage space.
3. A mode retailed view will be presented. Click on View backups…
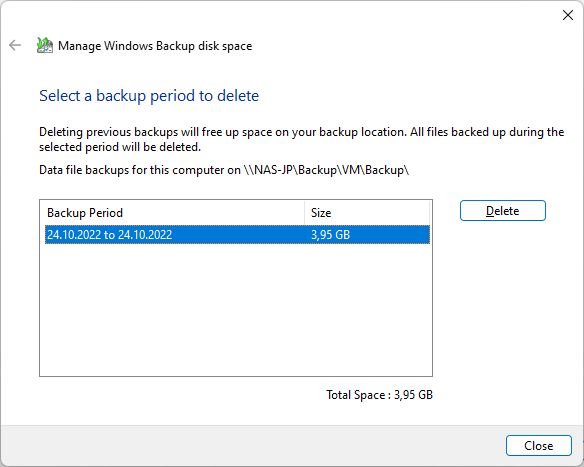
4. Another popup will show a list of all backups and their size. Select the older ones, one by one, and click Delete. Confirm to proceed. Close this window when you’re done.
Note: you will not be able to delete the system image this way, only user files, and other selected folders. Don’t worry, I have you covered so read on:
How to Delete Windows Backup System Image to Free Up Space
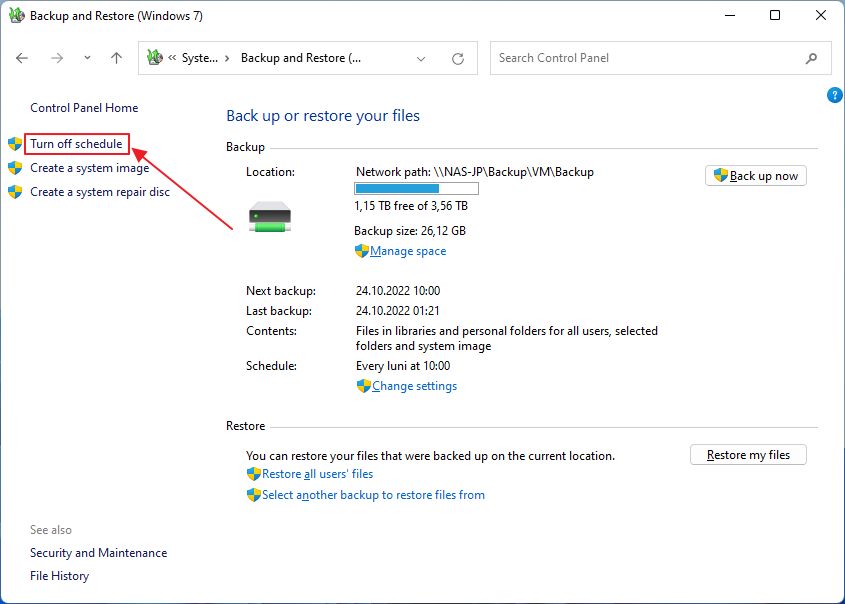
If you want to delete the Windows Backup and Restore System Image you need to first disable the Scheduled backup.
1. To do so head back to the main page of Backup and Restore and click on Turn off schedule.
2. Now click again on Manage space.
3. The same window will show up as in the previous guide, but now the System image section with the Change settings… button is not grayed out. Click to open another popup.
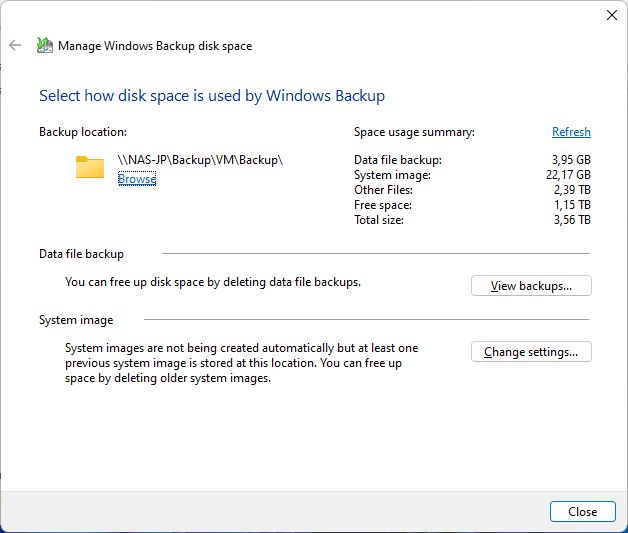
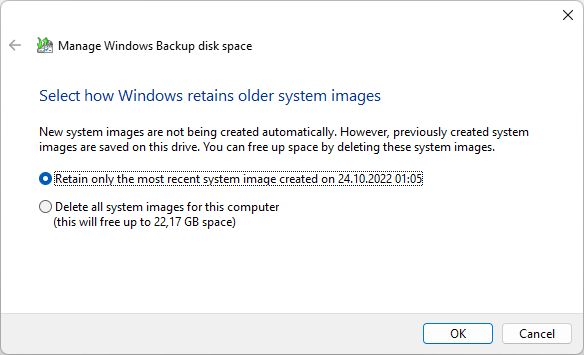
4. Here you can choose to retain the most recent system image from the time Backup and Restore last run.
If you still want to clear space, click on Delete all system images from this computer. There’s a note on how much space you can save.
Select and confirm with OK to proceed.
Can You Turn Off Windows Backup and Restore?
Well, kind of. What I mean by that is you can’t go back to “Windows Backup has not been set up” for some reason. But what you can do to disable Backup and Restore completely in Windows is:
- Turn off the schedule.
- Delete file backups.
- Delete the system image.
That’s it, now you know how you set up Windows Backup and Restore to save your important system data to a network drive.
Complementary read: How to backup a network drive contents in Windows
We’ll follow up this article with a bunch of other guides that will show you how to use Windows Backup to keep your data safe so make sure you’re subscribed to get notified when these articles are published.
How to Backup a Network Drive in Windows: Manual and Automated Guide
Update: we detailed how to create a Recovery Drive so you can boot Windows into RE (Recovery Environment).
Until then, we’re waiting for your feedback and comments.