- Most accessibility tools in Windows can be accessed using keyboard shortcuts.
- It’s more convenient to use keyboard shortcuts to turn accessibility features on than to go to Settings > Accessibility each time.
- This keyboard shortcuts list also covers shortcuts that control the accessibility tools’ functionality.

Assistive technologies are not just meant for people with disabilities, as some of the options included in Windows can help you do things faster, see better, or facilitate using specific types of devices and input methods.
I have covered them here on BinaryFork extensively. In this article I’m going to make a list of the most important keyboard shortcuts that turn on or off and control the functionality of the Windows accessibility tools.
How to properly take screenshots in Windows with no extra software
CONTENTS
Magnifier
The magnifier is a pretty straightforward accessibility utility. It’s basically a lens that lets you magnify parts of the screen (or the entire screen). Additional functionalities include the ability to read text at or near the cursor.
| Win + Plus (+) | Turn on Magnifier |
| Win + Esc | Turn off Magnifier |
| Win + Plus (+) / Win + Minus (-) | Zoom in/Zoom Out |
| Ctrl + Alt + scrool wheel | Zoom in/Zoom Out |
| Switch mode to Lens | Ctrl + Alt + L |
| Switch mode to Docked | Ctrl + Alt + D |
| Switch mode to Fullscreen | Ctrl + Alt + F |
| Reading shortcut + Enter | Start/Pause/Resume reading |
| Press any key | Stop reading |
| Reading shortcut + left click | Read from mouse pointer |
| Reading shortcut + H | Read previous sentence |
| Reading shortcut + K | Read next sentence |
The Reading shortcut key is set from Settings > Accessibility > Magnifier. There are four options to choose from:
- Ctrl + Alt
- Caps Lock
- Insert
- Caps Lock or Insert
For more details about the Maginifier read the dedicated article.
Color filters
The Color filters tool will apply one of the six color filters over everything that is displayed on screen. The options cover vision problems such as deuteranopia, protanopia, tritanopia, and are meant to make everything easier to see.
There is only one Color filters keyboard shortcut: Win + Ctrl + C.
Pressing this combination will turn on the preselected color filter on and off. It will not cycle through the existing filters. These have to be selected in advance from Settings > Accessibility > Color filters.
For more details about Color filters read the dedicated article.
High contrast themes
Contrast themes achieve the same goal of making things easier to read on screen, but they do it in a different way from the Color filters. The colors are not changed, but Windows interface elements are displayed in contrasting colors.
There is also just one High contrast keyboard shortcut: Left Alt + Left Shift + Print Screen.
Same as the Color filters, this shortcut will switch between the current Windows theme and one of the four preselected High contrast themes. To preselect a contrast theme, go to Settings > Accessibility > Contrast themes.
For more details about Color filters read the dedicated article.
Narrator
The narrator utility will read what’s happening on screen, including web pages, documents, or other files with text content. Narrator cannot describe images or videos.
| Win + Ctrl + Enter | Turn Narrator on or off |
| Narrator key + V | Change verbosity level |
| Narrator key + Ctrl + D | Narrate image description or page title |
| Narrator key + S (press twice) | Narrate popular links |
| Narrator key + Alt + F | Send feedback to Microsoft |
The Narrator shortcut key is set from Settings > Accessibility > Narrator. There are three options to choose from:
- Caps Lock
- Insert
- Caps Lock or Insert
For more details about Color filters read the dedicated article.
Live captions
This is one of the cool new additions to Windows 11: the ability to display automatic captions for audio and video.
There is just one Live captions keyboard shortcut: Win + Ctrl + L.
Pressing this keyboard shortcut will toggle the live caption window on and off. Changes to the captioning appearance can be done from the caption window and from Settings > Accessibility > Captions.
Windows Speech Recognition, Voice Access, and Voice typing
I’ll mention this briefly for one reason: in Windows 11 this functionality will soon be replaced with Voice access, which we’ve detailed already.
There is just one keyboard shortcut for Windows Speech Recognition: Win + Ctrl + S.
This shortcut will turn on or off Windows Speech Recognition.
I suspect this keyboard shortcut will be allocated to Voice Access once Windows Speech Recognition is retired for good. Voice Access only has two shortcuts currently:
| Alt + Shift + C | Switches between listening and mic off |
| Alt + Shift + B | Switches between listening and sleep (if mic is not off) |
If you’re only interested in dictating text into document then you want Voice typing, already explained in detail.
Here’s the keyboard shortcut to turn Voice typing on and off: Win + H.
On-screen keyboard, Sticky keys, Filter keys
There are a few accessibility options linked to the keyboard use. I have grouped them together in one table:
| Win + Ctrl + O | Toggle the On-screen keyboard on and off |
| Press Shift 5 times | Turn on Sticky keys |
| Hold Shift for 8 seconds | Turn on Filter keys |
As a quick reminder, Sticky keys will allow you to perform multiple key shortcut combinations one key at a time, while Filter keys will make sure accidental keyboard presses are discarded. They are all explained in detail in this other article.
Remember that in order to turn off Sticky keys and Filter keys once enabled you will have to navigate to Settings > Accessibility > Keyboard.
Use quick action toggles if you don’t like shortcuts
If you find it difficult to remember keyboard shortcuts the most important Windows accessibility tools can be activated from the quick toggles found in the quick action system tray menu.
1. First, open the quick toggles menu by pressing Win + A or by clicking on the network/volume icons.
2. Click on the Accessibility icon. You may have to add it first (use the small pencil icon at to bottom-right corner of this panel).
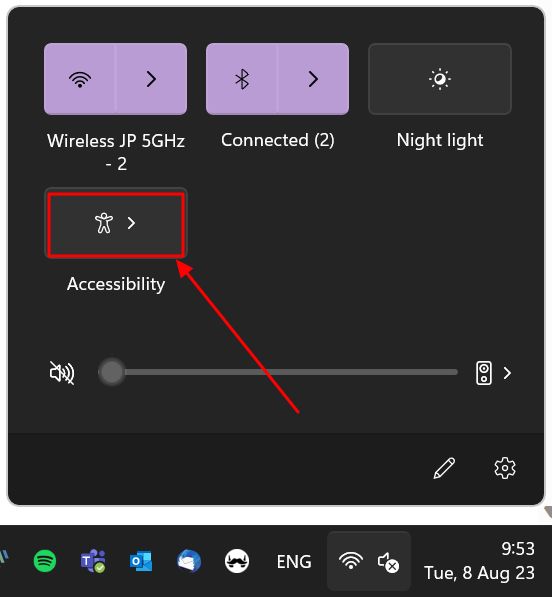
3. Now toogle the desired utility on and off from the second panel.
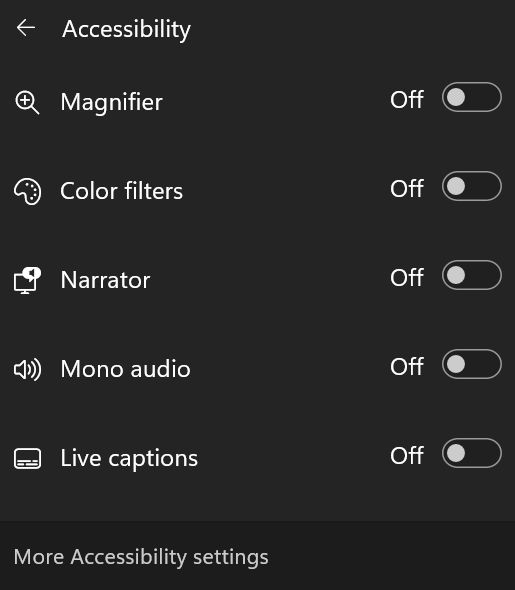
It’s one way to do it, but this menu doesn’t cover all utilities and their settings. So, if you find yourself using specific accessibility tools often it pays dividends to learn the main keyboard shortcuts. This is always my recommendation.
Night Light: the blue light eye care feature you should use in Windows
