- If you need more disk space you can delete all Restore Points in Windows with a few clicks.
- Keep in mind that you need other backup methods in place if you want to be able to restore Windows to a previous state.
- Restore Points can be deleted for each drive or partition, but the better option, if disk space is low, is to modify the maximum usage to allow for System Protection.

Disk space is precious, especially on the Windows system partition if you didn’t allocate enough space during the initial installation of the operating system.
If you have enabled System Protection this feature will start taking up disk space, as you install programs and drivers, storing them in Restore Points which you can use later to go back to, in case something goes wrong.
If you really need that space and can’t get it by deleting something else, there’s the option to delete all restore points for each drive in your system. I’ll show you how to do it in the next section.
Delete All Restore Points in Windows: Step-by-Step Guide
First, you can’t just delete all restore points in Windows, for all drives at once. You will need to repeat this guide for each system drive or partition. I personally think this is a good thing, as you can control which drive individually. Let’s start:
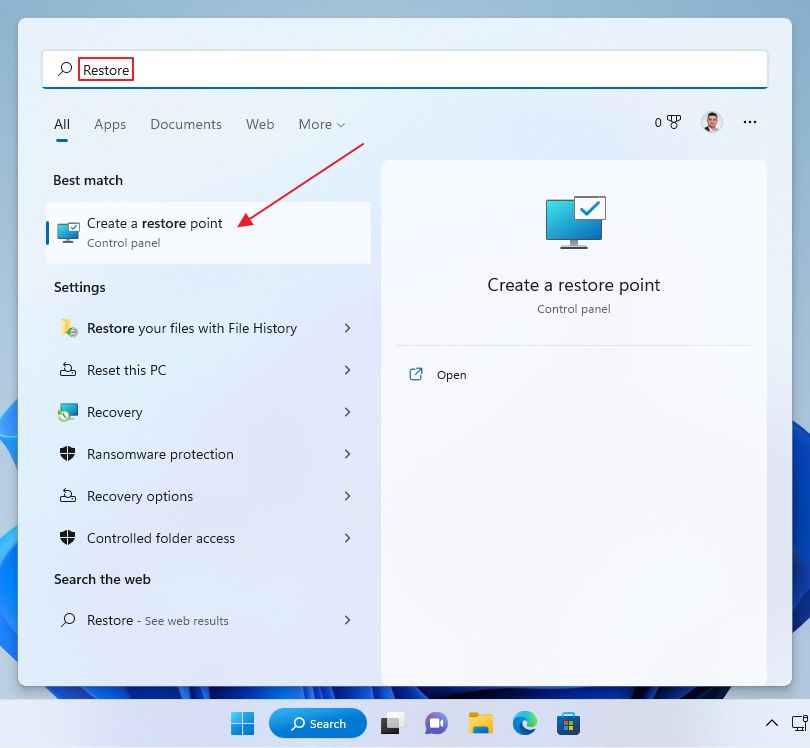
1. Press the Win key to open the Star menu and type Restore.
2. Open the option called Create a restore Point. Don’t worry, you will not create a manual restore point this way, but the option you’re looking for is found in the same place.
3. The System Properties utility will open with the System Protection tab selected. Here you will see a list of all your detected fixed drives and partitions. Look for the drives with Protection set to On.
If protection is not enabled then no restore points can be created for that drive.
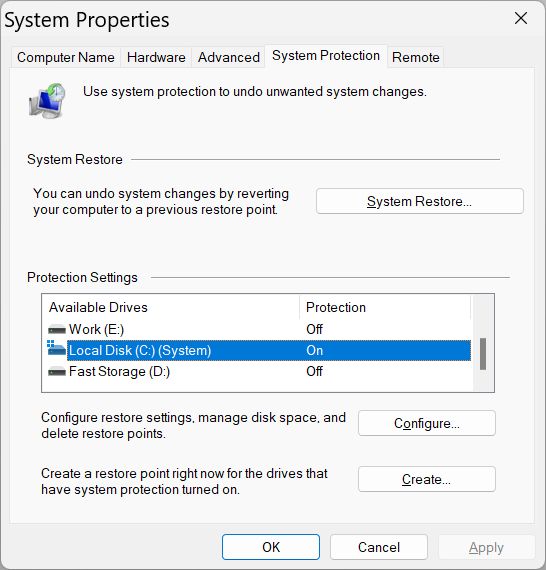
Select the drive you want to free up space for and press on the Configure… button.
4. At the bottom of the next window look for the Delete button next to the Delete all restore points from this drive label.
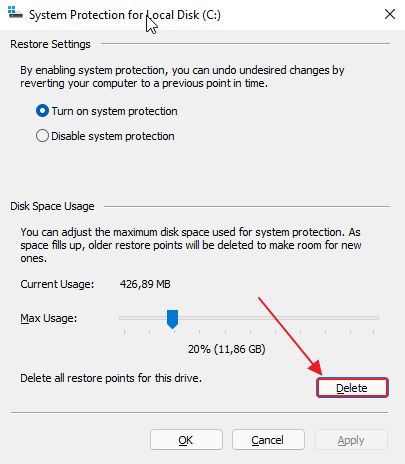
5. A warning message will be displayed before deleting anything. If you’re sure you want to delete all exiting Restore Points for the selected drive click on Continue.
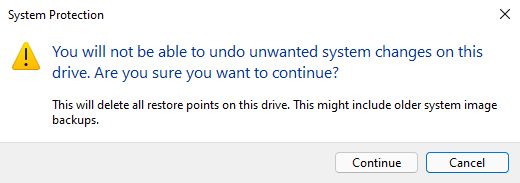
The window will refresh and you should see that Current Usage is now 0 bytes.
If you disable system protection Windows will stop creating Restore Points when you install, uninstall or update drivers.
If you keep System Protection On, new Restore Points will start filling up the drive again.
Instead of Deleting Restore Points Try Lowering Max Usage Allowed
Personally, I think the best option is to just lower the maximum disk space usage allowed.
Windows will automatically delete older Restore Points if the occupied disk space increases too much, so you don’t have to keep an eye on things.
How to do it? While you’re in the System Protection configure window, adjust the slider next to Max Usage. You will see in real time the maximum allowed disk space in gigabytes corresponding to the selected percentage.

If you still can’t spare precious disk space for Restore Points, you could set up a periodic backup to a network drive via the Backup and Restore utility or just create a System Image and refresh it from time to time.

How Long Does System Restore Take: Windows 10 vs Windows 11
Having no backup leaves you with little recovery options that will restore the state of the system.