- Here’s how you can fix Windows won’t start by using the advanced Recovery Environment options included in the operating system.
- Although Windows is much more stable than ever, critical crashes can still occur and can sometimes prevent your system from starting up again.
- If your computer starts in Recovery Mode you have quite a few system recovery options to fix problems.

I recently had a serious issue with one of my virtual machines. After a Windows Update that went wrong, the machine wouldn’t boot correctly. Normally, I would see this message, which informed me that Windows is rolling back changes because Something didn’t go as planned. No need to worry-undoing changes. please keep your computer on, then the machine would boot correctly.

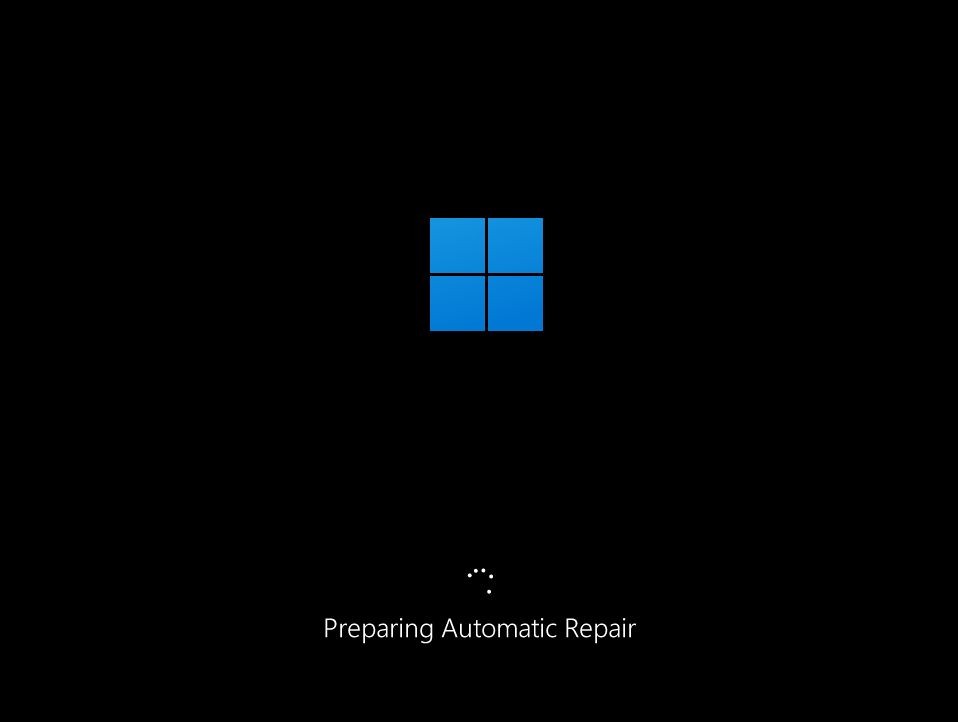
In my case, I could try applying the same update over and over again, failing each time, then Windows would recover and all was good. That was until I was greeted with this lovely Preparing Automatic Repair message.
This is a sign that Automatic Windows Recovery kicked in and it was trying to fix the issues that were preventing the computer from starting correctly. I wasn’t so lucky this time, and my machine wouldn’t start at all.
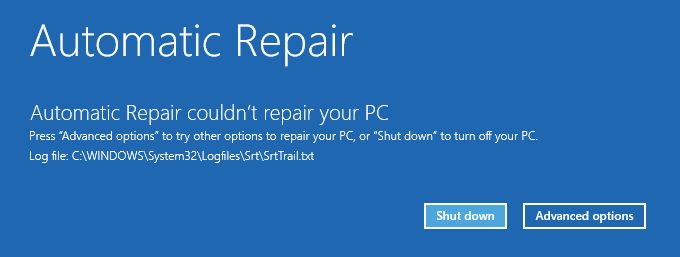
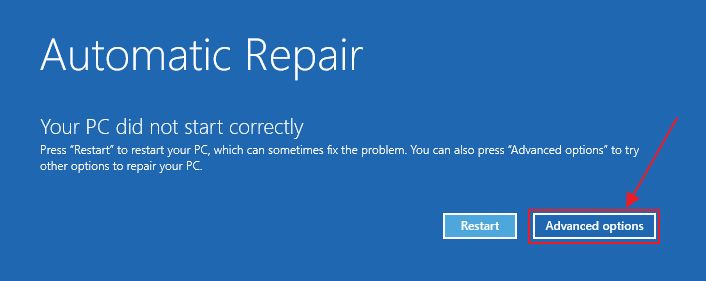
Automatic Repair failed every time and I was always left with these two options: Restart, hoping that this will fix issues (sometimes it does), and Advanced options, which we’re going to talk about in this article.
The scenario above is very convenient for illustrating this guide with a real scenario. It is not a once-in-a-blue-moon thing, mind you, as it happened quite a few times in the past, not just on VMs, but also on bare metal hardware.
It’s not a daily occurrence either, but it does happen, and the causes can be multiple, usually hard to diagnose, but somewhat easy to fix.
I hope this guide will help you fix your Windows won’t start issues so you can get back to work, or gaming, without having to completely reinstall Windows.
CONTENTS
- Why Windows Won’t Start: Possible Causes
- Try Start-up Repair to Fix Problems That Prevent Windows from Starting
- Windows Won’t Start After an Update: Fix by Uninstalling Quality or Feature Updates
- Run a System Integrity Scan From Command Prompt in Recovery Environment
- Use System Restore to Revert to a Previous Restore Point if Windows Can’t Boot
- Restore Windows to the Previous State from a Backup and Restore System Image
- Reset Windows PC While Keeping User Files and Settings
- Nuclear Option: Reinstall Windows on Top of the Existing Installation to Fix Boot Issues
- Use a Recovery Drive to Reinstall (Recover Windows) If PC Can’t Boot into Windows Recovery Environment Automatically
Why Windows Won’t Start: Possible Causes
Typical issues that will prevent Windows from starting include:
- Windows update does something it’s not supposed to do.
- Overclocking: you have pushed your hardware too far.
- You or a program somehow deleted important system files.
- Some system files got corrupted.
- A nasty hardware-software incompatibility.
- Driver-related issues.
- A recent BIOS update messed up something.
All the fixes below will involve the Windows RE (Recovery Environment). You’ll recognize it from the blue background, minimal icons, and white text.
Try Start-up Repair to Fix Problems That Prevent Windows from Starting
This is the first thing you should try if your computer will boot Windows into recovery mode directly.
1. Select the Troubleshoot – Reset your PC or see advanced options menu.
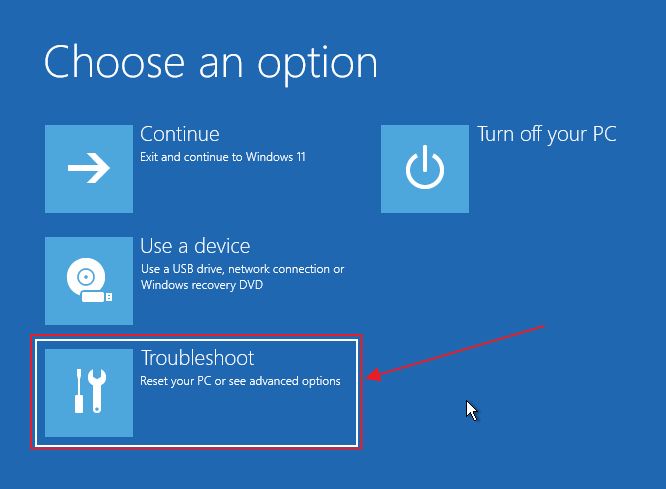
2. In the new menu select the Advanced options item.
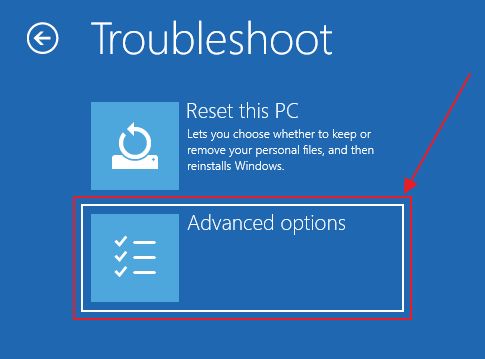
3. The Start-up Repair is the first option in this menu. Select to start the automatic diagnostic process
4. There is not much to do at this point other than wait for the diagnosis to finish, followed by a restart. If Windows boots correctly this time, you’re in the clear.

This option rarely works in my experience. Not much has changed from Windows 7 and 10, unfortunately, so keep your expectations in check.
If it doesn’t work for your scenario move to the next option:
Windows Won’t Start After an Update: Fix by Uninstalling Quality or Feature Updates
We’ve discussed how to uninstall updates from within Windows, but if the system doesn’t boot we don’t have this option. Instead, we’re going to use the Windows RE option:
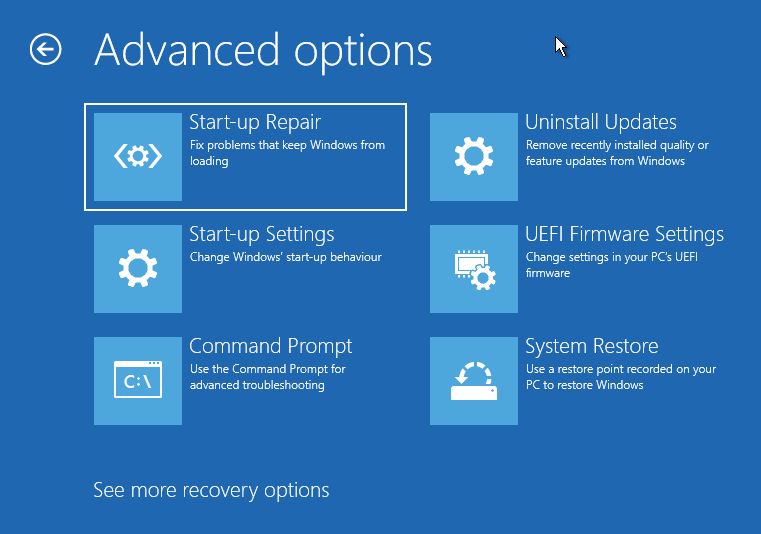
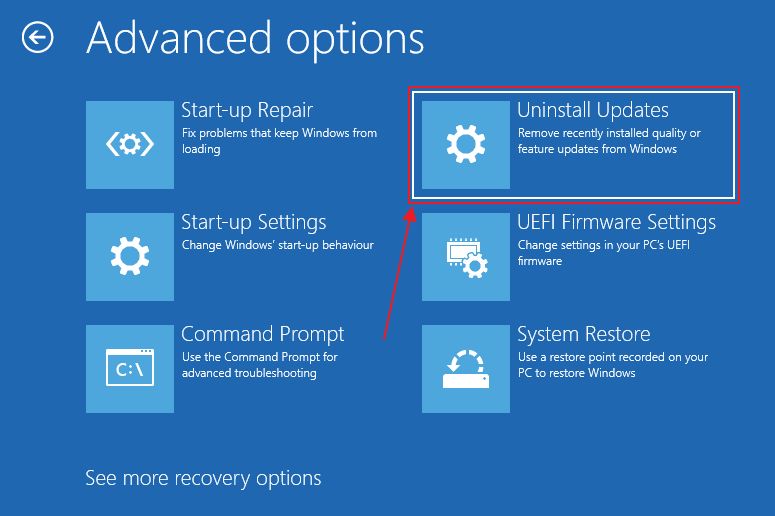
1. Go to Troubleshoot > Advanced options again.
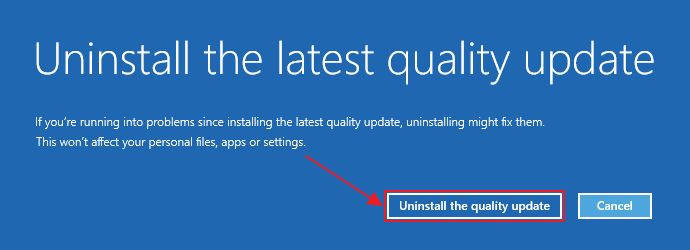
2. Select the Uninstall Updates option.
3. At this step you’ll see two options: uninstall a quality update or a feature update. You can’t select which updates to uninstall, as the system will automatically remove the last update of the type you have selected.
I suggest you use these options one by one and see which one works for you.
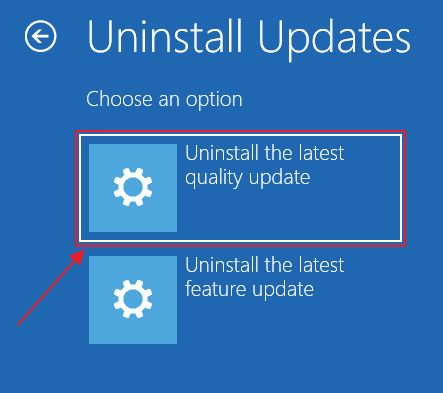
4. Confirm by pressing the Uninstall the quality update/Uninstall the feature update button and let Windows do its thing.


If the problem keeps happening after a successful recovery it may be a good idea to pause Windows updates temporarily until Microsoft fixes the core issue. Submitting a bug report could help if you’re not the patient type. It’s not a guarantee either that it will speed things up, but it’s worth a try.
Run a System Integrity Scan From Command Prompt in Recovery Environment
If the problem lies with some corrupt or removed system file then you could do a full scan using the Command Prompt. It’s one of the best CMD commands and can prove a lifesaver in this case.
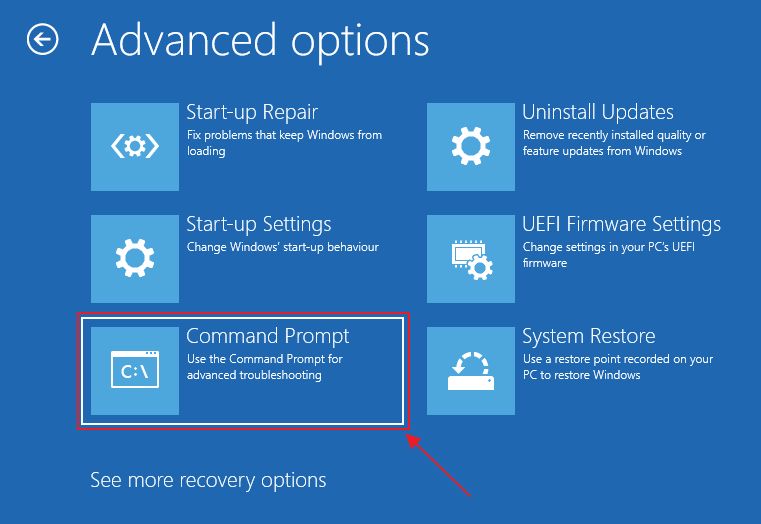
1. Navigate Windows RE to Troubleshoot > Advanced options.
2. Click on Command Prompt, which will launch the command shell.
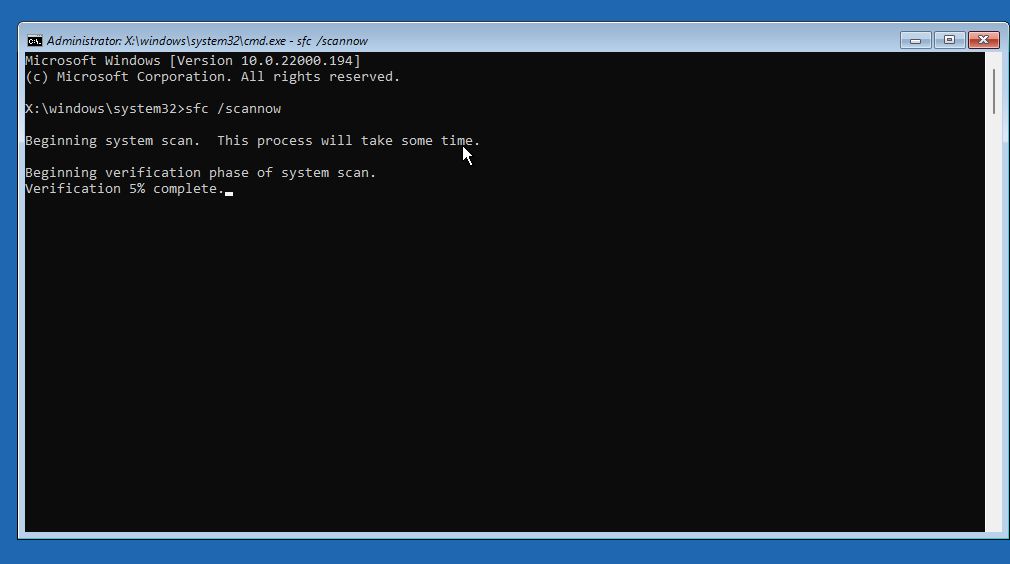
3. Once here type the following command:
sfc /scannowPress Enter to execute. It will take some time for the system integrity check to verify all files.
4. Hopefully, you’ll have better luck than I did. I’ve received a cryptic message saying that Windows Resource Protection could not perform the requested operation.
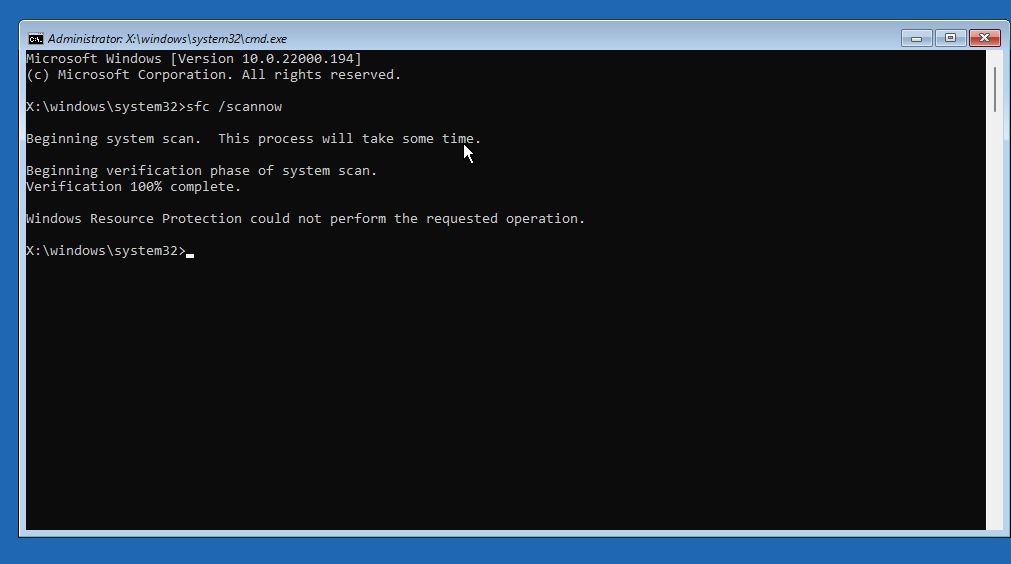
Tough luck. So let’s see what other options we have at our disposal:
Use System Restore to Revert to a Previous Restore Point if Windows Can’t Boot
This option is an excellent one, but there’s one very important caveat.
If you didn’t enable System Protection on your main Windows partition and didn’t create a manual restore point this solution won’t work, because there isn’t any previous restore point to restore to. This has to be done before any boot problems occur.
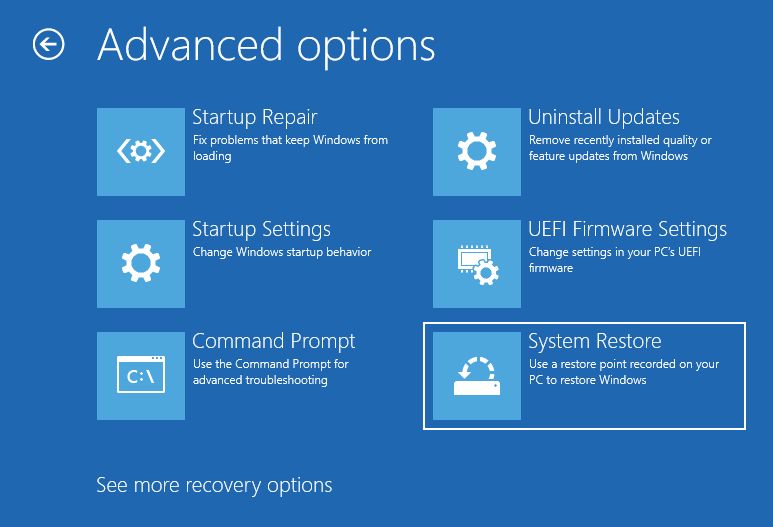
1. Select again Troubleshoot > Advanced options.
2. Now select the System Restore option.
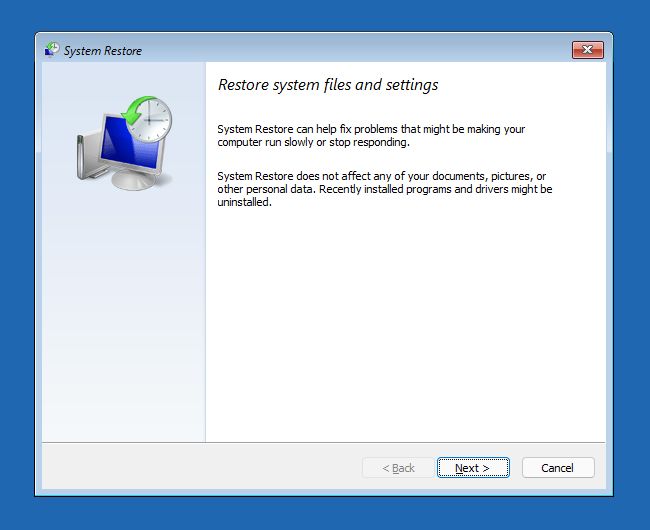
3. The System Restore app will start. The first screen is just an explainer of what it does. Click Next to continue.
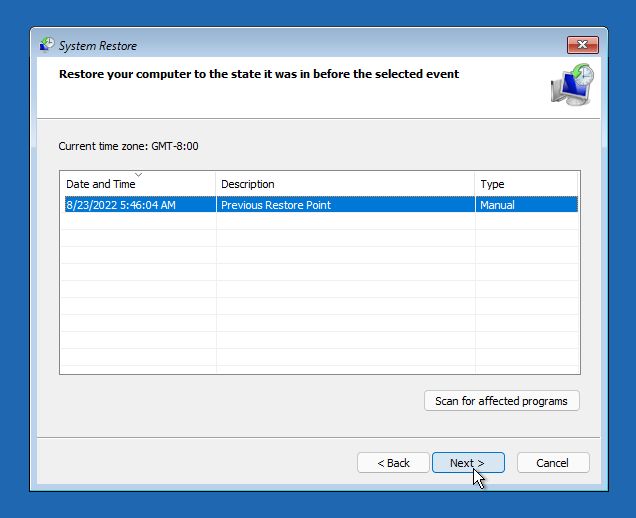
4. Now you should see a list of all restore points saved on your computer. If you want to see what’s changed between the current state of the system and its state at the time the restore point was made click on the Scan for affected programs button, but it’s not necessary to do so.
5. The next screen is a confirmation of what’s going to happen.
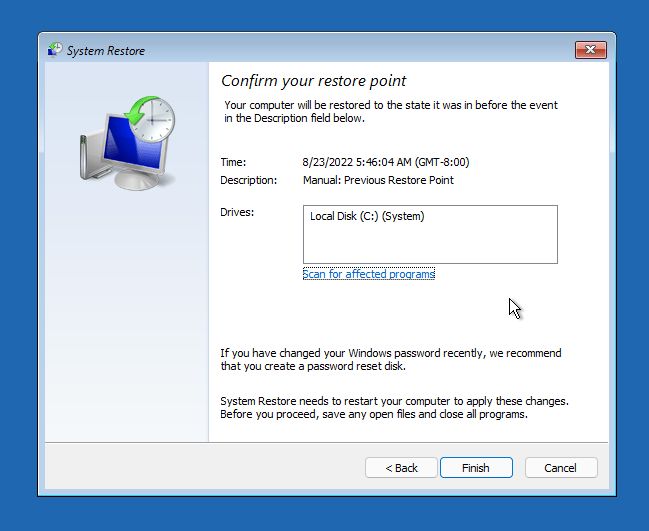
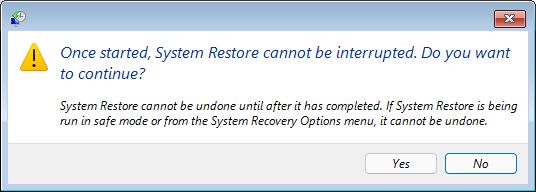
6. Another warning will let you know that once you start a System Restore, you can’t interrupt or undo this action. Confirm with Yes.
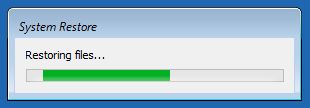
7. Let the recovery process finish. At this point, the system will restart and hopefully, you’ll see the login screen instead of the blue Recovery Environment.
Restore Windows to the Previous State from a Backup and Restore System Image
If you’ve set up Backup and Restore previously to a network location (we have a complete article on how to do it), local disk, or external hard drive you get a much better option which will restore Windows exactly to how it was at a previous date, aka the date you built the System Image.
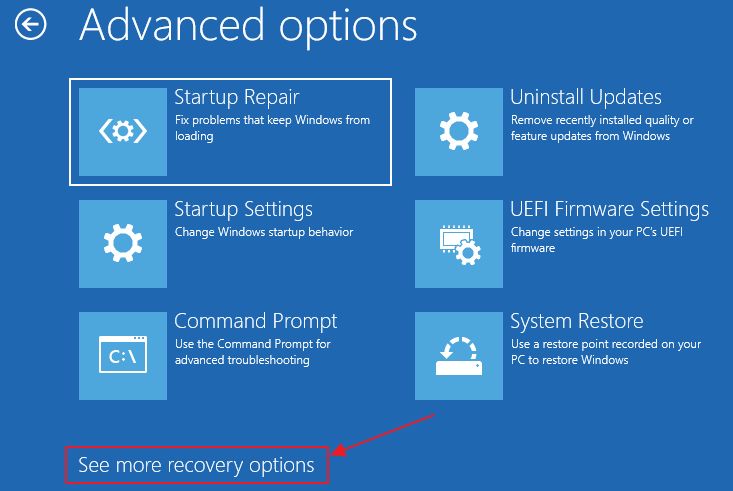
1. Select Troubleshoot, then go to Advanced options.
2. Note at the bottom another link See more recovery options. Click on it:
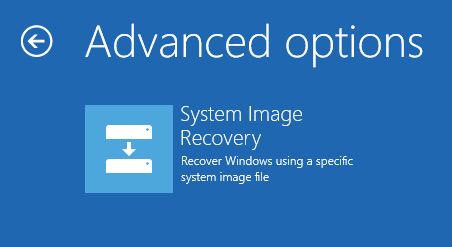
3. Click on the only option: System Image Recovery.
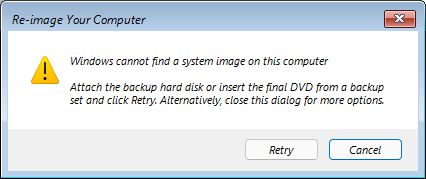
4. You will see a disconcerting message that no image was found on this computer (if you’ve set the backup to a network drive). Click on Cancel to get other system recovery options.
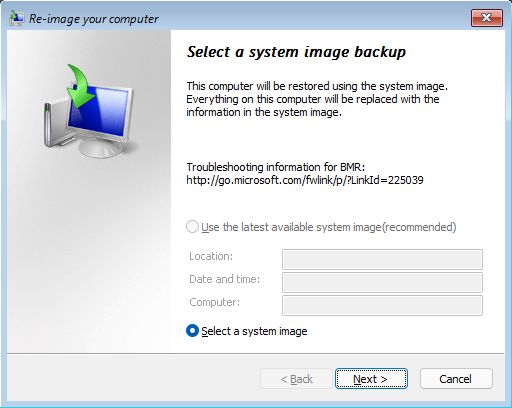
5. At this step click Next, as the Select a system image option is already selected.
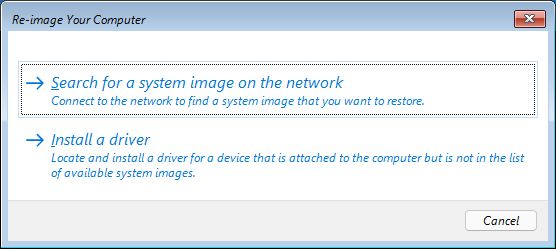
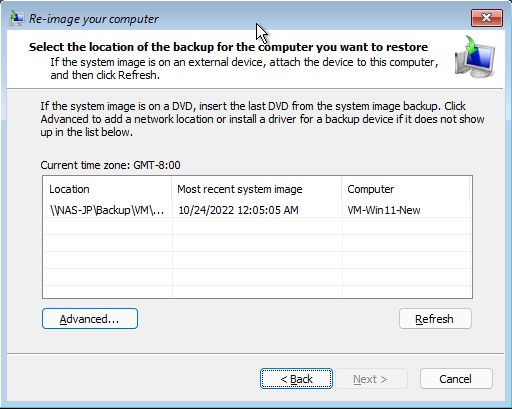
6. In the new windows click the Advanced… button to select the network location of your backup.

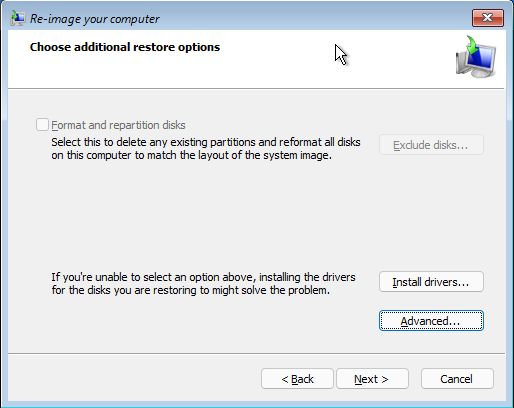
7. Confirm you want to browse a network location. Alternatively, if you attached an external disk that’s not recognized by the Windows Recovery environment here’s where you can add the required drivers.
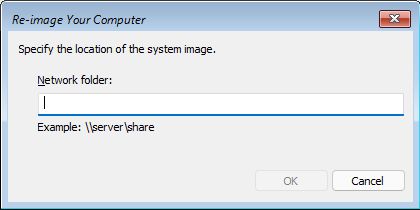
8. Since the Recovery environment is very basic, you will need to input the location manually.
9. You will be asked for credentials if the backup location is password protected.
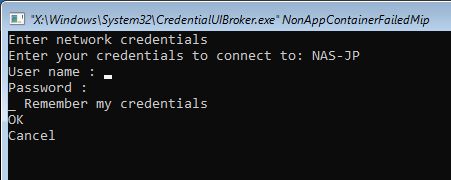
Hint: Navigate between items with TAB (Shift + TAB if you need to go back).
Important: don’t forget to add the network device name before the username. Ex: use network_device\username or else it won’t work.
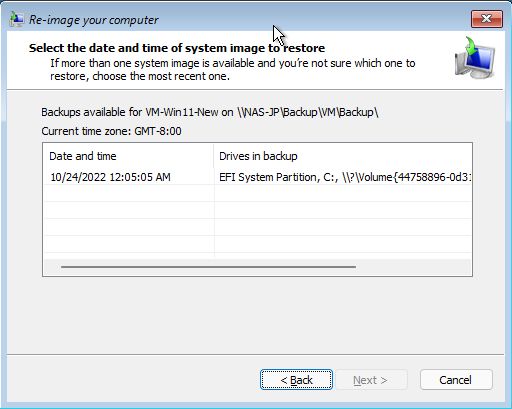
10. The network location will now show up, together with the date of the most recent backup, which you will select and use for restore proposes.
11. If more than one backup is present, select the one you want to recover to and click Next.
12. Another confirmation window. Click Next to move forward.
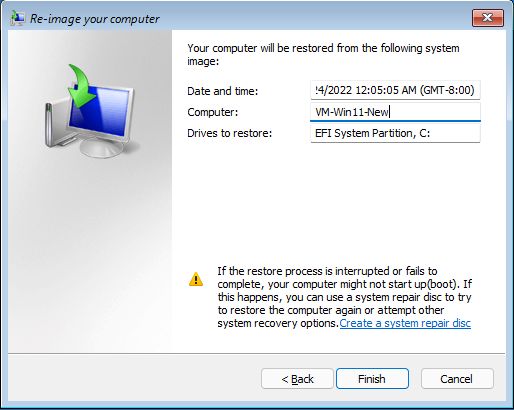
13. This is the final confirmation, I promise. Hit Finish to begin the actual image recovery process.
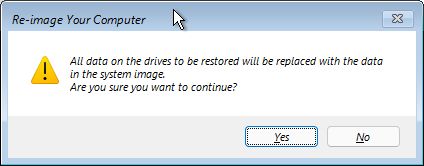
14. Kidding! One more little popup.
15. All you have to do now is wait patiently for the system recovery to finish, aka the Re-imagine Your Computer process.
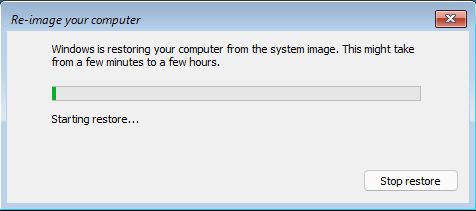
Your Windows machine should be up and running in no time.
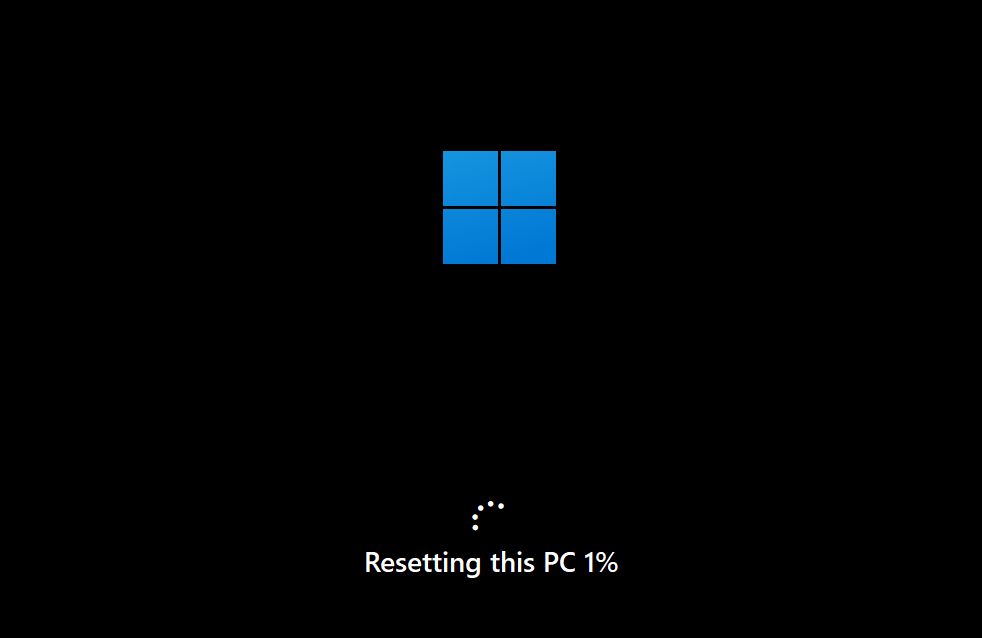
Reset Windows PC While Keeping User Files and Settings
If none of the methods above works you can still try a Reset this PC. I’m going to show you the recommended method, which will keep your personal files, but not programs, or settings, which will be removed/reset to defaults.
All reset options will basically reinstall Windows using the hidden Recovery Partition stored on your system drive OR the system files from your Recovery Drive, depending on where you’ve started the Recovery Environment from.
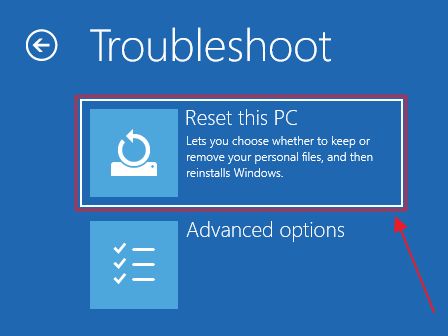
1. Once again go to this section: Troubleshoot, but don’t select Advanced options.
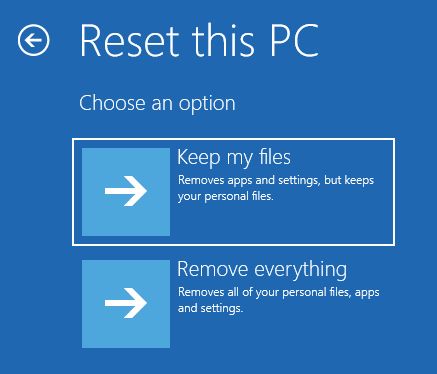
2. Click on the Reset this PC button.
3. Make sure you click on Keep my files button, the first option in the list. This option will only keep your user files from the Users folder (Documents, Pictures, Videos, Music, and so on).
Selecting the second one will remove everything. It’s just like a Windows clean install. So not a reset, but a complete cleanup.
4. There are two options for how Reset this PC works, either from Microsoft’s cloud server or directly from the local computer.
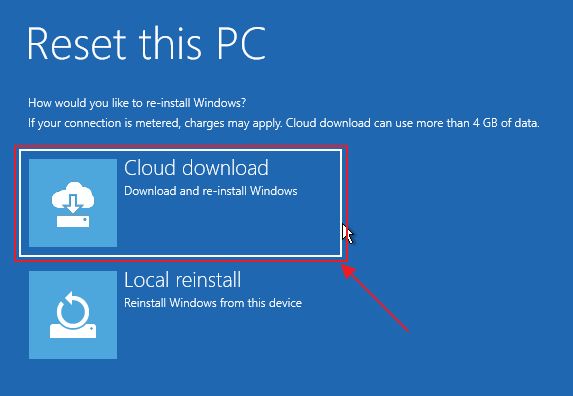
You can try both if one fails, as it did in my case.

If it works, the outcome should be identical: a working computer.
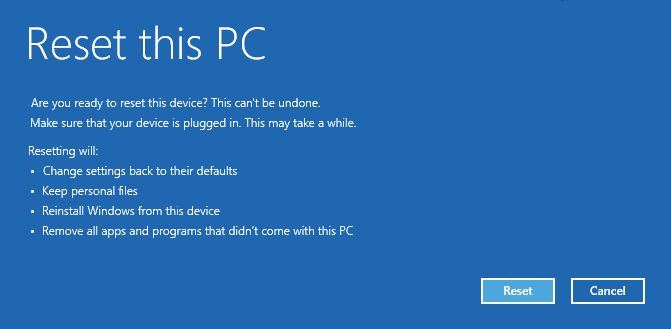
5. You’ll see a brief explanation of what data will be kept, and what will be reset. Confirm with the Reset button and wait for the process to finish.
This method didn’t work either for my machine. We’re only left with one option:
Nuclear Option: Reinstall Windows on Top of the Existing Installation to Fix Boot Issues
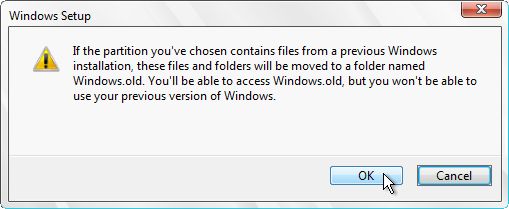
First, I need to let you know how this option works: you will install a new Windows instance on the same system partition. The previous version of Windows together with programs and user documents will be moved inside a Windows.old folder, where you can find your previous data if you know what you’re looking for.
You will need to set up your Windows machine as you would do after a clean install.
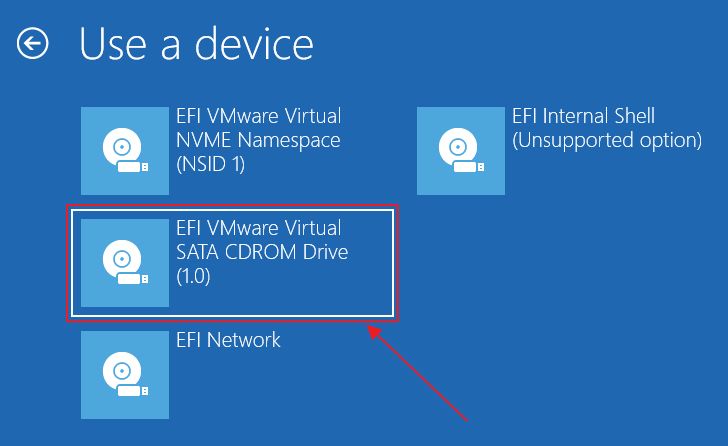
1. Insert a bootable Windows install media disk (CD-ROM or USB flash drive).
2. In the Windows Recovery Environment select Use a device option.
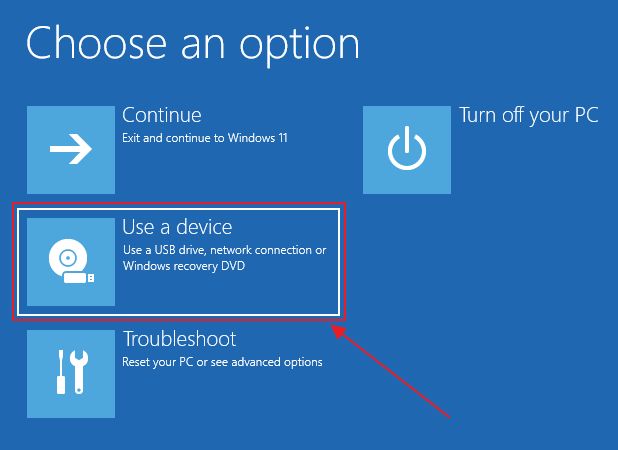
3. Select the Windows installation disk from this list. The system will reboot and will try and boot from the selected media.
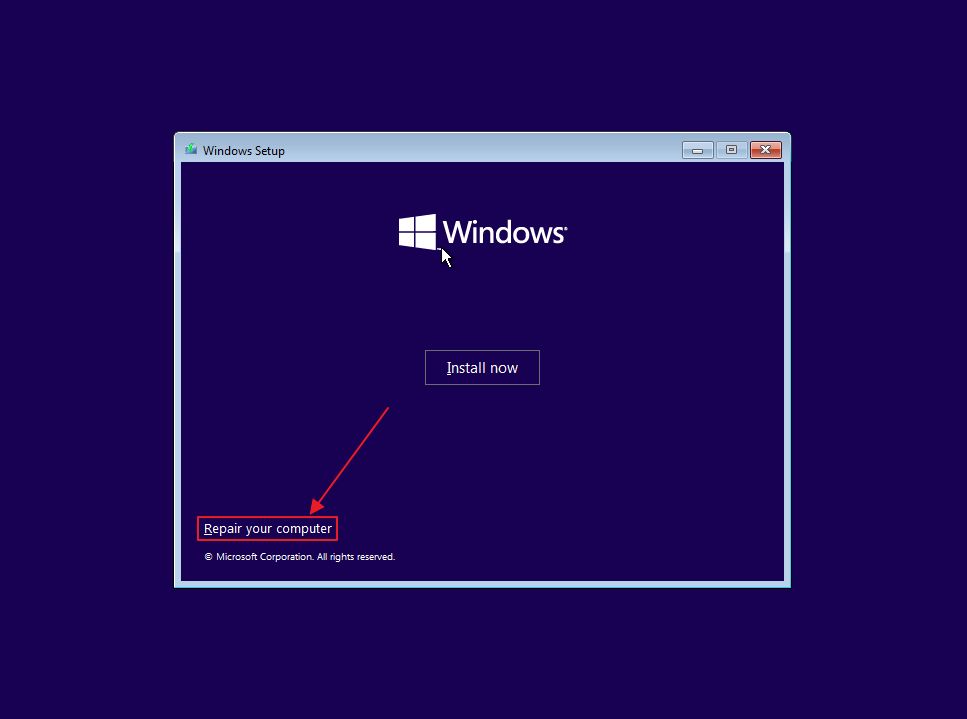
4. Make sure you press a key when you see this message.

5. Once the installation starts, you’ll be tempted to press the Repair this computer button, but don’t. It will just start the same Recovery Environment you try to get away from. Click on Install now instead.
6. Another weird Microsoft thing: it seems like you have the option to Upgrade Windows and keep all your data, but that’s not the case.
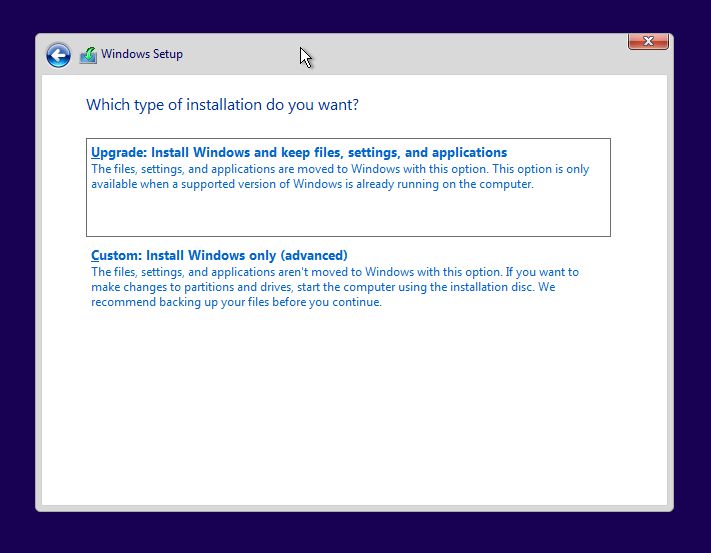
Selecting this option shows this message immediately:
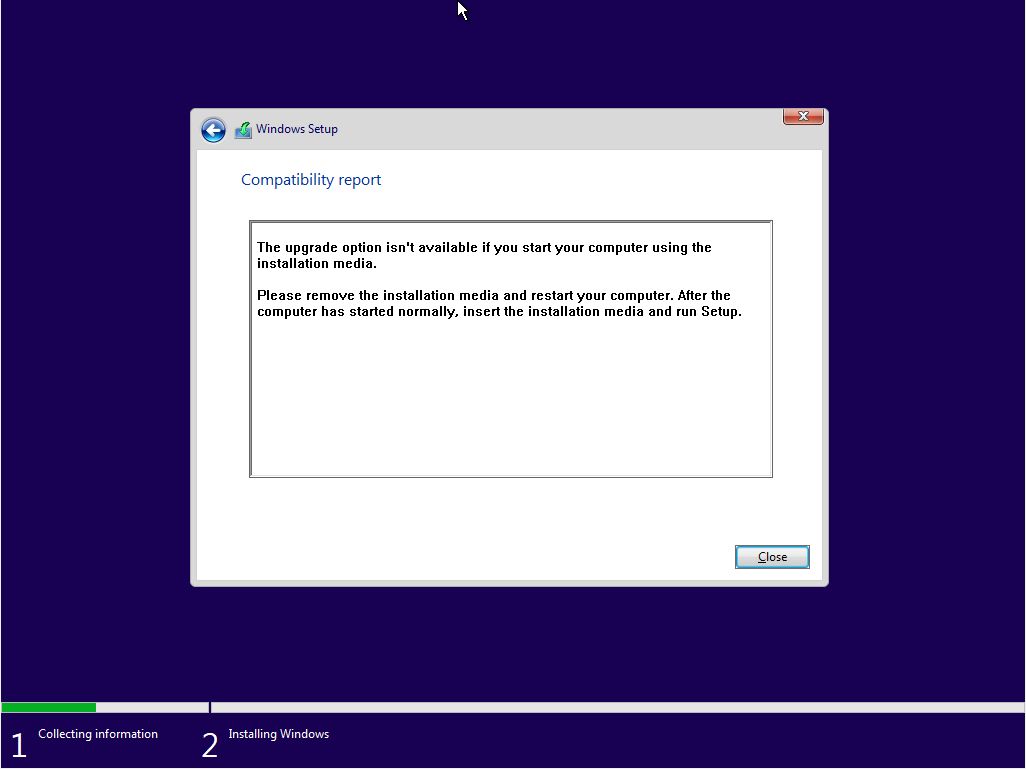
So click on Custom: Install Windows only (advanced).
7. You must now select the partition where you want Windows installed. It’s important to select the previous system partition, the one labeled Primary. Don’t select the small System, Reserved, and Recovery partitions.
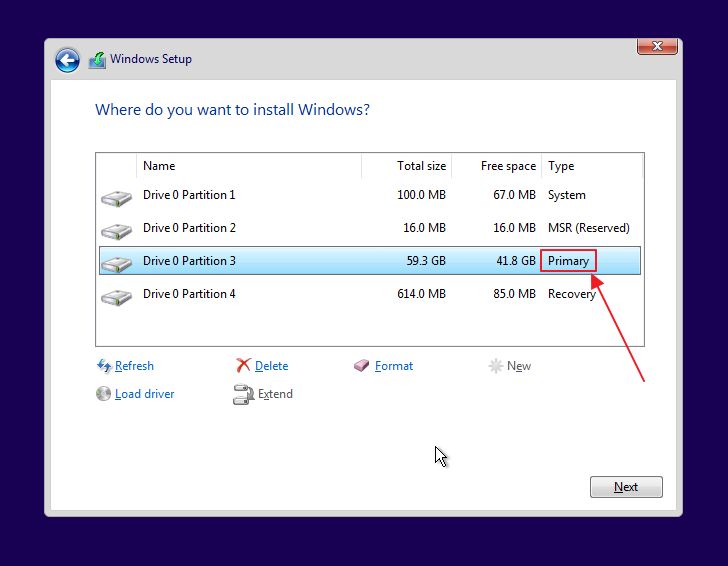
If you have more than one partition on your disk (as I would do) you need to select the correct one. Your only chance is to figure out which is the correct one by looking at its size. If you see this warning message it means you’ve selected the correct partition.
8. Wait for the installer to copy all files. Your machine will reboot at this time and you’ll see this boot menu, which shows all operating system entries detected on your computer.
If you do nothing the boot manager will automatically load the first option from this list in a few seconds.

You can change these startup options by clicking on the Change defaults or choose other options link. Select the desired timer, or default entry, or go back to the repair menu.

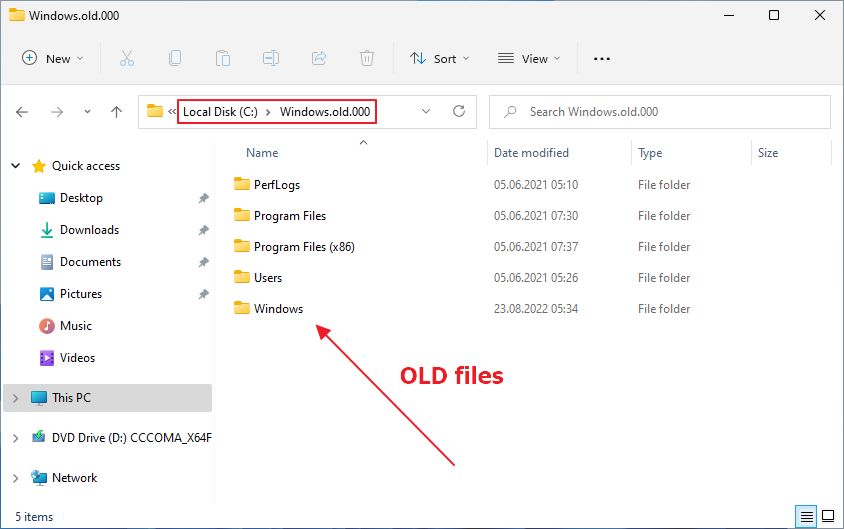
9. Once you boot into Windows open File Explorer (press Win + E) and navigate to the C: partition. Here you’ll find the Windows.old.000 folder (the name can end in 001, 002, or 003 if you reinstall Windows this way a couple more times).
Inside this folder, there are all your previous Windows files, user documents, and program folders. You’ll do a lot of searching and copying if you need to recover something.
This last option is not a recovery option per se, as you can figure out, that’s why I would only use it as a last resort. In my case, it worked and I was able to solve the Windows won’t start issue. It was not ideal, of course, but what is it when it comes to computer troubleshooting?
Use a Recovery Drive to Reinstall (Recover Windows) If PC Can’t Boot into Windows Recovery Environment Automatically
Sometimes things get so messed up that Windows won’t start at all. Without the Recovery Environment, there isn’t much you can do. If you have a Recovery Drive you can boot from that, as it offers pretty much the same Recovery Environment options.
If you don’t have one, you can use another Windows machine to create one.
Here’s how to use the Recovery Drive to get to Windows RE:
1. Insert the Recovery Drive into one of your USB ports.
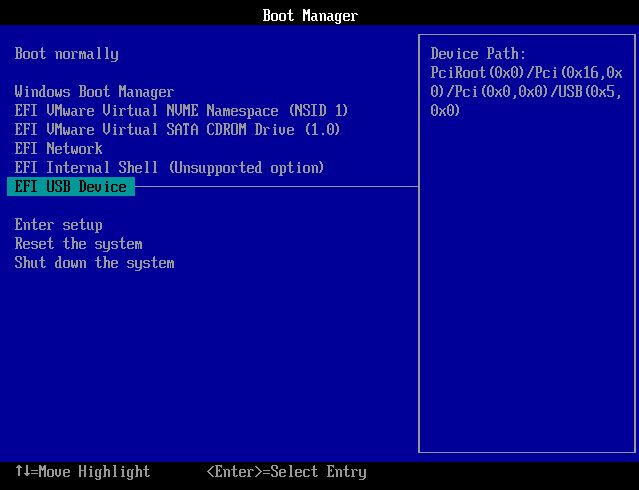
2. Press F8 as the computer starts to bring up the boot menu.
3. Select the USB device to boot from the Recovery Drive. Press Enter to confirm.
4. Wait until you see the first screen, which asks about the keyboard layout you wish to use. Select the appropriate layout with the mouse or with the keyboard to continue.

5. The next screen is the Recovery Environment you already know and probably hate.
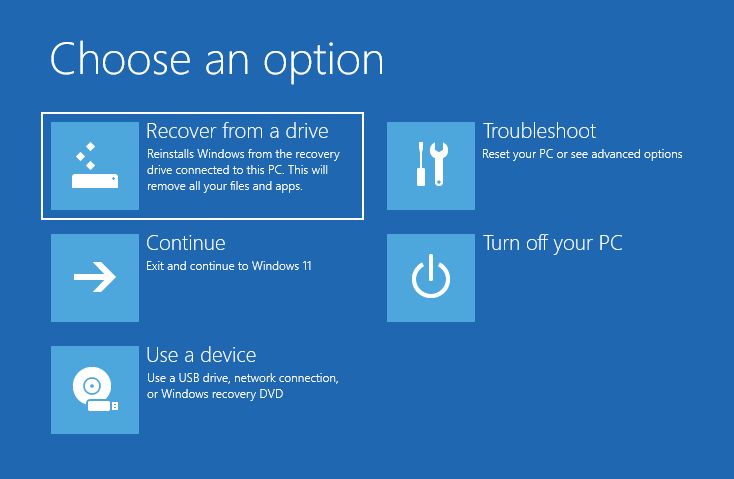
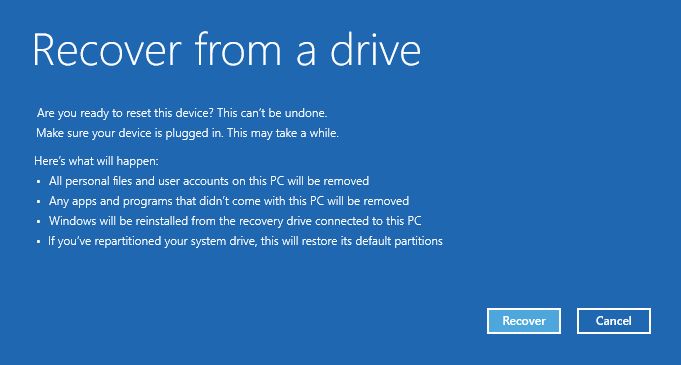
If you opted to add the backup system files during the creation of your Recovery Drive you’ll see an option to Recover Windows from a drive. It’s not what you think, as it means a complete reinstall.
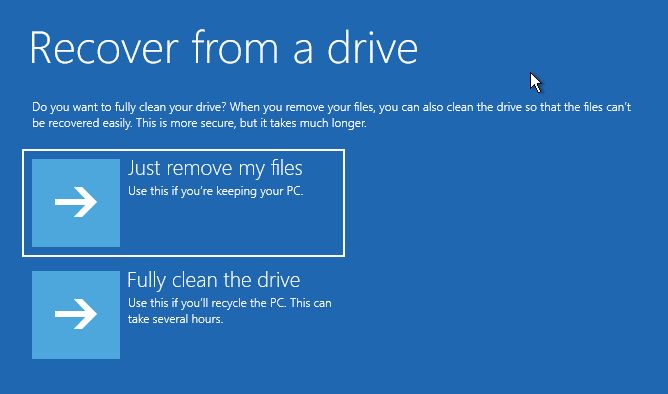
6. Unlike the Reset PC option from the automatic Recovery Environment, you don’t get to keep the user files. Both options that are presented to you will delete all files and programs.
The second option, Fully clean the drive, will take a few hours because it will rewrite all your hard drive bits to ensure the info is not recoverable. It’s a good option if you will be selling your old PC.
7. You should see now a confirmation window that details what’s going to happen. Read everything and if you’re OK click on the Recover button.
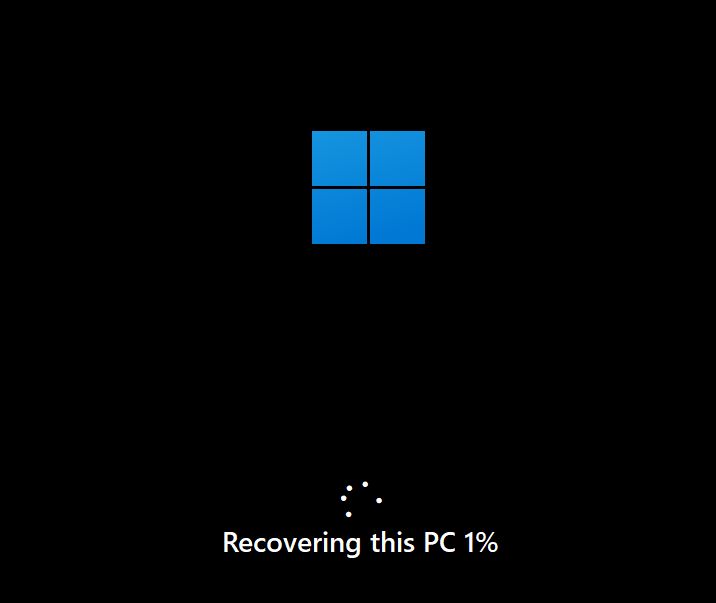
8. The recovery process starts immediately and the computer will reboot a couple of times, and you’ll go through the Windows installation procedure, but not all steps will be shown to you.
Anyway, if you have a backup handy including a System Image that’s always the better option to recover Windows.
How To Rollback Driver Updates in Windows to Fix Issues
I do hope this guide will help you recover your Windows machine from its Recovery Environment boot loop.
If you’ve used other methods to successfully recover your PC from Windows RE I would appreciate it if you leave a comment with your solution. Your expertise could potentially help a lot of people diagnose their PCs and keep their sanity in check.
I’m also gathering data on the “Windows could not find the Recovery Environment” error some people are getting when the PC can’t get to Windows Recovery no matter what they try. Expect an article soon, so consider subscribing to get notified automatically.