- ASUS Smart Connect is a feature that will combine all WiFi bands into one and will automatically migrate devices to the band with the best throughput.
- Learn what ASUS Smart Connect does, and how to enable and tweak it further for best router performance.
- Wireless routers are becoming smarter with every generation and are adding new features to help users.
In the Frequently Asked Questions about ASUS Routers article (other similar FAQs are also available on our website), I mentioned ASUS Smart Connect but didn’t really dig deep into this intelligent feature. I’ve had it on my ZenWiFi Mesh system since the beginning, but I didn’t really give it much attention when I first set up my router.
So, I’ve decided to dig deeper into this feature and tell you all you need to know, and probably a bit more.
CONTENTS
What is ASUS Smart Connect?
First, Smart Connect is not a feature limited to ASUS Routers, but it’s tied to Broadcom-powered router chipsets, so it’s possible to enable it on other router brands. You just have to check if it’s there.
Basically, ASUS Smart Connect is a function that brings all router bands (2.4 GHz, 5 GHz, and 6 GHz if present) under the same wireless SSID. You will connect a device to this unified network and the router will decide what wireless band to use at any given time.
Without Smart Connect enabled, you would have to connect your device to another band if the signal strength drops or the available bandwidth is too low (maybe someone in your household is downloading something intensive). That’s true even for mesh systems, including ASUS AiMesh. I know from experience.
Switching between bands will happen automatically and transparently to the user, depending on things like signal strength and bandwidth utilization.
What’s the advantage of ASUS Smart Connect you ask? You don’t have to remember more than one wireless password and you will always get the best possible connection for your connected devices.
At least that’s the theory. As with any auto feature, it can fail, and when it does you don’t have much control over what’s happening.
How to Enable Smart Connect on an ASUS Router
Now, if you still want to try ASUS Smart Connect, here’s what you have to do to enable this feature on your router.
1. Log in to your ASUS router web interface (you can follow this guide if you don’t know how to do it).
2. Navigate to Advanced Settings > Wireless > General tab.
3. Click on the Enable Smart Connect toggle to enable. Don’t forget to hit Apply, at the bottom of this page to confirm.
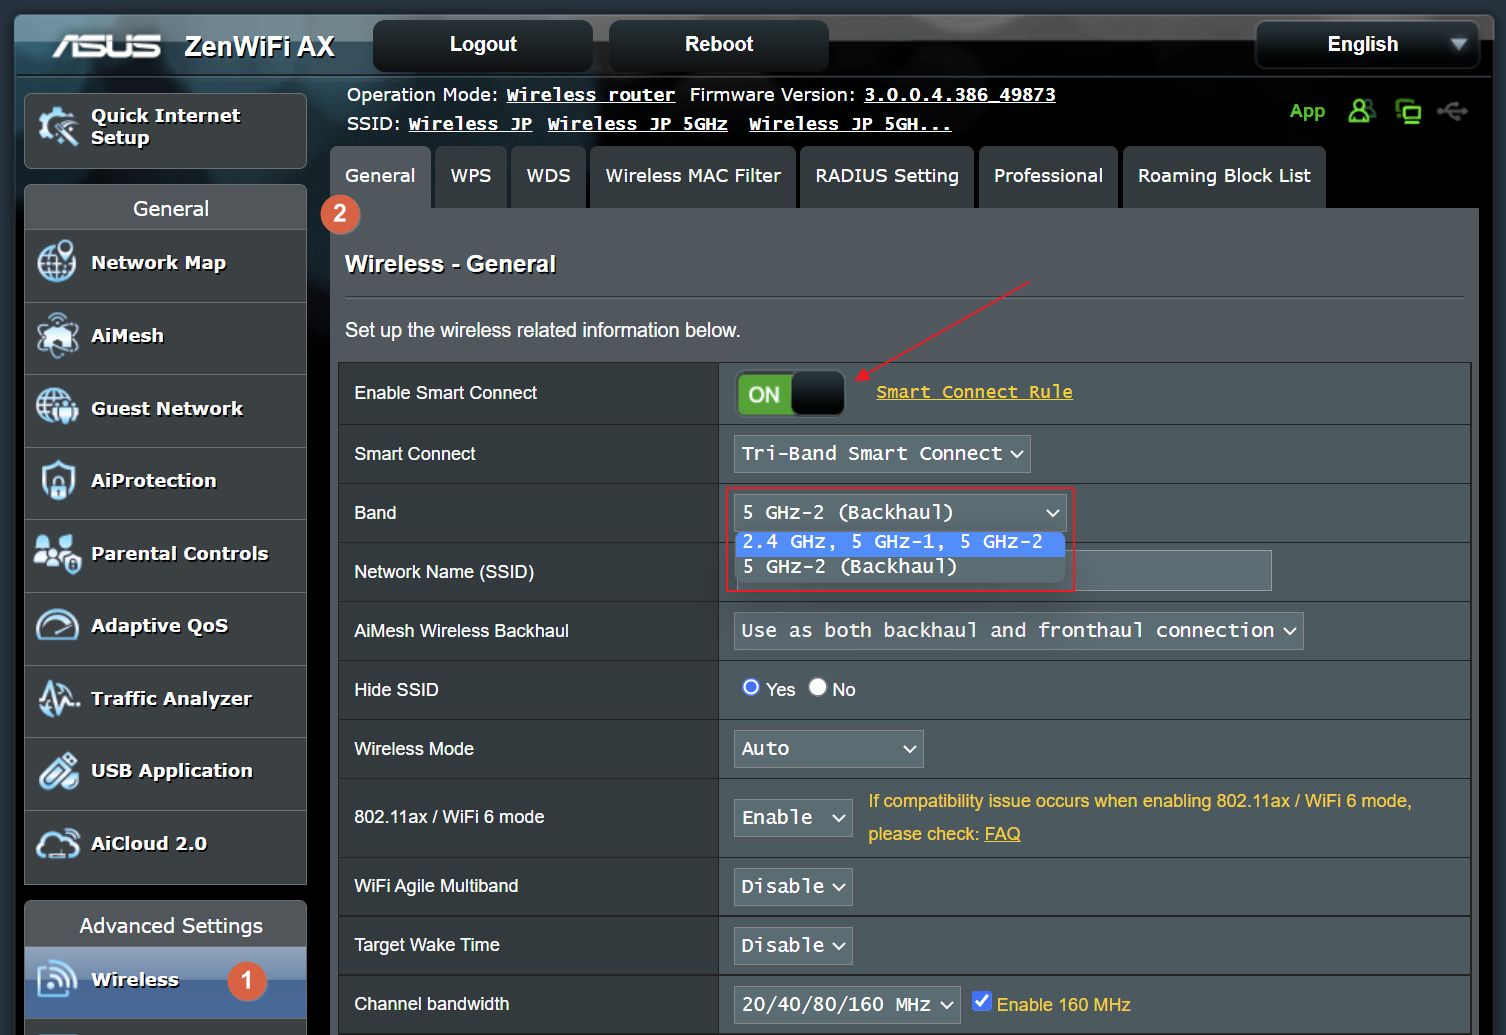
4. If you have more than two bands or if you have set up an AiMesh system you may see a menu called Band. This will let you specify which bands Smart Connect is allowed to use.
Maybe you want the node’s backhaul link to remain free. I’ve chosen to use all bands.
That’s it, ASUS Smart Connect should be working right now on your router.
How to Set Up ASUS Advanced Smart Connect Rules
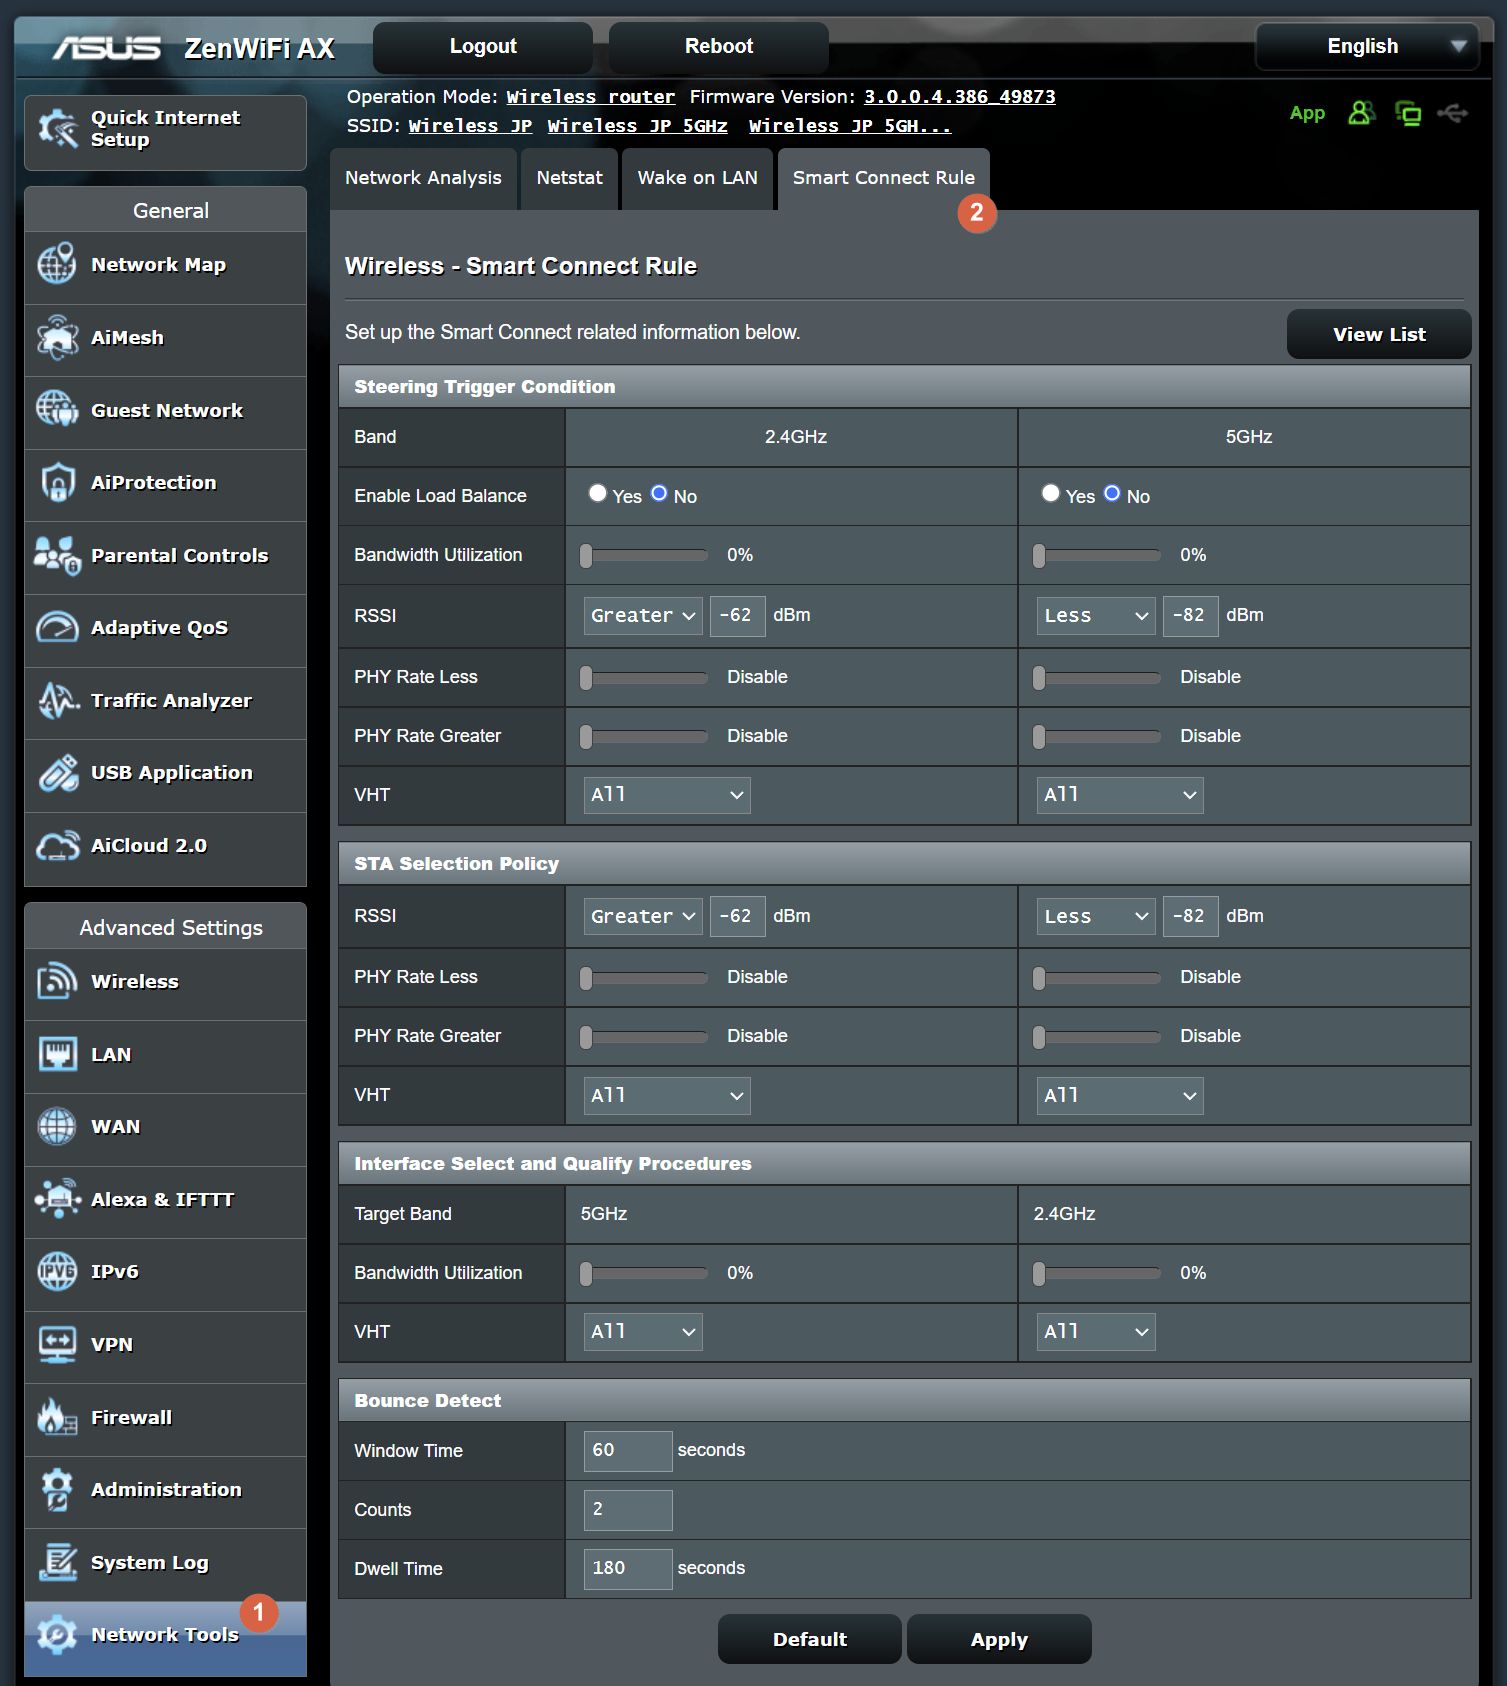
If you’ve noticed, on the same page where you enable Smart Connect, once you hit the toggle, there’s a yellow link. This will take you to the Advanced Settings > Network Tools > Smart Connect Rule page.
This is where you’ll find the very advanced features that allow you to control how Smart Connect works. You have very fine control over how devices will be roamed between bands.
If you really want to know what these features do I recommend you take a look at this article. I’ll just mention below a few of the important Smart Connect advanced rules.
Note: rules are available for each wireless band.
- Steering Trigger Condition section – controls the conditions that have to be met for a device to be set to that band. You get control over the Bandwidth utilization, Load Balancing, Signal strength, and VHT (type of protocol a device uses).
- STA Selection Policy section – a bit redundant, allowing controlling what happens when a device meets one of the conditions above and needs to be steered. You can control RSSI (signal quality), PHY Rate (bandwidth available: min-max interval), and VHT.
- Interface Select and Qualify Procedures section – here you get control over where a device is moved once the decision is made. You can set up other bands’ priorities and available bandwidth limits for these bands.
- Bounce Detect section – this is where you control how often devices can be switched from one band to another. To ensure devices are not constantly jumping from one band to another, leading to connection problems, here you can tweak the maximum frequency of switching that’s permitted.
Should You Enable ASUS Smart Connect?
The biggest issue I have with ASUS Smart Connect is that at this point it’s not possible to manually link specific devices to a certain band and have it excepted from roaming.
Why is it important? Maybe some devices which still use older WiFi protocols have a hard time with either a faster 5 GHz band or can’t really use the newest WiFi 6 standard, even if they’re theoretically backward compatible.
This is why I’ve personally decided to keep ASUS Smart Connect off for now. My Chromecast 3 is giving me headaches as it is.
What I’m saying is that you should try ASUS Smart Connect, and see if it works OK on your home setup. If it’s all good keep it on, if not, disable it. Don’t forget to let me know your experience in the comments down below.
So, if you’re asking if ASUS Smart Connect is Good or Bad, the answer is somewhere in the middle. It actually depends on the devices you are connecting to your router. You should try it at least, then decide if it works for you. That’s the best advice I can give you.
How to Disallow Smart Connect Clients from Using Specific Wireless Bands
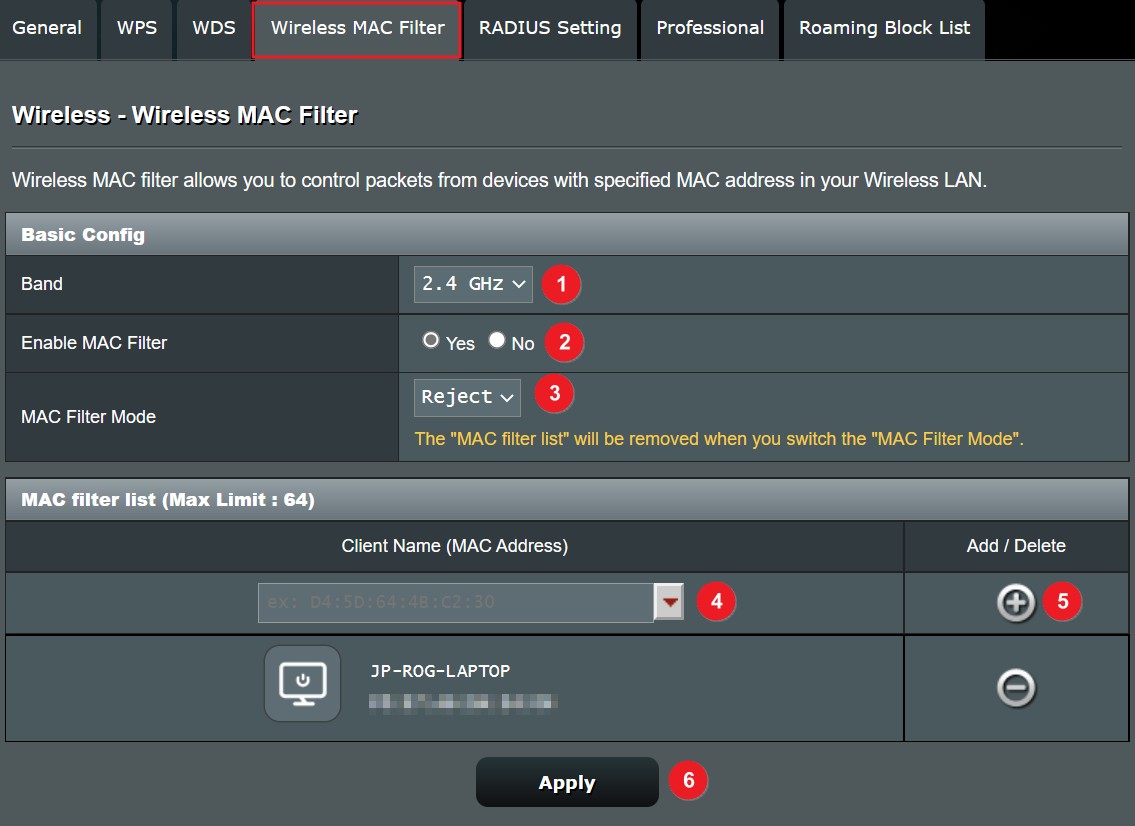
I stand corrected by one of the readers (thanks Alan for pointing this out): it’s possible to prevent wireless clients from joining and utilizing a specific band by using the Wireless MAC Filter section from within Advanced Settings > Wireless router admin page.
Here’s how it works, with or without Smart Connect already enabled:
- Select the wireless band you want to deny access to.
- Turn on Enable MAC filter for that band.
- Change MAC Filter Mode to Reject. This will clear all existing accepted MAC addresses if they exist.
- Select a device from the Client Name list, which lists all wireless clients connected at that moment. Alternatively, just type the MAC address yourself, if you know it.
- Click on the Add button to add a new client to the reject list.
- Click on Apply for changes to take effect.
One note I personally have about this method is that the Wireless MAC filter is supposed to control device access, from a security standpoint, but since it works even when Smart Connect is not enabled maybe I got it wrong.
ASUS Router (FAQ) Frequently Asked Questions: What You Need to Know
After all, I always prefer having more options than less options, so I do like that ASUS allows granual control of all wireless bands.


It is indeed possible to choose which band to steer your clients to under Smart Connect. You can use the Wireless Mac filter to disallow a particular client from joining either 2.4 GHz or 5.1 GHz bands. In this way you can ensure that certain devices only connect to one of the other.